
Install or Update CUDA and cuDNN
Introduction
In this tutorial, I’ll guide you to install or update CUDA and cuDNN, such that you can use them for machine learning with your Nvidia graphics card. If you are here, I’m figuring out you have had a freaking hard time trying to install CUDA and start milking your GPU. So, I’ll spare you the talk so we can jump right into action.
How to Easily Install or Upgrade CUDA and cuDNN
Setting up to Install or Update CUDA and cuDNN
Before proceeding, make sure you BACK UP ALL YOUR DATA, as this procedure of installing CUDA and cuDNN directly interacts with your PC on a low level and can seriously mess up things if not properly done. I cannot stress this enough, BACK UP YOUR PC.
Another prerequisite is to make sure that you have enough space on your PC. Make sure that you have at least 20 GB OF FREE SPACE on your C DRIVE because that is where all the files will be installed.
Make sure you have a CUDA-supported Nvidia GPU. You can check if your GPU is supported by going to Nvidia’s website here.
Make sure you have a CUDA-supported operating system. You can check if your operating system is supported by going to Nvidia’s website here.
Time Needed : 01 hours 30 minutes
Carefully follow the next series of instructions to get the best results from this tutorial. This is going to be a long ride, so, grab a cup of coffee, and let’s get started.
Step 1: Uninstall Unnecessary Software
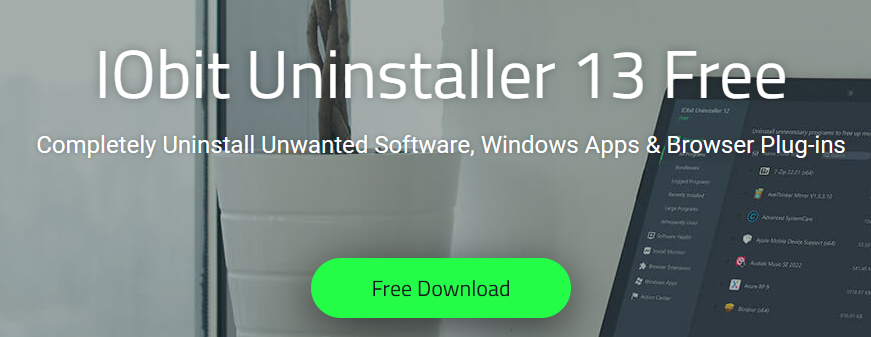
The first thing you are going to do is uninstall all the unnecessary stuff, which might hinder the installation of CUDA. This is very important but I usually see many tutorials online, skipping this step.This is to make sure that you don’t get any version conflicts because each component to be installed has to EXACTLY match its required version. Also, this is a necessary step to take for those who tried but did not successfully install CUDA in the past, just to make sure you have a clean slate, and we are all on the same page.You can uninstall all previously installed components by going to the “Control Panel>Uninstall a program” and then clicking and uninstalling the components one by one, but, I want us to do this in a simpler and more effective way.Go to Iobit’s website here.
 Click on the Download button, as shown in the image above.Once the download is complete, launch the installer file (iobituninstaller.exe) from your downloads folder.
 Follow the installation process. Make sure you uncheck the check boxes at the bottom left of the installation window, to avoid installing unnecessary software, unless you think you may need them. But for the purpose of this tutorial, they are not necessary.After installing the Iobit uninstaller app, run the app and check all the software which will be uninstalled. These may include stuff like: 1. Python2. Anaconda3. Miniconda4. Jupyter Notebook5. CUDA and cuDNN6. Microsoft Visual C++7. Visual Studio Installer8. Visual Studio Build Tools9. Visual Studio IDE and all components10. GeForce experience and all components11. Nvidia Graphics Driver and all components
 After checking all the software which you want to uninstall, as shown above, click the uninstall button. You should see the uninstallation process, as shown in the following image.
 Using the above software will automate most of the uninstallation process for you, by removing any unnecessary leftovers by any unnecessary software and resetting the registry key modifications made by any unnecessary software, as shown in the following image.
 After all the unnecessary stuff has been uninstalled, RESTART YOUR PC.
Step 2: Install Microsoft Visual C++
So, I’m guessing your PC is clean and ready for the installation process now. The next step will be to install Microsoft Visual C++.This is where I see many tutorials online, telling you to go and download the entire Microsoft Visual Studio market, which will just take tens of gigabytes in your PC for nothing, meanwhile, Microsoft clearly states on their website found here that, installing Visual Studio is just one way of installing Visual C++ and it’s not the only way as seen below.
 You can still independently install C++ without necessarily going down the route of installing Visual Studio first.First, install Visual Studio Build Tools, by going to its official website here and downloading it, as shown below.
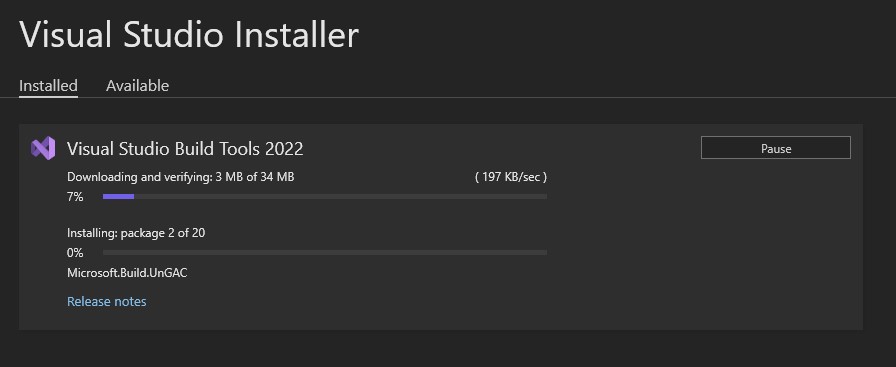
 Make sure you have the following requirements, requested to install Visual Studio Build Tools:Hardware Requirements:1. 1 GB RAM for x862. 2 GB RAM for x643. 5400 RPM hard disk drive4. At least 1.6GHz processor5. 200 MB of available hard disk space6. Additional 512 MB RAM for Virtual Machine usageAdditional Requirements:1. .NET Framework 4.5For more information on OS support see the Visual Studio 2015 Compatibility Page.After downloading the Visual Studio Build Tools setup, launch the setup execution and follow the installation guide to the end, as shown below.
 Also take note that, without Visual Studio Build Tools, you may not even be able to compile Python code, so it is important you DO NOT SKIP THIS STEP.Next, you have to install Microsoft Visual C++, and to do that, simply go to Microsoft’s official website here, and download version 2013 and version 2015-2022, as shown in the image below.
 Once your download is complete, launch the Visual C++ 2013 setup file from your downloads folder, and just follow the setup installation guide till the end.
 Then launch the Visual C++ 2015-2022 setup file from your downloads folder, and just follow the setup installation guide till the end.
Step 3: Install CUDA
After installing Microsoft Visual C++, you can proceed with the installation of CUDA. But before installing CUDA, you have to make sure you know exactly what version of PyTorch matches the CUDA you want to install by going to the PyTorch website.This is because Pytorch has a tool on their website which automatically generates the command which you will use to install the exact PyTorch version that matches your CUDA version. So you want to make sure that you see the exact CUDA version that will make it easy for you to install PyTorch, which I will demonstrate in a moment.So, first, go to the PyTorch version compatibility checking tool here.
 On the website, you should see the latest and most stable versions of CUDA, which are supported by PyTorch, as shown in the image above (At the time of writing this article they are Versions 11.8 and versions 12.1). Preferably, you’d like to download the versions shown to you by the compatibility tool.Now, head to Nvidia’s CUDA website here, search and download any of the CUDA versions you saw from the Pytorch website version compatibility checking tool.
 Given that we saw CUDA version 11.8 on the PyTorch compatibility checker, we are going to download exactly that version, as seen in the image above.The version you see there will probably be different for you if you are reading this in the far future, so make sure you understand the procedure I am using and not just repeating exactly what I am doing.After CUDA has been downloaded, install it, by simply running the CUDA setup file. Follow the installation guide in the setup window as shown in the following images.
 After clicking on the “AGREE AND CONTINUE” button, you’ll be taken to the next page, as shown in the image below. Instead of taking the Recommended “Express” installation, select the Advanced “Custom“ mode, where you can manually select the components to be installed.
 As shown in the following image, the CUDA setup also installs an Nvidia Graphics driver and the GeForce Experience app, alongside the CUDA framework.You might be tempted to think that, since that driver comes with the CUDA setup, it is probably the most suitable, but no, it is not. The problem is that the graphics driver and GeForce experience app that comes with the CUDA setup are usually outdated and will not exploit your GPU to the fullest.
 Next, you are going to choose the default installation location and make sure you take note of that location, as we will soon need it. Do as shown in the following image.
 After validating the above settings, you will land on the following page which will warn you, telling you to install Visual Studio first. Don’t worry, just validate and move to the next section, as shown below.
 Now, if you are like the majority of people, your setup should cross this part without any problem. But if you are among the select few who never have things the easy way, you might be on the verge of breaking your keyboard, seeing the following error or something similar “The following processes must be stopped before the CUDA Visual Studio Integration installation can proceed: “, as seen in the image below.
 Seeing the above error, I can imagine you are probably thinking now “Ah! I knew I should have installed Visual Studio”, but trust me, even if you installed Visual Studio with all its components and plugins, that error will still not go.Luckily for you, I am one of the select few who had the privilege of having that error, and managing to circumvent it. So, if you look at the error keenly, you’ll notice that it is talking about a currently running process on your PC, which is blocking the setup from continuing. Both the name and ID of the process which they are referring to, have been given.You may be tempted to launch the task manager and check for the above-mentioned process, but know that the Windows task manager does not show processes running on Windows. In order to see and manage processes, you have to go to the Windows Performance Monitor app.You can access it by searching for “Performance Monitor” in the Windows search bar. You should see it pop up amongst your search results as shown in the following image.
 When you run the above application you will see the window in the following image.
 Don’t be intimidated by the fancy window in the image above, just click on the “Open Resource Monitor” link, which I have circled in red, at the bottom of the window in the above image. This will launch the “Resource Monitor” application, which will let you see all ongoing Windows processes, as shown in the image below.
 Looking at the error we encountered during the CUDA setup installation, the error message we had was “The following processes must be stopped before the CUDA Visual Studio Integration installation can proceed: Performance Monitor (Process ID: 1216)“.The above error tells us that we have to stop the process which has the 1216 Process ID, so all we need to do is to get into the Resource Monitor and look for the exact ID of the process given in the error message (which was 1216 in my case, your own case might have a different ID).You can check for the Process IDs by scrolling and looking under the PID column of the Resource Monitor. Once you find the ID of the process hindering your installation process, go ahead and end the process by right-clicking on the row where the process appears.In the resulting pop-up menu, click on the “End Process” button, to end the undesired process, as shown in the image above. Once the process is ended, go back to your CUDA setup installation process, and click on the “CANCEL” button, as shown in the image below.
 Cancelling the installation process might be counter-intuitive, I know. The reason why we are cancelling the process is to restart the setup, simply because we want the setup to pick up the changes which we have made.If you just click on the “RETRY” button, you will keep getting the same error, because the setup has not been refreshed with the updated configurations done within the Resource Monitor. The setup doesn’t refresh in real time.So all you have to do now is to re-run the setup and follow the installation guide till the end (not forgetting to choose the Advanced “Custom“ installation mode and remove the Nvidia GPU driver and GeForce Experience application from the setup installation menu, as we earlier did).If you see another error such as “The following processes must be stopped before the CUDA Visual Studio Integration installation can proceed: ” solve it by going to the Resource Monitor, finding the corresponding Process ID of the undesired process and ending the process (just repeat what we did above). Don’t forget to restart the setup installation program, so that it picks up the changes.After doing everything above, you should see the setup cross the part where it previously got stuck, as shown in the following image.
 When the CUDA setup successfully installs, you can then click on the “NEXT” button, and then close the window, as shown in the image below.
Step 4: Install cuDNN
After installing CUDA, you need to install cuDNN. To install cuDNN, you have to first go to the Nvidia cuDNN website and sign up. Without signing up, they will not give you access to their product. You can sign up by going to their sign-up page here. If you have already signed up, then you just have to sign in.Once you have signed in, go to the cuDNN download page here, and download cuDNN. Make sure that you read carefully to find the version of cuDNN that matches the version of CUDA you earlier installed. Since we got CUDA 11.8, we are going to look for its exact corresponding cuDNN version, as shown in the image below.
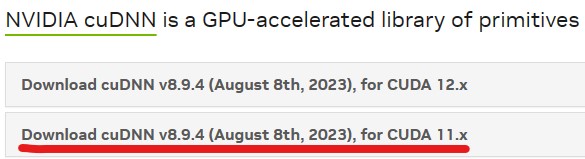
 As seen in the image above, cuDNN v8.9.4 which I have underlined in red, is the latest version of cuDNN which corresponds to CUDA 11.8. The “11x” means that this version of cuDNN will work for every version 11 of CUDA.Click on the section underlined in red, as shown in the image above. Once you click there, you’ll be presented with a drop-down of several types of cuDNN for the various operating systems. As shown in the image below.
 Since I am on the Windows Operating System, I will choose the “Local Installer for Windows (zip)“, which I underlined in the image above. Once the download is complete, extract the zip folder, using any zip extracting software of your choice, to your desired location on your PC, as shown in the image below.
 Remember I said you should take note of your CUDA installation path, which was shown during the CUDA setup execution. Well, we are going to need to use that path now. Open the extracted cuDNN folder and copy the “bin“, “include” and “lib” folders, as shown in the image below.
 Paste the copied files in the CUDA installation location. If you used the default installation location settings, then you’ll find it installed at “C:\Program Files\NVIDIA GPU Computing Toolkit\CUDA\v11.8” as shown in the image below. Your location may change, depending on your version of CUDA.For example, if you had rather installed CUDA 11.7, then your path would be something like “C:\Program Files\NVIDIA GPU Computing Toolkit\CUDA\v11.7“, so make sure you are going to the location of the corresponding CUDA version you installed, especially if you are having more than one version of CUDA installed.You may see a message asking you if you want to overwrite existing files, accept and validate to overwrite all existing files. If you don’t see the message, there’s no problem.
 After copying the cuDNN folders to the CUDA installation folder, the next thing to do is to configure the environment and system variable paths for the “bin” and “libnvvp” folders found within the CUDA installation folder.To configure your paths, first, you have to launch your system variable editor app. To launch it, just open your Windows search, and type in “environment variables“. You should see a result similar to that shown in the image below.
 When you click on the above search result, you will see a window pop up, as shown in the image below. Make sure that you are within the “Advanced” tab, then click on the “Environment Variables” button within the window.
 After clicking on the “Environment Variables” button, a new window will pop up. The window has two sections, the upper section for configuring user variables and the lower section for configuring system variables.In the upper section, select the “path” row and click on the “Edit” button, as shown in the following images.
 After clicking on the “Edit” button in the image above, a new window with several rows of text will appear. This is where you will add the paths.Copy the paths of your “bin” and “libnvvp” folders found within the CUDA installation folder, which should look something like: (“C:\Program Files\NVIDIA GPU Computing Toolkit\CUDA\v11.8\bin” and “C:\Program Files\NVIDIA GPU Computing Toolkit\CUDA\v11.8\libnvvp“).Create 2 new lines for the “bin” and “libnvvp” paths within the new window, and add the lines within that window, as shown in the image below.
 Now hit the “OK” button at the bottom of the window, then go back to the previous window (titled “Environment Variables“) and select the lower section for editing system variables. Search for the “path” row and select it. Once that row is selected, click on the “Edit” button, as shown in the following image.
 Once more, copy the paths of your “bin” and “libnvvp” folders found within the CUDA installation folder, which should look something like: (“C:\Program Files\NVIDIA GPU Computing Toolkit\CUDA\v11.8\bin” and “C:\Program Files\NVIDIA GPU Computing Toolkit\CUDA\v11.8\libnvvp“).Create 2 new lines for the “bin” and “libnvvp” paths within the new window, and add the lines within that window, as shown in the image below.
 Now hit the “OK” button at the bottom of the window, then go back to the previous window (titled “Environment Variables“) and click “OK” there too. Finally, go to the “System Properties“, window and click on the “OK” button. After doing everything above, you must have configured your paths correctly. Now, you have to REBOOT your PC for the changes to take place.All the above configurations were done because cuDNN doesn’t come as a setup execution file, so, you have to manually install it, and point the operating system to its installation location, such that it can be used whenever and wherever you want to use it in your PC.
Step 5: Install Nvidia GPU Driver
After installing the CUDA framework and the cuDNN library, you have to install the latest version of your graphics card driver. To do that, head to the Nvidia official website here.Select the latest version of your GPU driver, operating system and language, using the drop-down menus. If you have the choice between the “Game Ready” and the “Studio” version, choose the “Game Ready” version of the driver and hit the search button, as shown below.
 Once the driver is downloaded, proceed to install it by launching the setup execution file, and following the installation guide to the end. You can also install the Experience app if you want.
 After clicking the “AGREE AND CONTINUE” button, you will land on the next page asking you to choose between the “Express (Recommended)” installation mode, or the “Custom (Advanced)” installation mode.Instead of taking the Recommended “Express” installation, select the Advanced “Custom“ mode, this is because you want to make sure that the setup performs a clean installation, removing any previous settings from the previous driver that may hinder your CUDA installation.In the above image, click the “NEXT” button and make sure you tick the “Perform a clean installation” check box in the next window, before clicking again on the “NEXT” button, as shown below.While your driver is installing, you might experience some screen flickering due to the setup installation configurations.After your driver has been installed, reboot your PC.
Step 6: Install Conda
After installing the latest version of the Nvidia GPU driver, you have to install Conda. Now, you can choose to go with the light version (Miniconda) or the full version (Anaconda).Now just to clarify, Miniconda is the Conda version that comes with the minimal tools needed to run a Conda project, while Anaconda comes with all the tools pre-installed so that you don’t have to go installing them one by one.Intuitively, you might think, since Anaconda comes with everything, it’s the one that will be best, but no. The problem is, that it may come with versions of PyTorch pre-installed and you absolutely don’t want that, given that it may hinder your installation, since you would manually want to install PyTorch, to make sure it matches the version you want to use.Also, anaconda requires a lot of space since it installs several packages which you may never even use, so, you also save space by installing Miniconda.OK, enough chit-chat, let’s move on. Go to Anaconda’s website here, and download the latest version of Miniconda for your corresponding operating system, as shown below.
 After downloading Miniconda, proceed with the installation by launching the setup execution and following the instructions, as shown below.
 After launching the setup execution, click the “Next>” button and proceed with the installation guide, until you reach the “Advanced Installation Options” page. When there, select all the checkboxes and click on the “Install” button, as shown below.By default, the “Clear the package cache upon completion” checkbox is not ticked, I recommend you tick it because it will make the setup do a post-installation cleanup, to remove unused items after installing, such that it doesn’t use excessive disk space for nothing.By default too, the “Add Miniconda3 as my PATH environment variable” checkbox is not ticked, and when you tick it, it shows you a warning message saying that’s not recommended.Well, the reason why I asked you to tick it, is because it enables you to use the Python installed by Conda, not just within the Conda environment (Anaconda Prompt), but also with external environments such as the Windows Powershell or Command Prompt, so that you can use one version of Python within any IDE and also to do any python related work.For example, since Miniconda installed Python version 3.11 if I verify this in my Anaconda prompt, I should see the Python version by typing in the command “python –version” within the Anaconda prompt, as shown below.
 You should see the same thing if you run the “python –version” command within the Windows Powershell.
 And same thing for Windows Command Prompt.
 But if you had not ticked the “Add Miniconda3 as my PATH environment variable“, you will not have this option and always have to use the Anaconda prompt only, when you want to use Python. This may be inconvenient, especially for using within IDEs like VSCODE.That is why at the beginning of this tutorial, I asked you to uninstall all versions of Python on your PC, to avoid any conflicts with the Python which was eventually going to be installed by Conda.
Step 7: Install TensorFlow
After successfully installing Conda, the next thing is to install TensorFlow. What you must understand is that TensorFlow 2.10 is the last version which you could install and run natively on Windows OS, without having to perform some strange magic.You can read more about that on the TensorFlow official website here.
 You should also note that it is preferable to install TensorFlow with the “Pip” package manager than the “Conda” package manager, as shown in the image excerpt from the TensorFlow website below.
 So, to be on the safe side, we are going to follow their instructions and install the last possible installable TensorFlow for Windows, using the “Pip” package manager.First things first, we have to launch our “Anaconda Prompt” command line interface by searching for it in the Windows search and running it, as shown in the image below.
 Next, we have to create a separate Conda environment for using TensorFlow, by using the command “conda create –name tf python=3.9“. Take note that the “python=3.9“ in the previous command, is because that is the Python version that best matches the version of TensorFlow we are about to install, so make sure you don’t change the Python version, as shown below.
 When the command line interface is ready to proceed, press the “y” key and hit “Enter” to launch the creation of your TensorFlow environment, as shown in the image below.
 After installing the TensorFlow environment, you have to activate it with the command “conda activate tf“, as shown below.
 While within the TensorFlow environment, you have to upgrade your “Pip” package manager by typing in the command “pip install –upgrade pip –user“, as shown in the image below.
 Once your “Pip” has been upgraded to the latest version, proceed to install the latest possible installable TensorFlow for Windows, using the command (pip install “tensorflow<2.11”), as shown in the image excerpt below, from the TensorFlow website and from my own command line interface.

 After installing TensorFlow, test your CPU setup by running the following command: python -c “import tensorflow as tf; print(tf.reduce_sum(tf.random.normal([1000, 1000])))” as shown in the image excerpt below, from the TensorFlow website and from my own command line interface.
 If everything works well, you should see something as shown in the above image.Next, proceed to test your GPU setup by running the python -c “import tensorflow as tf; print(tf.config.list_physical_devices(‘GPU’))” command, as shown in the image excerpt below, from the TensorFlow website and from my own command line interface.
 If everything works well, you should see something as shown in the above image.
Step 8: Install PyTorch
Remember that we went to the PyTorch website at the beginning of the tutorial to see which version of CUDA we were going to install, that was exactly for this moment, such that when we now install PyTorch it should just match with our version of CUDA.So, we are going to go back to the PyTorch website here and use their version compatibility matching tool to generate the command that we will run in our command line interface to install the most appropriate version of PyTorch, which will match our CUDA, cuDNN, Python and TensorFlow earlier installed.To generate the command, select the options that correspond best to your system. For me, these are the options I selected at the time of writing this post:1. PyTorch Build: Stable (2.1.0)2. Your OS: Windows3. Package: Conda4. Language: Python5. Compute Platform: CUDA 11.8
 After selecting the above options, the tool generated the following command (conda install pytorch torchvision torchaudio pytorch-cuda=11.8 -c pytorch -c nvidia) as shown in the image below:
 If you had gone through the details of the PyTorch website, you should have seen that the Conda package manager is the most suitable package manager for installing PyTorch, because it installs all dependencies.I have personally noticed that the Conda package manager does everything possible to auto-match your dependencies and configure your installation such that there are no compatibility issues, contrary to Pip, which will just directly install PyTorch without trying to help you auto-fix any compatibility issues that may occur.So, we are going to proceed by running the above command generated by the version compatibility tool we used on the PyTorch website. Make sure you are still within the TensorFlow Anaconda Environment we earlier created, then run the command in your Anaconda Prompt command line interface, as shown below.
 When the command line interface is ready to proceed, press the “y” key and hit “Enter” to launch the installation of your PyTorch, as shown in the image below.
 When the download process is over, your terminal should look something like the image below.
 After installing your PyTorch, the next thing is to verify whether your installation was successful. You can do that by typing the following commands in your Anaconda Prompt:First, run the command: “nvcc –version“, as shown below.
 If the command is successful, then, run the following command: “nvidia-smi“, as shown below.
 If both of the above commands work, then know you are on the right track.NB: You might have noticed that we installed CUDA 11.8, but after running the “nvidia-smi” command, you noticed at the top right of the tabular display above, that the CUDA version shown is 12.2.This is simply because some GPU drivers may come with a higher version of CUDA, and as a result, will upgrade the current version of CUDA during installation. That is also one reason why I think it’s preferable for the GPU driver to be installed after the installation of CUDA and cuDNN, which may be counterintuitive at first glance.I didn’t find a way to stop the driver from upgrading the current CUDA version, nevertheless, I also discovered that it caused no problems to the installation process.
Step 9: Install Ipykernel
To switch from using the Anaconda default environment (base), to using your TensorFlow environment (tf) you earlier created and vice versa, you would normally use the “conda activate tf” or “conda activate base” commands.The problem is, within the IDE, you may not have the luxury of time to always do that, hence the need for a bridge such as the “ipykernel” package, which permits you to switch between the Anaconda default environment (base) and the TensorFlow environment (tf) seamlessly.Hence, we are going to install the “ipykernel” package, which is going to help us switch between our different Anaconda environments without having to go into the command line interface, punch things and restart our IDEs all the time.To install the “ipykernel” package, simply launch your anaconda prompt and type in the command “pip install ipykernel” as shown below.
 Run the above command both in the base and in the tf environments, to make sure it is available for switching from any environment in use to any target environment.
Step 10: Install and Configure IDE
After installing everything above, you may want to configure it to work properly with your IDE such that you can jump into work and completely forget you ever went through a head-wrecking installation such as this one.In this step, you can follow with any IDE of your choice. You can go with Jupyter Notebook, Jupyter Lab and so on.If you want to carry on with Jupyter Notebook, then you would have to install the Anaconda Navigator, by launching your Anaconda Prompt and running the “conda install anaconda-navigator” command.From there, you can then run the “anaconda-navigator” command to launch the Anaconda User Interface, then click on the “Install Jupyter Notebook or Install Jupyter Labs” button to install whatever IDE you want to use.Or, you can still install Jupyter Notebook by running the “conda install jupyter” command. Then still, while in Anaconda Prompt you can launch it with the “jupyter notebook” command.All the above are fine, but I personally prefer using VSCODE over the Jupyter Notebook IDE for my AI, Machine Learning and Data Science projects for 2 simple reasons.1. It is computationally less expensive to run VSCODE given that you don’t have to open a browser to run it, and browsers typically require lots of RAM to run, so you save on RAM.2. Jupyter Notebook IDE does not allow you to extend its functionalities with plugins like VSCODE does. This means, no version control with Git, no dark mode, and so on.Hence I’ll be carrying on this tutorial with VSCODE. So, head over to the official Microsoft website for downloading Visual Studio Code here, and download it. Once downloaded, launch the setup execution file and follow the installation guide till the end, as shown below.
 Click the “Next” button until you reach the “Select Additional Tasks” page. While on that page select the (Add “Open with Code” action to Windows Explorer file context menu) and the (Add “Open with Code” action to Windows Explorer directory context menu) options, to make your IDE user experience better.This will permit you to open a source file and edit it, by simply right-clicking on the file and selecting “Open With VSCODE“ from the Windows contextual menu.Select the “Next” button and wait for installation to complete, as shown below.Now, while in VSCODE, move to the extension section and search for “jupyter” and you’ll see the extensions showing in the search results. Make sure you are connected to the internet before searching.
 Select the first search result called “Jupyter“. When selected you’ll see that it’s actually a pack of extensions. Install all the extensions.
 When everything is installed, you have to test your IDE to see if it works properly with the Jupyter Notebook extension and all the previous stuff installed. So, I have prepared some test code below, which you can use to test your system. Download the code using the link below.CUDA TESTER DOWNLOADExtract the downloaded code.Right-click on the extracted file, then select the “Open with Code” option within the contextual menu. You should see something similar to the image below.
 At the top right, click on the “Select Kernel” button, as shown below.
 After clicking on the “Select Kernel” button, a menu will pop up, at the top of the IDE, asking you to choose between “Python Environments…” and “Existing Jupyter Server…“. Choose the “Python Environments…” option, as shown below.
 After choosing the above option, another pop-up window will appear, asking you to choose between the default miniconda3 environment, and the TensorFlow environment you earlier created, choose the TensorFlow environment, as shown below.
 After choosing your environments to use for running the code, run the code by clicking on the “Run All” button.
 OK, so the moment of truth, if everything works fine, you should see the following output.
 If you did not see the above output, means you probably got something wrong along the way. You can try to go through this post again and make sure everything was correctly done.In case you prefer copying parts of the code, or reading the full content of the downloaded source file before extracting and running it, check out the raw source code below.
 Click on the Download button, as shown in the image above.Once the download is complete, launch the installer file (iobituninstaller.exe) from your downloads folder.
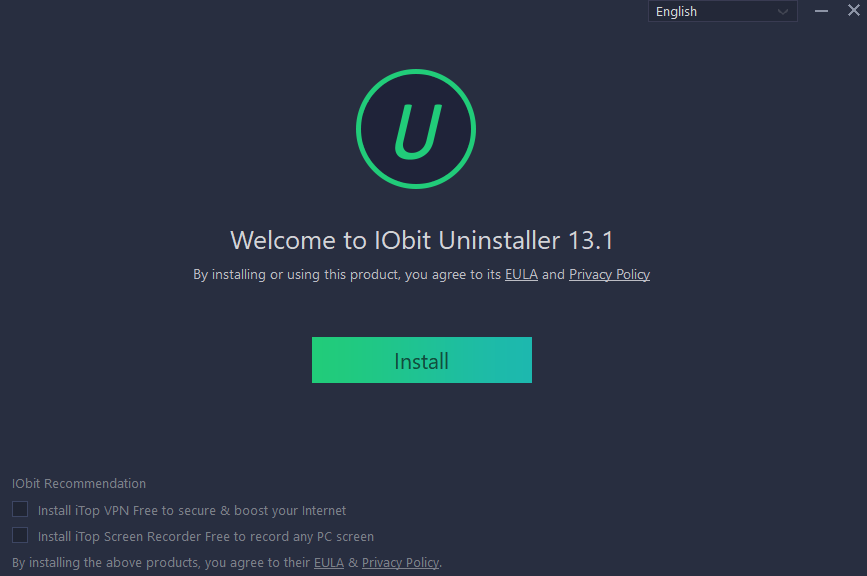 Follow the installation process. Make sure you uncheck the check boxes at the bottom left of the installation window, to avoid installing unnecessary software, unless you think you may need them. But for the purpose of this tutorial, they are not necessary.After installing the Iobit uninstaller app, run the app and check all the software which will be uninstalled. These may include stuff like: 1. Python2. Anaconda3. Miniconda4. Jupyter Notebook5. CUDA and cuDNN6. Microsoft Visual C++7. Visual Studio Installer8. Visual Studio Build Tools9. Visual Studio IDE and all components10. GeForce experience and all components11. Nvidia Graphics Driver and all components
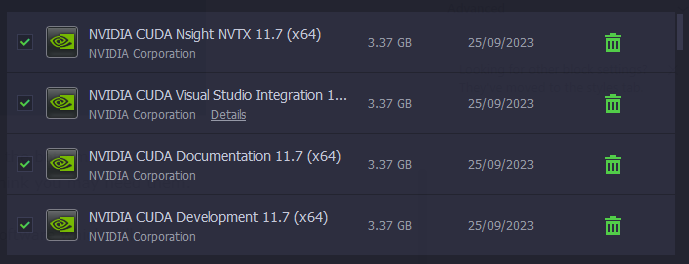 After checking all the software which you want to uninstall, as shown above, click the uninstall button. You should see the uninstallation process, as shown in the following image.
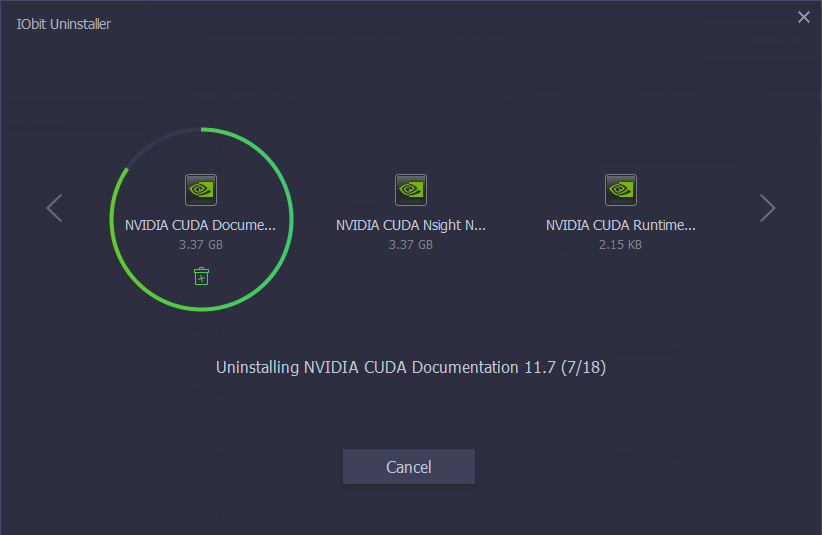 Using the above software will automate most of the uninstallation process for you, by removing any unnecessary leftovers by any unnecessary software and resetting the registry key modifications made by any unnecessary software, as shown in the following image.
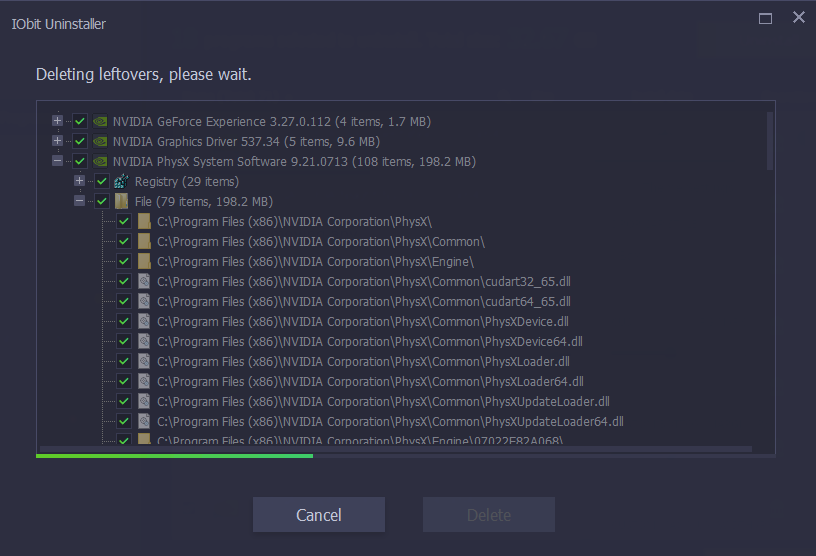 After all the unnecessary stuff has been uninstalled, RESTART YOUR PC.
 You can still independently install C++ without necessarily going down the route of installing Visual Studio first.First, install Visual Studio Build Tools, by going to its official website
  Make sure you have the following requirements, requested to install Visual Studio Build Tools:Hardware Requirements:1. 1 GB RAM for x862. 2 GB RAM for x643. 5400 RPM hard disk drive4. At least 1.6GHz processor5. 200 MB of available hard disk space6. Additional 512 MB RAM for Virtual Machine usageAdditional Requirements:1. .NET Framework 4.5For more information on OS support see the
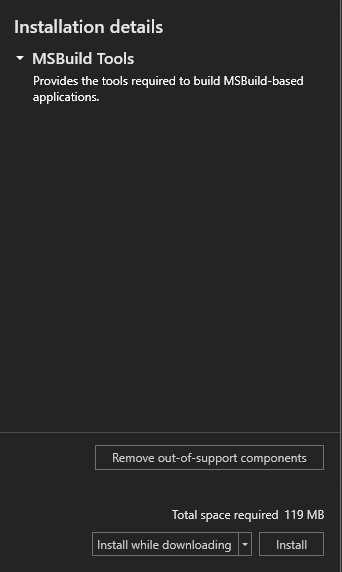
 Also take note that, without Visual Studio Build Tools, you may not even be able to compile Python code, so it is important you DO NOT SKIP THIS STEP.Next, you have to install Microsoft Visual C++, and to do that, simply go to Microsoft’s official website
 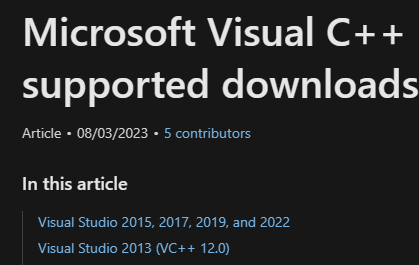 Once your download is complete, launch the Visual C++ 2013 setup file from your downloads folder, and just follow the setup installation guide till the end.
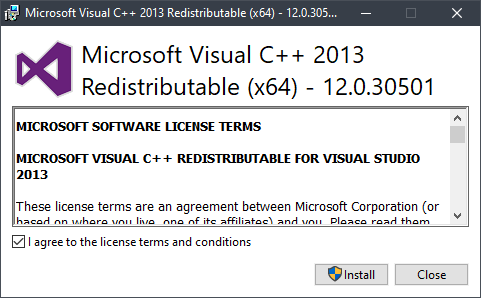 Then launch the Visual C++ 2015-2022 setup file from your downloads folder, and just follow the setup installation guide till the end.
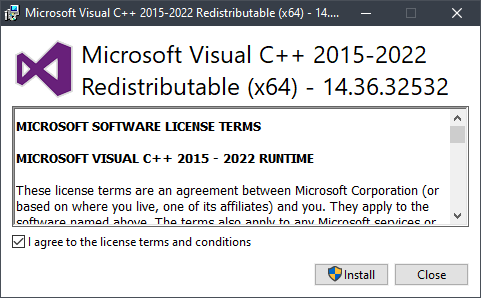
 On the website, you should see the latest and most stable versions of CUDA, which are supported by PyTorch, as shown in the image above (At the time of writing this article they are Versions 11.8 and versions 12.1). Preferably, you’d like to download the versions shown to you by the compatibility tool.Now, head to Nvidia’s CUDA website
  Given that we saw CUDA version 11.8 on the PyTorch compatibility checker, we are going to download exactly that version, as seen in the image above.The version you see there will probably be different for you if you are reading this in the far future, so make sure you understand the procedure I am using and not just repeating exactly what I am doing.After CUDA has been downloaded, install it, by simply running the CUDA setup file. Follow the installation guide in the setup window as shown in the following images.
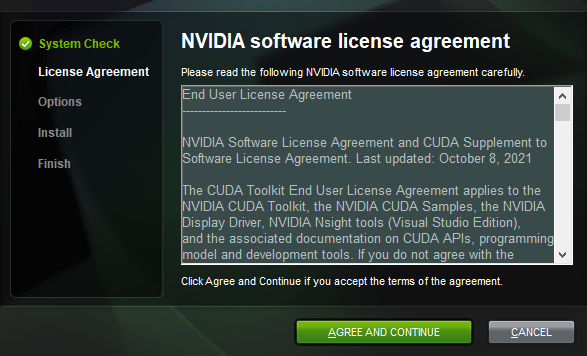 After clicking on the “AGREE AND CONTINUE” button, you’ll be taken to the next page, as shown in the image below. Instead of taking the Recommended “Express” installation, select the Advanced “Custom“ mode, where you can manually select the components to be installed.
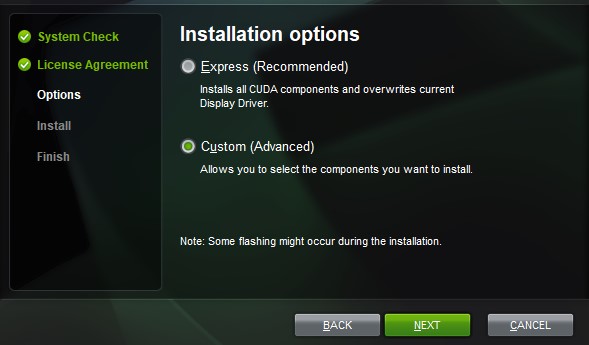 As shown in the following image, the CUDA setup also installs an Nvidia Graphics driver and the GeForce Experience app, alongside the CUDA framework.You might be tempted to think that, since that driver comes with the CUDA setup, it is probably the most suitable, but no, it is not. The problem is that the graphics driver and GeForce experience app that comes with the CUDA setup are usually outdated and will not exploit your GPU to the fullest.
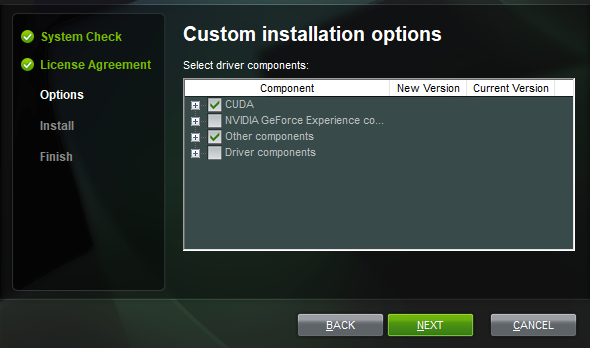 Next, you are going to choose the default installation location and make sure you take note of that location, as we will soon need it. Do as shown in the following image.
 After validating the above settings, you will land on the following page which will warn you, telling you to install Visual Studio first. Don’t worry, just validate and move to the next section, as shown below.
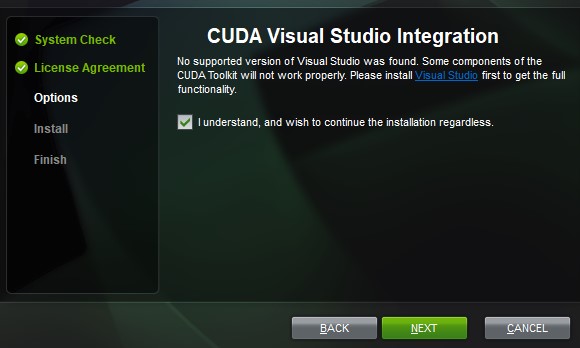 Now, if you are like the majority of people, your setup should cross this part without any problem. But if you are among the select few who never have things the easy way, you might be on the verge of breaking your keyboard, seeing the following error or something similar “The following processes must be stopped before the CUDA Visual Studio Integration installation can proceed: “, as seen in the image below.
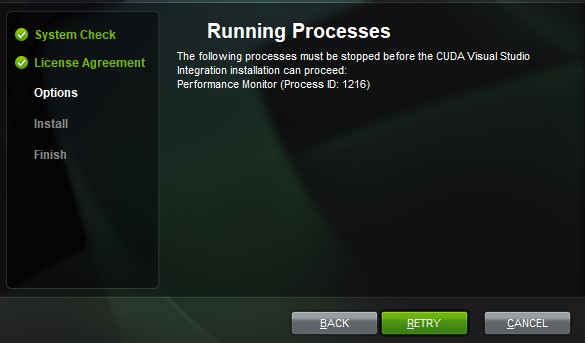 Seeing the above error, I can imagine you are probably thinking now “Ah! I knew I should have installed Visual Studio”, but trust me, even if you installed Visual Studio with all its components and plugins, that error will still not go.Luckily for you, I am one of the select few who had the privilege of having that error, and managing to circumvent it. So, if you look at the error keenly, you’ll notice that it is talking about a currently running process on your PC, which is blocking the setup from continuing. Both the name and ID of the process which they are referring to, have been given.You may be tempted to launch the task manager and check for the above-mentioned process, but know that the Windows task manager does not show processes running on Windows. In order to see and manage processes, you have to go to the Windows Performance Monitor app.You can access it by searching for “Performance Monitor” in the Windows search bar. You should see it pop up amongst your search results as shown in the following image.
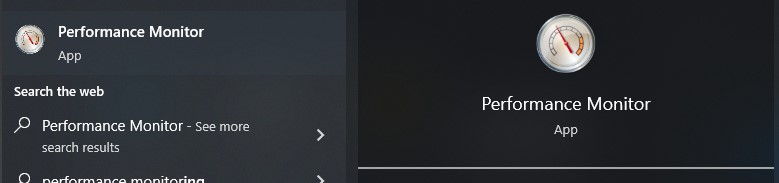 When you run the above application you will see the window in the following image.
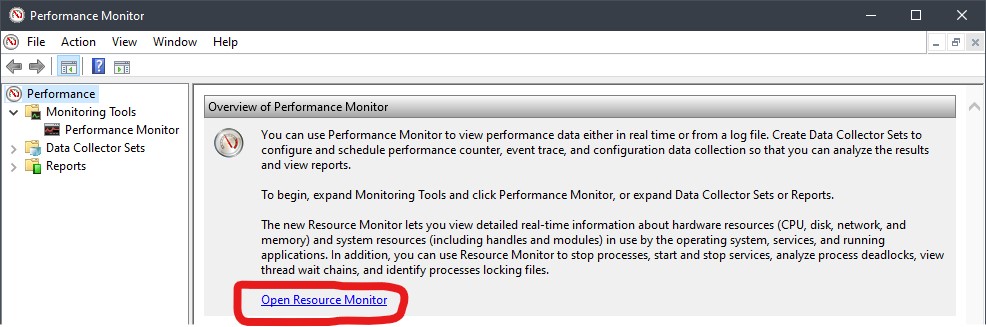 Don’t be intimidated by the fancy window in the image above, just click on the “Open Resource Monitor” link, which I have circled in red, at the bottom of the window in the above image. This will launch the “Resource Monitor” application, which will let you see all ongoing Windows processes, as shown in the image below.
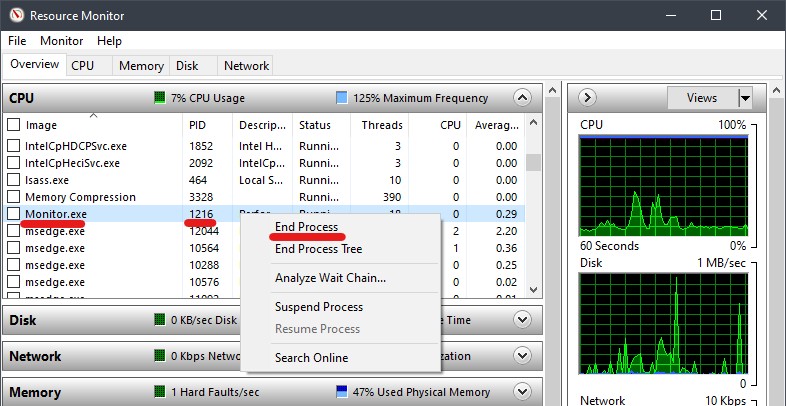 Looking at the error we encountered during the CUDA setup installation, the error message we had was “The following processes must be stopped before the CUDA Visual Studio Integration installation can proceed: Performance Monitor (Process ID: 1216)“.The above error tells us that we have to stop the process which has the 1216 Process ID, so all we need to do is to get into the Resource Monitor and look for the exact ID of the process given in the error message (which was 1216 in my case, your own case might have a different ID).You can check for the Process IDs by scrolling and looking under the PID column of the Resource Monitor. Once you find the ID of the process hindering your installation process, go ahead and end the process by right-clicking on the row where the process appears.In the resulting pop-up menu, click on the “End Process” button, to end the undesired process, as shown in the image above. Once the process is ended, go back to your CUDA setup installation process, and click on the “CANCEL” button, as shown in the image below.
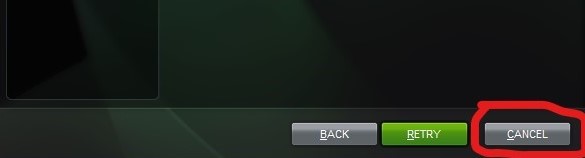 Cancelling the installation process might be counter-intuitive, I know. The reason why we are cancelling the process is to restart the setup, simply because we want the setup to pick up the changes which we have made.If you just click on the “RETRY” button, you will keep getting the same error, because the setup has not been refreshed with the updated configurations done within the Resource Monitor. The setup doesn’t refresh in real time.So all you have to do now is to re-run the setup and follow the installation guide till the end (not forgetting to choose the Advanced “Custom“ installation mode and remove the Nvidia GPU driver and GeForce Experience application from the setup installation menu, as we earlier did).If you see another error such as “The following processes must be stopped before the CUDA Visual Studio Integration installation can proceed: ” solve it by going to the Resource Monitor, finding the corresponding Process ID of the undesired process and ending the process (just repeat what we did above). Don’t forget to restart the setup installation program, so that it picks up the changes.After doing everything above, you should see the setup cross the part where it previously got stuck, as shown in the following image.
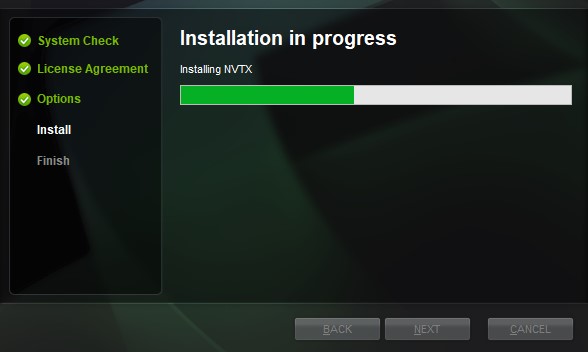 When the CUDA setup successfully installs, you can then click on the “NEXT” button, and then close the window, as shown in the image below.
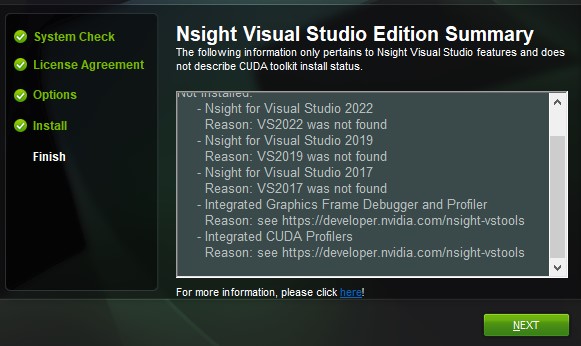
 As seen in the image above, cuDNN v8.9.4 which I have underlined in red, is the latest version of cuDNN which corresponds to CUDA 11.8. The “11x” means that this version of cuDNN will work for every version 11 of CUDA.Click on the section underlined in red, as shown in the image above. Once you click there, you’ll be presented with a drop-down of several types of cuDNN for the various operating systems. As shown in the image below.
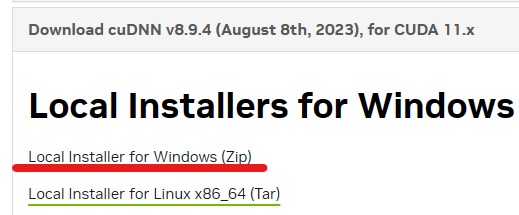 Since I am on the Windows Operating System, I will choose the “Local Installer for Windows (zip)“, which I underlined in the image above. Once the download is complete, extract the zip folder, using any zip extracting software of your choice, to your desired location on your PC, as shown in the image below.
 Remember I said you should take note of your CUDA installation path, which was shown during the CUDA setup execution. Well, we are going to need to use that path now. Open the extracted cuDNN folder and copy the “bin“, “include” and “lib” folders, as shown in the image below.
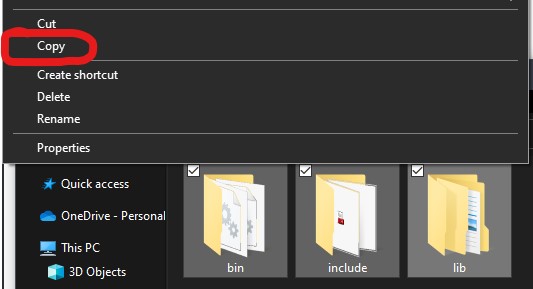 Paste the copied files in the CUDA installation location. If you used the default installation location settings, then you’ll find it installed at “C:\Program Files\NVIDIA GPU Computing Toolkit\CUDA\v11.8” as shown in the image below. Your location may change, depending on your version of CUDA.For example, if you had rather installed CUDA 11.7, then your path would be something like “C:\Program Files\NVIDIA GPU Computing Toolkit\CUDA\v11.7“, so make sure you are going to the location of the corresponding CUDA version you installed, especially if you are having more than one version of CUDA installed.You may see a message asking you if you want to overwrite existing files, accept and validate to overwrite all existing files. If you don’t see the message, there’s no problem.
 After copying the cuDNN folders to the CUDA installation folder, the next thing to do is to configure the environment and system variable paths for the “bin” and “libnvvp” folders found within the CUDA installation folder.To configure your paths, first, you have to launch your system variable editor app. To launch it, just open your Windows search, and type in “environment variables“. You should see a result similar to that shown in the image below.
 When you click on the above search result, you will see a window pop up, as shown in the image below. Make sure that you are within the “Advanced” tab, then click on the “Environment Variables” button within the window.
 After clicking on the “Environment Variables” button, a new window will pop up. The window has two sections, the upper section for configuring user variables and the lower section for configuring system variables.In the upper section, select the “path” row and click on the “Edit” button, as shown in the following images.
 After clicking on the “Edit” button in the image above, a new window with several rows of text will appear. This is where you will add the paths.Copy the paths of your “bin” and “libnvvp” folders found within the CUDA installation folder, which should look something like: (“C:\Program Files\NVIDIA GPU Computing Toolkit\CUDA\v11.8\bin” and “C:\Program Files\NVIDIA GPU Computing Toolkit\CUDA\v11.8\libnvvp“).Create 2 new lines for the “bin” and “libnvvp” paths within the new window, and add the lines within that window, as shown in the image below.
 Now hit the “OK” button at the bottom of the window, then go back to the previous window (titled “Environment Variables“) and select the lower section for editing system variables. Search for the “path” row and select it. Once that row is selected, click on the “Edit” button, as shown in the following image.
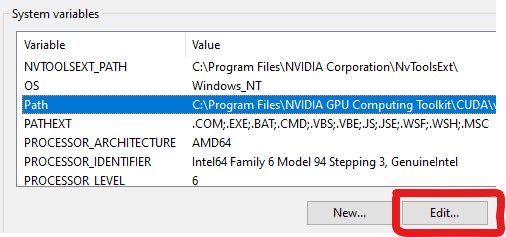 Once more, copy the paths of your “bin” and “libnvvp” folders found within the CUDA installation folder, which should look something like: (“C:\Program Files\NVIDIA GPU Computing Toolkit\CUDA\v11.8\bin” and “C:\Program Files\NVIDIA GPU Computing Toolkit\CUDA\v11.8\libnvvp“).Create 2 new lines for the “bin” and “libnvvp” paths within the new window, and add the lines within that window, as shown in the image below.
 Now hit the “OK” button at the bottom of the window, then go back to the previous window (titled “Environment Variables“) and click “OK” there too. Finally, go to the “System Properties“, window and click on the “OK” button. After doing everything above, you must have configured your paths correctly. Now, you have to REBOOT your PC for the changes to take place.All the above configurations were done because cuDNN doesn’t come as a setup execution file, so, you have to manually install it, and point the operating system to its installation location, such that it can be used whenever and wherever you want to use it in your PC.
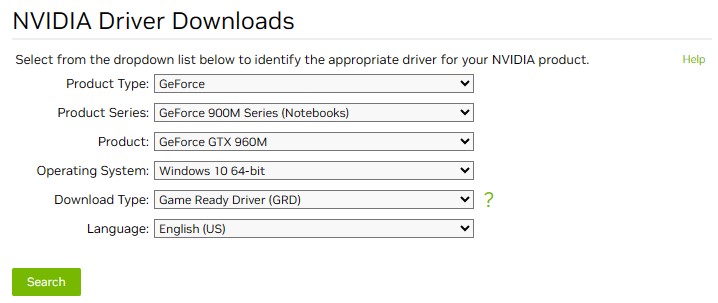 Once the driver is downloaded, proceed to install it by launching the setup execution file, and following the installation guide to the end. You can also install the Experience app if you want.
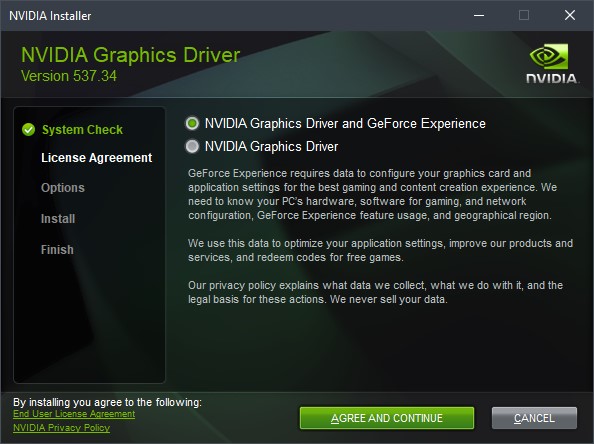 After clicking the “AGREE AND CONTINUE” button, you will land on the next page asking you to choose between the “Express (Recommended)” installation mode, or the “Custom (Advanced)” installation mode.Instead of taking the Recommended “Express” installation, select the Advanced “Custom“ mode, this is because you want to make sure that the setup performs a clean installation, removing any previous settings from the previous driver that may hinder your CUDA installation.
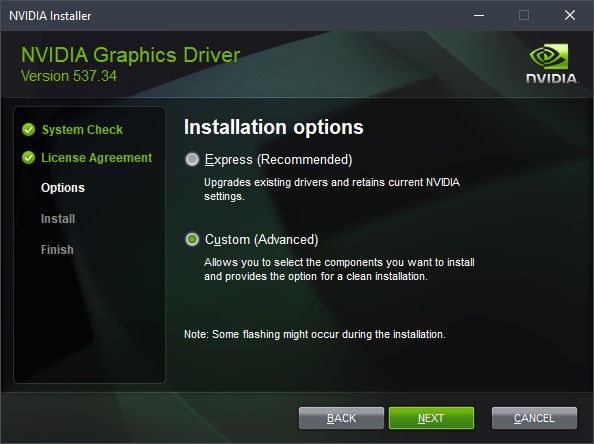 In the above image, click the “NEXT” button and make sure you tick the “Perform a clean installation” check box in the next window, before clicking again on the “NEXT” button, as shown below.
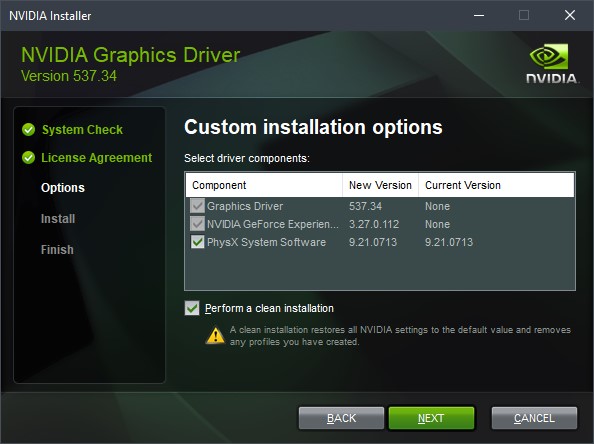 While your driver is installing, you might experience some screen flickering due to the setup installation configurations.
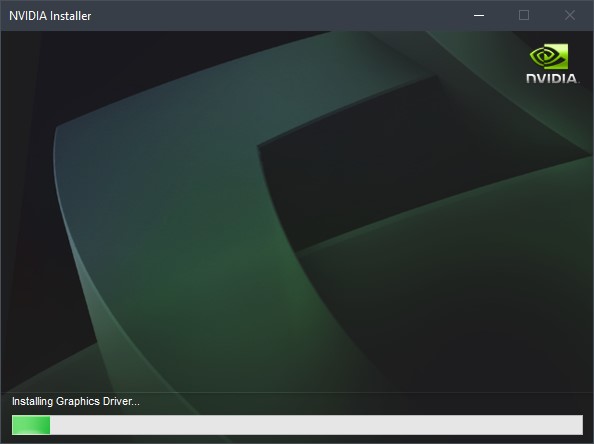 After your driver has been installed, reboot your PC.
 After downloading Miniconda, proceed with the installation by launching the setup execution and following the instructions, as shown below.
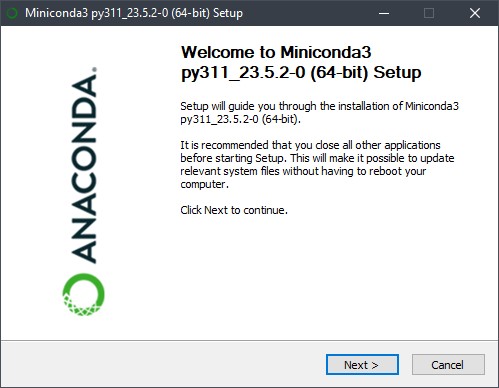 After launching the setup execution, click the “Next>” button and proceed with the installation guide, until you reach the “Advanced Installation Options” page. When there, select all the checkboxes and click on the “Install” button, as shown below.
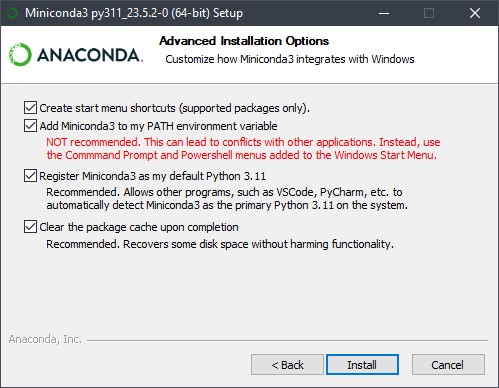 By default, the “Clear the package cache upon completion” checkbox is not ticked, I recommend you tick it because it will make the setup do a post-installation cleanup, to remove unused items after installing, such that it doesn’t use excessive disk space for nothing.By default too, the “Add Miniconda3 as my PATH environment variable” checkbox is not ticked, and when you tick it, it shows you a warning message saying that’s not recommended.Well, the reason why I asked you to tick it, is because it enables you to use the Python installed by Conda, not just within the Conda environment (Anaconda Prompt), but also with external environments such as the Windows Powershell or Command Prompt, so that you can use one version of Python within any IDE and also to do any python related work.For example, since Miniconda installed Python version 3.11 if I verify this in my Anaconda prompt, I should see the Python version by typing in the command “python –version” within the Anaconda prompt, as shown below.
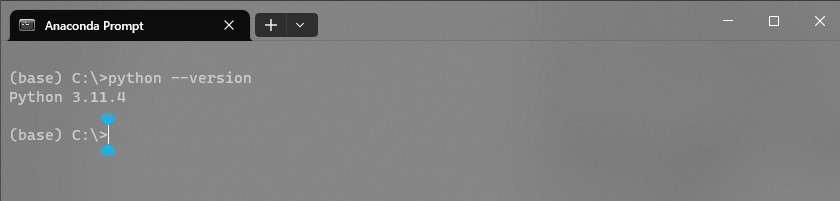 You should see the same thing if you run the “python –version” command within the Windows Powershell.
 And same thing for Windows Command Prompt.
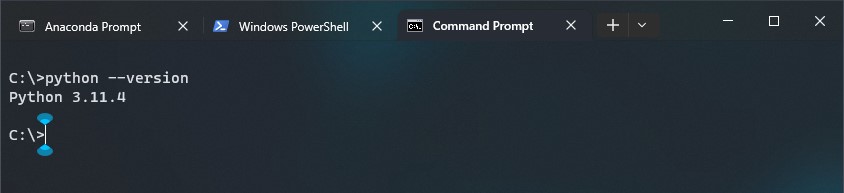 But if you had not ticked the “Add Miniconda3 as my PATH environment variable“, you will not have this option and always have to use the Anaconda prompt only, when you want to use Python. This may be inconvenient, especially for using within IDEs like VSCODE.That is why at the beginning of this tutorial, I asked you to uninstall all versions of Python on your PC, to avoid any conflicts with the Python which was eventually going to be installed by Conda.
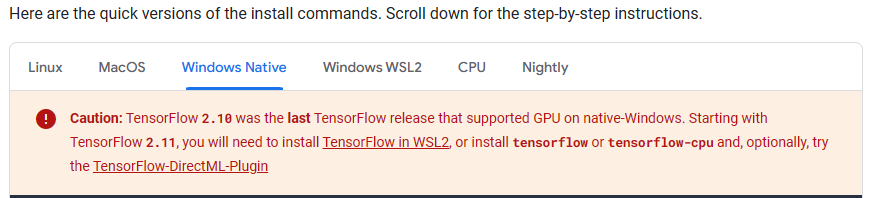 You should also note that it is preferable to install TensorFlow with the “Pip” package manager than the “Conda” package manager, as shown in the image excerpt from the TensorFlow website below.
 So, to be on the safe side, we are going to follow their instructions and install the last possible installable TensorFlow for Windows, using the “Pip” package manager.First things first, we have to launch our “Anaconda Prompt” command line interface by searching for it in the Windows search and running it, as shown in the image below.
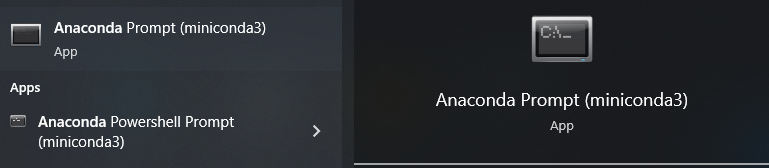 Next, we have to create a separate Conda environment for using TensorFlow, by using the command “conda create –name tf python=3.9“. Take note that the “python=3.9“ in the previous command, is because that is the Python version that best matches the version of TensorFlow we are about to install, so make sure you don’t change the Python version, as shown below.
 When the command line interface is ready to proceed, press the “y” key and hit “Enter” to launch the creation of your TensorFlow environment, as shown in the image below.
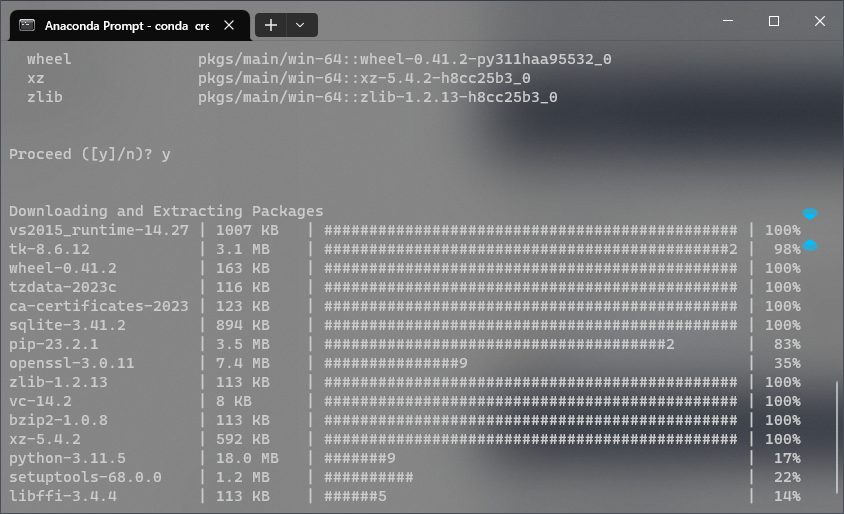 After installing the TensorFlow environment, you have to activate it with the command “conda activate tf“, as shown below.
 While within the TensorFlow environment, you have to upgrade your “Pip” package manager by typing in the command “pip install –upgrade pip –user“, as shown in the image below.
 Once your “Pip” has been upgraded to the latest version, proceed to install the latest possible installable TensorFlow for Windows, using the command (pip install “tensorflow<2.11”), as shown in the image excerpt below, from the TensorFlow website and from my own command line interface.
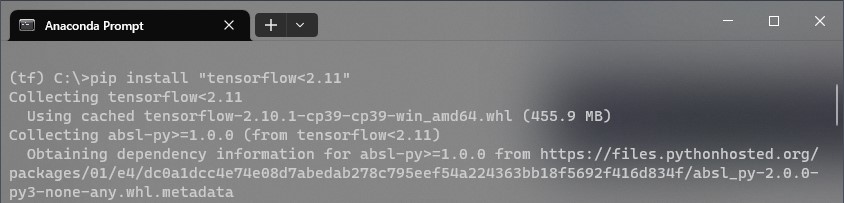
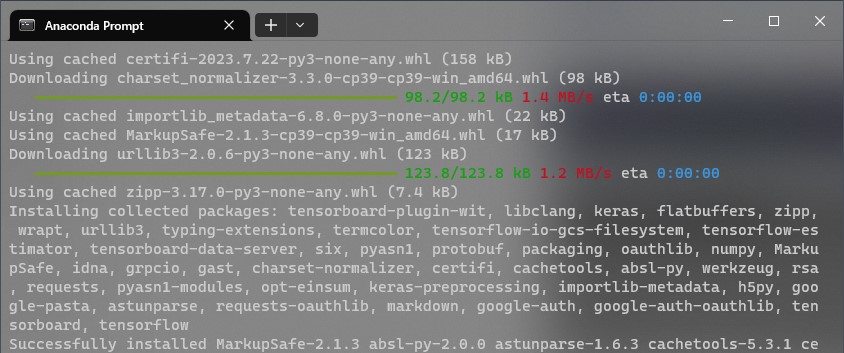 After installing TensorFlow, test your CPU setup by running the following command: python -c “import tensorflow as tf; print(tf.reduce_sum(tf.random.normal([1000, 1000])))” as shown in the image excerpt below, from the TensorFlow website and from my own command line interface.
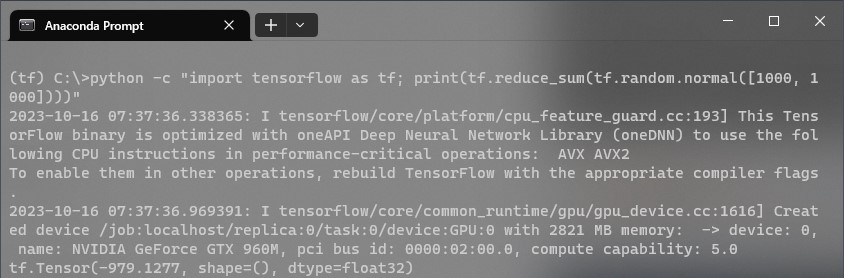 If everything works well, you should see something as shown in the above image.Next, proceed to test your GPU setup by running the python -c “import tensorflow as tf; print(tf.config.list_physical_devices(‘GPU’))” command, as shown in the image excerpt below, from the TensorFlow website and from my own command line interface.
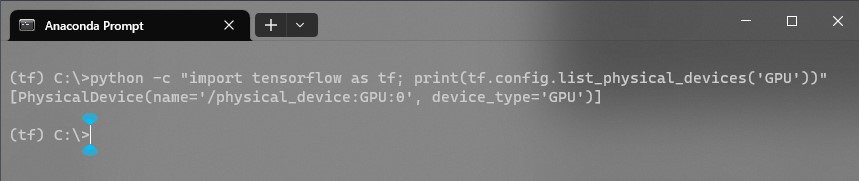 If everything works well, you should see something as shown in the above image.
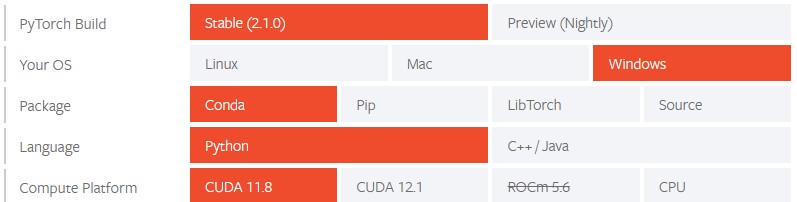 After selecting the above options, the tool generated the following command (conda install pytorch torchvision torchaudio pytorch-cuda=11.8 -c pytorch -c nvidia) as shown in the image below:
 If you had gone through the details of the PyTorch website, you should have seen that the Conda package manager is the most suitable package manager for installing PyTorch, because it installs all dependencies.I have personally noticed that the Conda package manager does everything possible to auto-match your dependencies and configure your installation such that there are no compatibility issues, contrary to Pip, which will just directly install PyTorch without trying to help you auto-fix any compatibility issues that may occur.So, we are going to proceed by running the above command generated by the version compatibility tool we used on the PyTorch website. Make sure you are still within the TensorFlow Anaconda Environment we earlier created, then run the command in your Anaconda Prompt command line interface, as shown below.
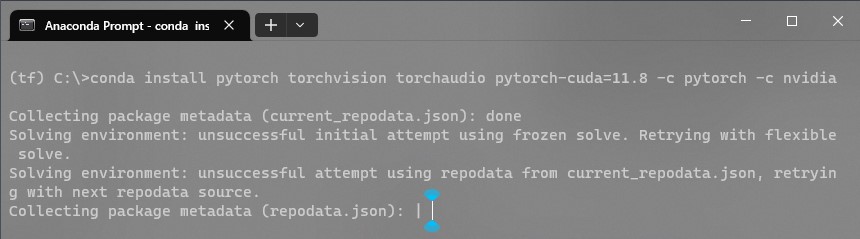 When the command line interface is ready to proceed, press the “y” key and hit “Enter” to launch the installation of your PyTorch, as shown in the image below.
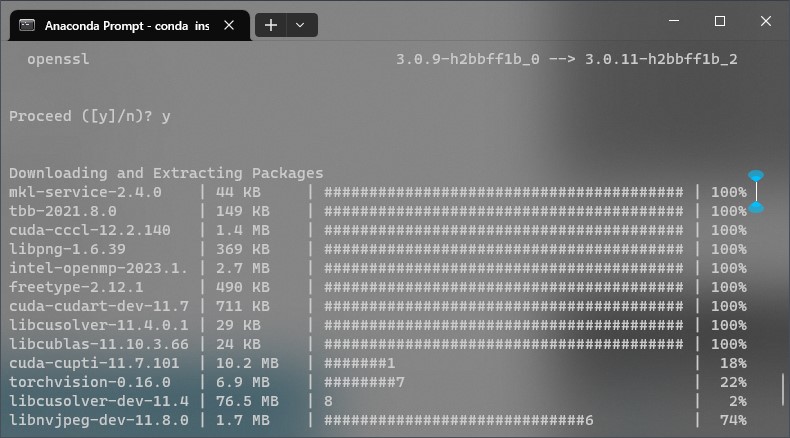 When the download process is over, your terminal should look something like the image below.
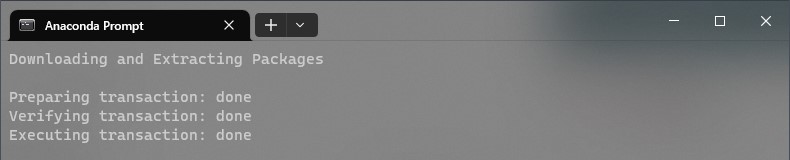 After installing your PyTorch, the next thing is to verify whether your installation was successful. You can do that by typing the following commands in your Anaconda Prompt:First, run the command: “nvcc –version“, as shown below.
 If the command is successful, then, run the following command: “nvidia-smi“, as shown below.
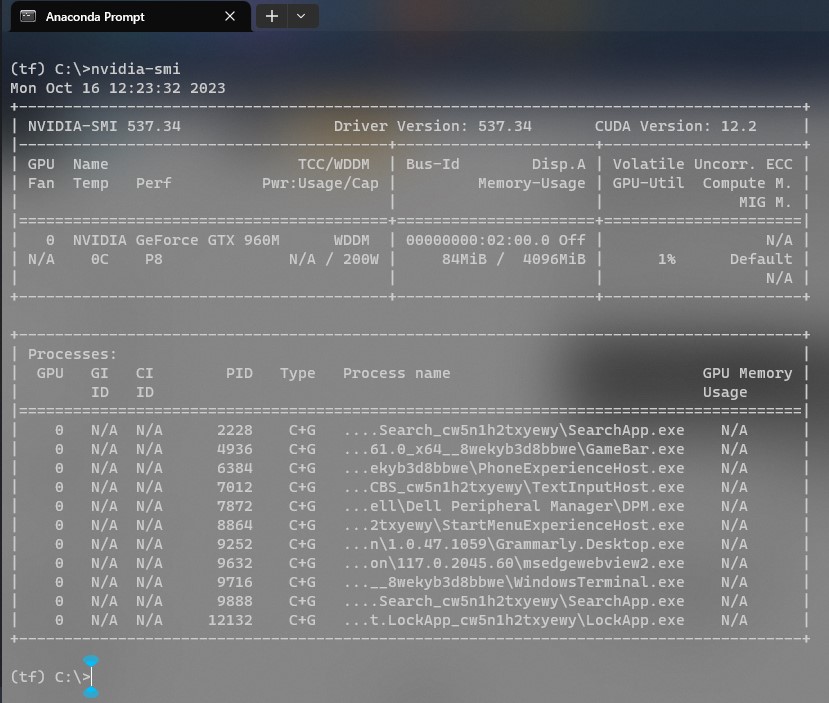 If both of the above commands work, then know you are on the right track.NB: You might have noticed that we installed CUDA 11.8, but after running the “nvidia-smi” command, you noticed at the top right of the tabular display above, that the CUDA version shown is 12.2.This is simply because some GPU drivers may come with a higher version of CUDA, and as a result, will upgrade the current version of CUDA during installation. That is also one reason why I think it’s preferable for the GPU driver to be installed after the installation of CUDA and cuDNN, which may be counterintuitive at first glance.I didn’t find a way to stop the driver from upgrading the current CUDA version, nevertheless, I also discovered that it caused no problems to the installation process.
 Run the above command both in the base and in the tf environments, to make sure it is available for switching from any environment in use to any target environment.
 Click the “Next” button until you reach the “Select Additional Tasks” page. While on that page select the (Add “Open with Code” action to Windows Explorer file context menu) and the (Add “Open with Code” action to Windows Explorer directory context menu) options, to make your IDE user experience better.This will permit you to open a source file and edit it, by simply right-clicking on the file and selecting “Open With VSCODE“ from the Windows contextual menu.Select the “Next” button and wait for installation to complete, as shown below.
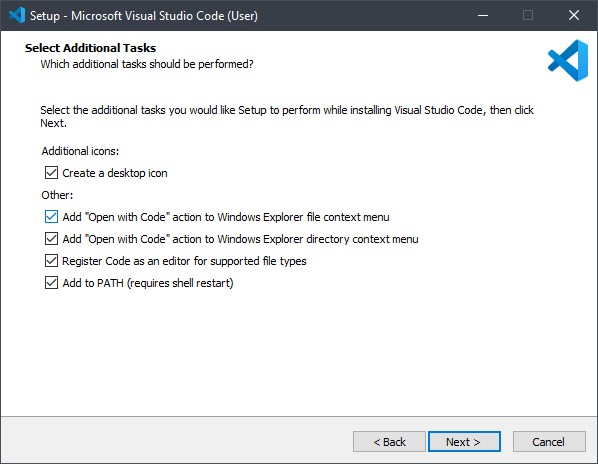
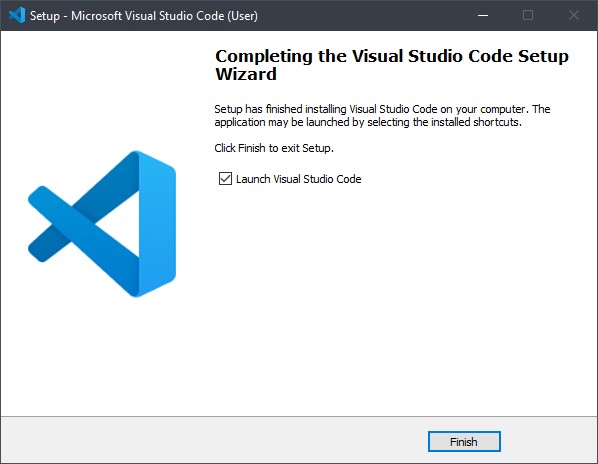 Now, while in VSCODE, move to the extension section and search for “jupyter” and you’ll see the extensions showing in the search results. Make sure you are connected to the internet before searching.
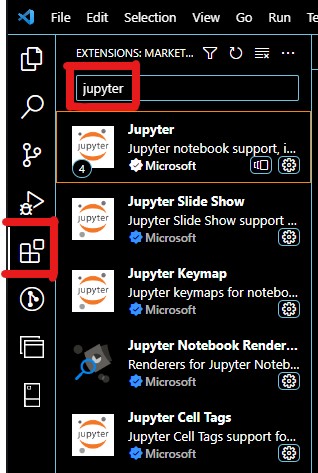 Select the first search result called “Jupyter“. When selected you’ll see that it’s actually a pack of extensions. Install all the extensions.
 When everything is installed, you have to test your IDE to see if it works properly with the Jupyter Notebook extension and all the previous stuff installed. So, I have prepared some test code below, which you can use to test your system. Download the code using the link below.
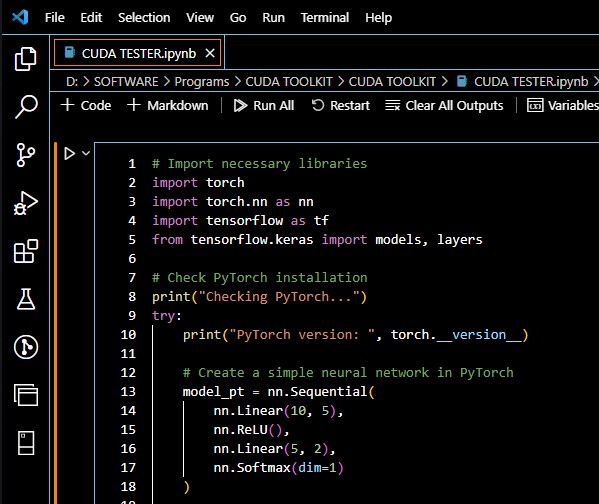 At the top right, click on the “Select Kernel” button, as shown below.
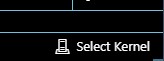 After clicking on the “Select Kernel” button, a menu will pop up, at the top of the IDE, asking you to choose between “Python Environments…” and “Existing Jupyter Server…“. Choose the “Python Environments…” option, as shown below.
 After choosing the above option, another pop-up window will appear, asking you to choose between the default miniconda3 environment, and the TensorFlow environment you earlier created, choose the TensorFlow environment, as shown below.
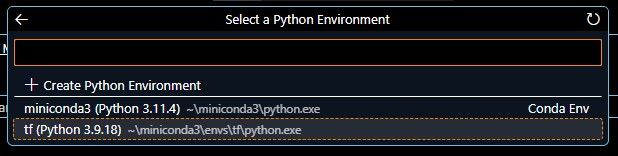 After choosing your environments to use for running the code, run the code by clicking on the “Run All” button.
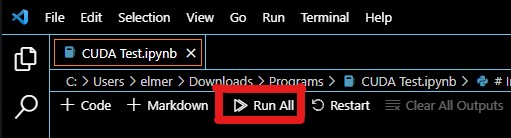 OK, so the moment of truth, if everything works fine, you should see the following output.
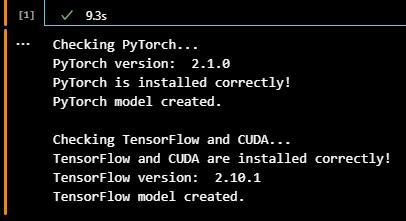 If you did not see the above output, means you probably got something wrong along the way. You can try to go through this post again and make sure everything was correctly done.In case you prefer copying parts of the code, or reading the full content of the downloaded source file before extracting and running it, check out the raw source code below.
# Import necessary libraries
import torch
import torch.nn as nn
import tensorflow as tf
from tensorflow.keras import models, layers

# Check PyTorch installation
print("Checking PyTorch...")
try:
    print("PyTorch version: ", torch.__version__)

    # Create a simple neural network in PyTorch
    model_pt = nn.Sequential(
        nn.Linear(10, 5),
        nn.ReLU(),
        nn.Linear(5, 2),
        nn.Softmax(dim=1)
    )

    print("PyTorch is installed correctly! \nPyTorch model created.")
except ImportError:
    print("PyTorch is not installed correctly.")

# Check CUDA availability for TensorFlow
print("\nChecking TensorFlow and CUDA...")
physical_devices = tf.config.list_physical_devices('GPU')
if len(physical_devices) > 0:
    print("TensorFlow and CUDA are installed correctly!")
    print("TensorFlow version: ", tf.__version__)

    # Create a simple neural network in TensorFlow
    model_tf = models.Sequential([
        layers.Dense(5, activation='relu', input_shape=(10,)),
        layers.Dense(2, activation='softmax')
    ])

    print("TensorFlow model created.")
else:
print("TensorFlow or CUDA is not installed correctly.")Conclusion
I hope this tutorial lived up to its promise of helping you install CUDA and cuDNN.
Obviously, there are a billion things that could go wrong while trying to implement such a complex procedure and I could never cover everything from A to Z in just one post, so, there’ll obviously be people having trouble with this.
Nevertheless, I’ll be waiting for your comments in the comment section and I’ll try to help as much as possible. If this post helped you, don’t forget to bookmark it for future use and share it with others whom it might help too.
Some Frequently Asked Questions and Their Answers
How do I update my CUDA version?
You can find the latest CUDA driver releases on the NVIDIA website. Once you’ve downloaded the latest driver, you’ll need to install it on your system. You can do this by following the instructions provided by the driver. Typically, this involves running an installer program and following the prompts.
How do I change my CUDA version on Colab?
Steps to downgrade CUDA and cuDNN in Google ColabStep 1: Check the current versions of CUDA and cuDNN. …Step 2: Uninstall the current versions of CUDA and cuDNN. …Step 3: Download the desired versions of CUDA and cuDNN. …Step 4: Install the desired version of cuDNN. …Step 5: Verify the installation.
How to install CUDA and cuDNN on Windows 10?
Select the Download cuDNN v8. 1.0 (January 26th, 2021), for CUDA 11.0, 11.1 and 11.2 option from the list, then choose cuDNN Library for Windows (x86). …Extract the zipped contents.Create the C:\Program Files\NVIDIA\cuDNN\v8…
Can I install two CUDA versions?
As a data scientist or software engineer, you may need to work with multiple versions of CUDA and cuDNN to support different deep-learning frameworks or applications. Yes, it is possible to install multiple versions of CUDA at once, on your PC.
How to manually install CUDA?
The setup of CUDA development tools on a system running the appropriate version of Windows consists of a few simple steps:Verify the system has a CUDA-capable GPU.Download the NVIDIA CUDA Toolkit.Install the NVIDIA CUDA Toolkit.Test that the installed software runs correctly and communicates with the hardware.
References for how to Install or Update CUDA and cuDNN
- nvidia.com: Download Drivers.
- iobit.com: Download Iobit Uninstaller.
- developer.nvidia.com: cuDNN sign up.
- developer.nvidia.com: cuDNN Archive.
- pytorch.org: PyTorch installation guide.
- developer.nvdia.com: CUDA Toolkit Archive.
- tensorflow.org: TensorFlow installation guide.
- developer.nvidia.com: GPUs supported by CUDA.
- code.visualstudio.com: Download Visual Studio Code.
- learn.microsoft.com: Download Microsoft Visual C++.
- nvidia.custhelp.com: Operating Systems supported by CUDA.
- visualstudio.microsoft.com: Download Visual Studio Build Tools.
- learn.microsoft.com: Microsoft Visual C++ system requirements.
Other Interesting Articles
- NovelAI Image Generator: How to Use Free Offline: With this tutorial, learn how to run the NovelAI Image Generator offline and create stunning images locally. Get Started Now!
- MetaGPT: Build Full Apps and Websites with Zero Code: Unlock the Power of AI with MetaGPT: Build Your Dream Website and Apps with Natural Language Prompts. Click Now to Learn How!
- Use ChatGPT 4 for Free Without a Plus Subscription: Learn how to use ChatGPT 4 for free without a Plus subscription. Use this guide and start generating high-quality responses today…
- OpenAI ChatGPT Course: Developer AI Course: Discover the power of OpenAI ChatGPT Course technology with our comprehensive course. Learn language modelling, chatbots… Enrol now!