How to Install JavaFX Scene Builder
Introduction
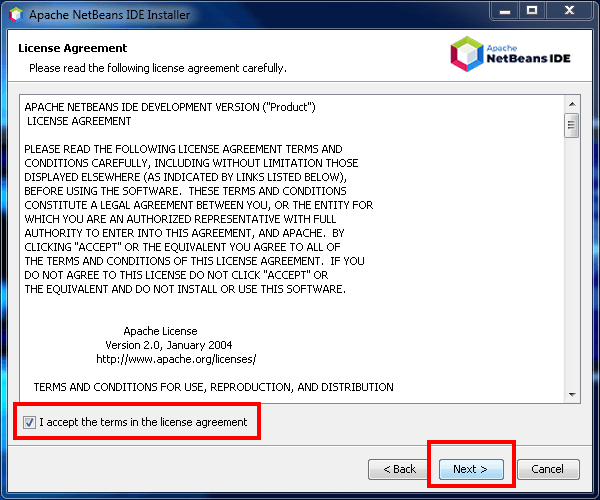
If you have ever wanted to develop an application using JavaFX Scene Builder, then you must know how <<MISSION IMPOSSIBLE>> it looks like to install it.
We are going to show you how to install JavaFX Scene Builder in Netbeans IDE start to finish (all steps included), including minor steps such as installing Java JDK and Java SDK.
So, STAY WITH US TILL THE END if you want to get up and running.
The complete JAVA TEST PROJECT of this tutorial can be downloaded below. You can extract it, open it in NetBeans and use it to test if your configuration is working.
Download “JAVA TEST PROJECT”
JavaApplication1.rar – Downloaded 986 times – 7.42 MBHow to Install JavaFX Scene Builder in Netbeans IDE
Installation of JavaFX Scene Builder
Time Needed : 1 hours 30 minutes
In this section, we are going to be talking about how to install each component needed for using JavaFX Scene Builder, from JDK to SDK to Netbeans IDE to JavaFX and Scene Builder.
Download Java JDK
A) Go to the Oracle website.B) Register on the Oracle website.C) Download the latest and most appropriate version of the Java JDK for your operating system here.NB: At the time of writing this article, the most appropriate version for my operating system (Windows 7) was Java JDK 11.0.8 x64 bit.

Install Java JDK
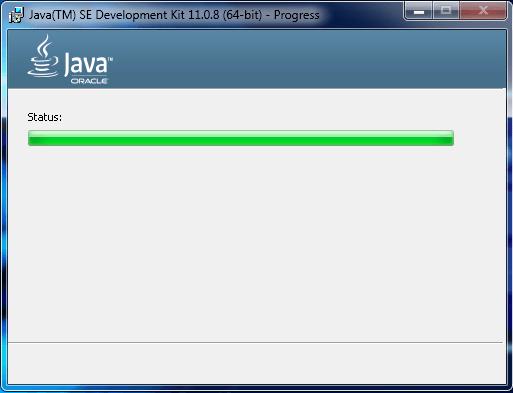
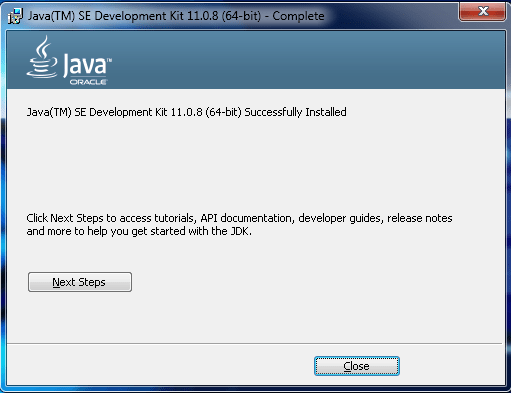
A) Run the JDK installer, choose the installation directory and install the JDK.


Set up Java JDK
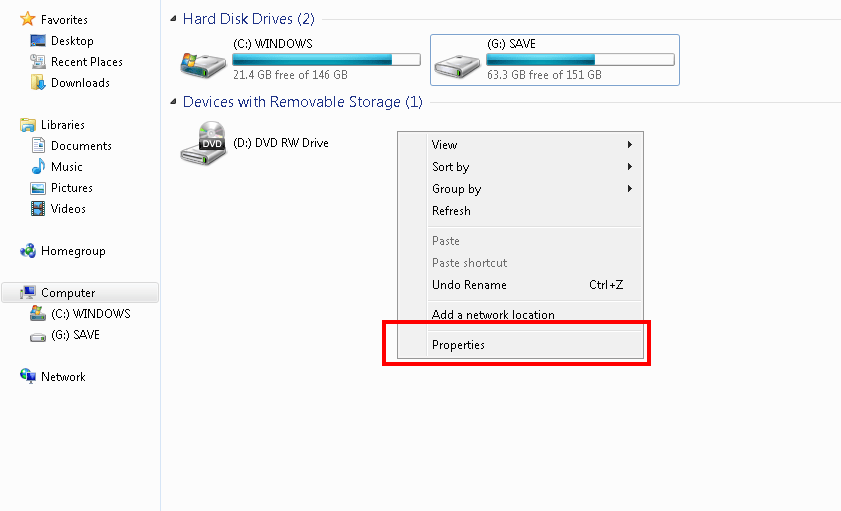
A) Go to <THIS PC>.B) Right-click and choose <PROPERTIES>.
 C) On the left pane of the Properties window, click on <ADVANCED SYSTEM SETTINGS>.D) Click on <ENVIRONMENT VARIBLES> at the bottom of the <ADVANCED> tab.
 E) Click on <NEW> under user varibale under <USER VARIABLE> pane.F) In the <VARIABLE NAME> text field, input “JAVA_HOME“.G) In the <VARIABLE VALUE> text field, input the file location of the java JDK installation “c:\Program Files\Java\jdk-11.0.8” then click on “OK” below.
 H) Select <PATH> click <NEW> and input “%JAVA_HOME%\bin” in the new text field.
 I) Under <USER VARIABLE> panel once more, click <NEW> and input “CLASSPATH” in the <VARIABLE NAME> text field.J) Add a FULL STOP “.” in the <VARIABLE VALUE> text field and click “OK”.
 K) Run ”Command Prompt” application and input <javac –version>. The currently installed version of Java should show (11.0.8).
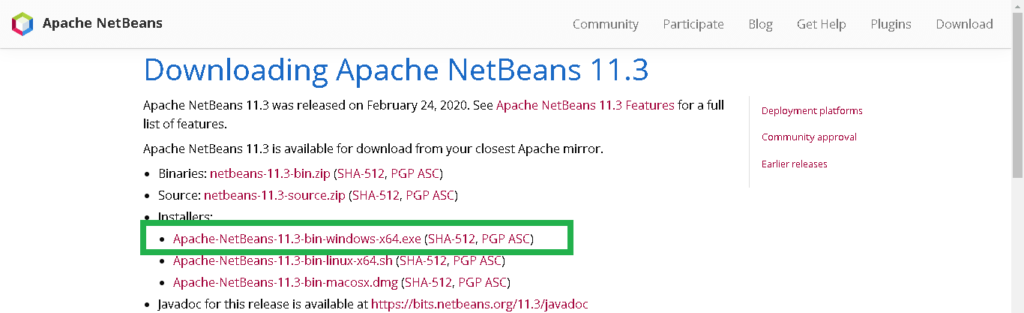
Download Apache NetBeans
A) Go to the Apache NetBeans website.B) Download the latest and most appropriate version of NetBeans IDE for your operating system here.C) At the time of writing this article, the most appropriate version for my operating system (Windows 7) was NetBeans 11.3 x64 bit.
 NB: It is recommended to install the current JDK release at the time when a particular NetBeans was released. For example; NetBeans 11 should work with JDK 11, NetBeans 8 should work with JDK 8 and so on.
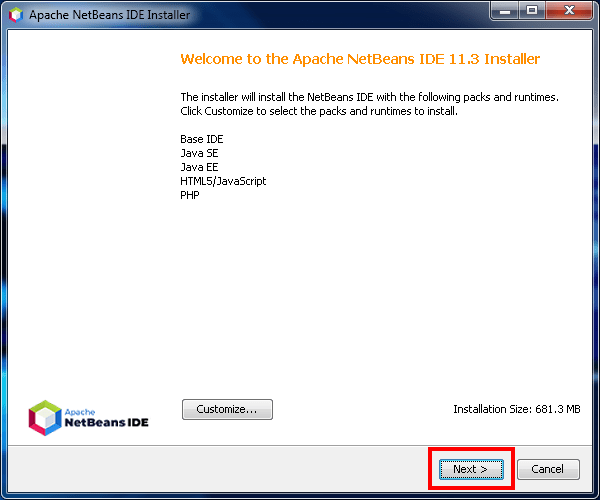
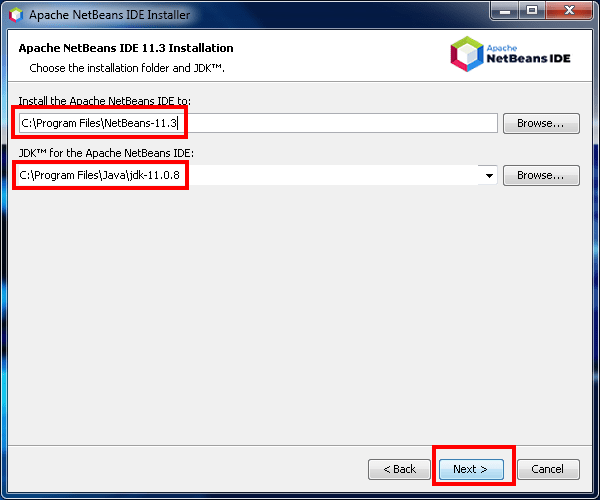
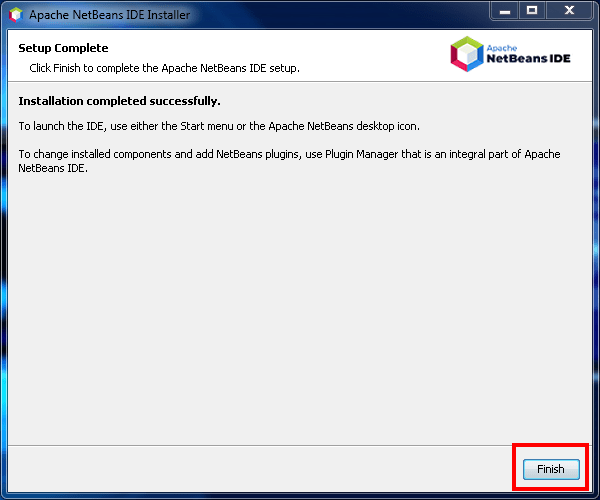
Install Apache NetBeans
A) Run the NetBeans installer, choose the installation directory and install NetBeans.


Point Apache NetBeans to the Appropriate JDK
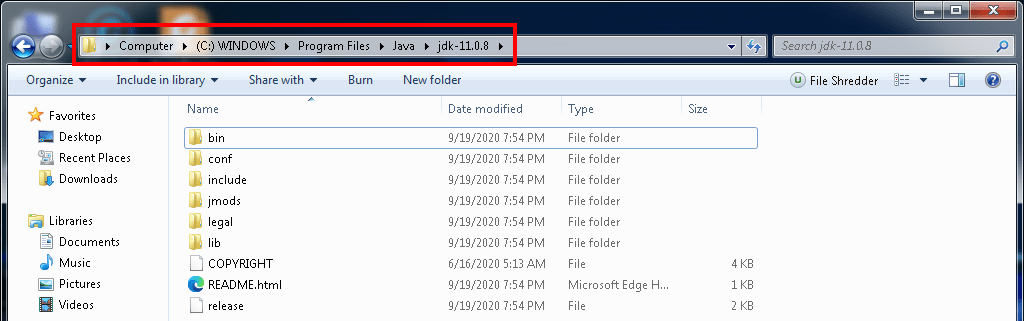
A) Copy the installation path of your JDK. In my case, it is (C:\Program Files\Java\jdk-11.0.8). Paste it in notepad.
 B) Go to the NetBeans installation folder (C:\Program Files\NetBeans-11.3\netbeans\etc\netbeans.conf) and open the configuration file <netbeans.conf> by dragging it and dropping in notepad (you may need to run notepad as an administrator).
 C) Scroll down the opened notepad document until you see the JDK installation path. If the JDK installation path in this document is different from your JDK installation path, remove it and replace it with the path you earlier copied and pasted in notepad then save it.
 NB: The above steps will permit the NetBeans IDE to use the JDK you have installed.
Customize Apache NetBeans
A) Run your NetBeans IDE.B) Click the <HELP> button on the top menu bar, and in the drop-down menu, click the <ABOUT> button. Make sure the Java version of NetBeans corresponds to the one you installed.
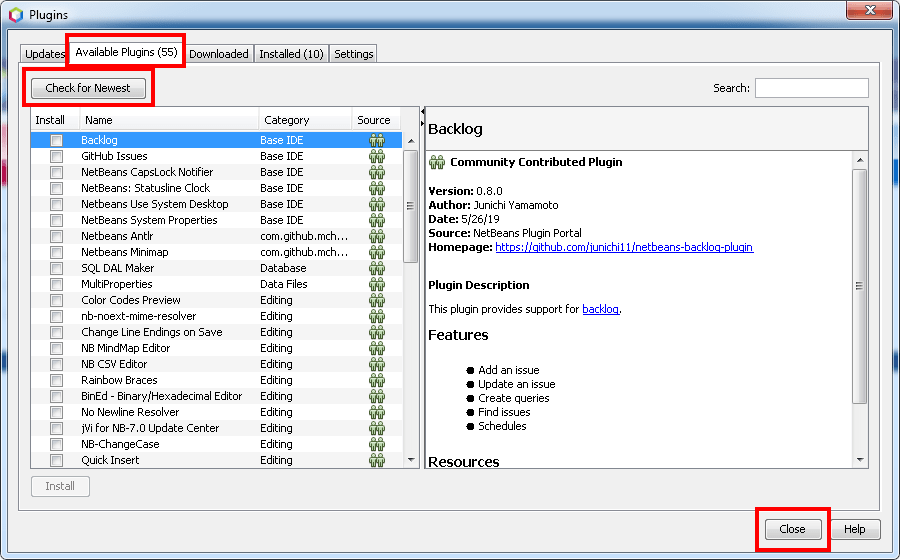
 C) Click the <TOOLS> button on the top menu bar, and in the drop-down menu, click the <PLUGINS> button. Check for new updates, download and install them if necessary.
 D) For those who like using the dark theme, click the <TOOLS> button on the top menu bar, and in the drop-down menu, click the <OPTIONS> button.
 E) In the <OPTIONS> menu, click the <LOOK AND FEEL> tab, then click on the drop-down menu to select your preferred NetBeans IDE theme.
 NB: You can further customize the interface of your IDE by tweaking settings in the other tabs, such as the <MISCELLANEOUS>, <FONT & COLORS> and <EDITOR> tabs.
 NB: Some changes may need the IDE to restart in order to take place.NB: You can also import or export previously made setting from a previous NetBeans installation.
Set up Apache NetBeans With JavaFX
A) Create a new project and test your NetBeans IDE by compiling and running a simple program like the “Hello World” program, as shown in the following steps.B) Click on the <NEW PROJECT> icon on the toolbar.C) Select <JAVA WITH ANT> on the left pane and select <JAVA APPLICATION> on the right pane, then click on the <NEXT> button at the bottom of the screen.
 D) Check the <CREATE A MAIN CLASS> checkbox and click on the <FINISH> button, at the bottom of the window.
 NB: If it is the first time you are using a feature in NetBeans IDE, after clicking on <NEXT> in the step above, you will have to download and install that feature as shown below.JAVA APPLICATION SOURCE CODEpackage javaapplication1;public class JavaApplication1 {
public static void main(String[] args) {System.out.println("Hello World");}} NB: If the program does not successfully run, go back to step 6 and point apache NetBeans to the appropriate JDK.NB: To create a JavaFX application the default way (through the main menu) using any NetBeans above NetBeans 8 will result in an error. To solve the problem, you will have to create a default Java application, then convert it into a JavaFX application as shown in the following steps.
 E) Click on the <NEW PROJECT> icon on the toolbar again.F) Select <JAVA WITH ANT> on the left pane and select <JAVA APPLICATION> on the right pane, then click on the <NEXT> button at the bottom of the screen.G) Check the <CREATE A MAIN CLASS> checkbox and click on the <FINISH> button, at the bottom of the window.H) Right-click on the application package on the left pane, click on <NEW>, click on <OTHER> click on <JAVAFX MAIN CLASS> then click on <NEXT> at the bottom of the window.
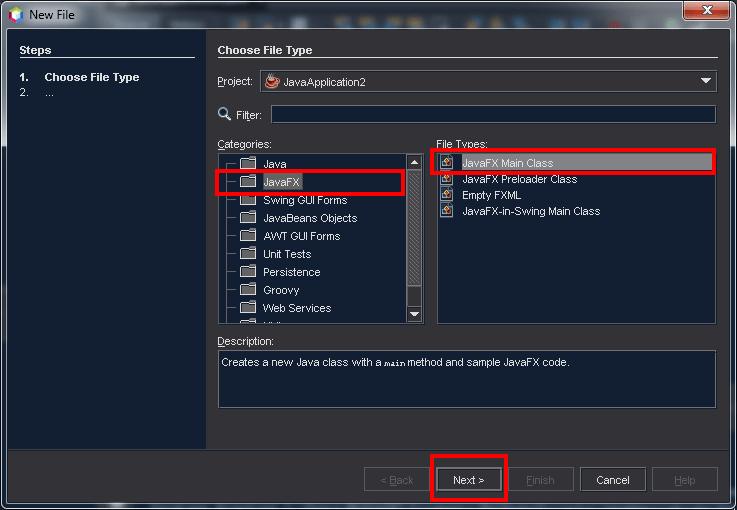
 I) Name the JavaFX Class, then click on <FINISH> at the bottom of the window.NB: At this point, you should see errors within the main NetBeans pane. The errors are caused by the absence of the JavaFX libraries, which we are going to install in the following steps.J) Download the most appropriate JavaFX SDK for your NetBeans IDE and operating system (the most appropriate version for me will be JavaFX Windows SDK 11 or higher, since I use Java JDK 11, NetBeans 11 and Windows, as my operating system). You can download it from here.
 K) Copy the downloaded JavaFX SDK to the main Java folder (C:\Program Files\Java), then extract it there (you may need administrator permission). Take note of the exact name and location of the JavaFX SDK extracted folder.
 L) On the top menu bar, click on <TOOLS> then click on <LIBRARIES> in the drop-down menu. In the new window that pops up, click on the <NEW LIBRARY> button under the left pane. In the new window that pops up, insert the name of the JavaFX SDK folder earlier extracted and click on the <OK> button at the bottom of the window.
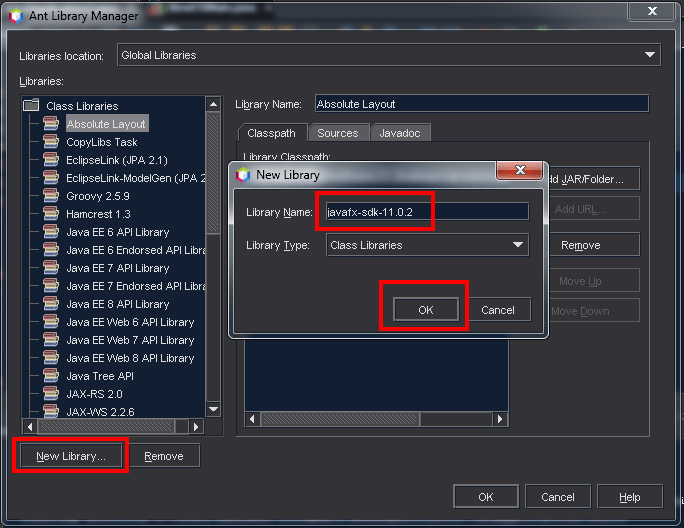
 M) Make sure the above newly created library is selected in the left pane. In the right pane, click on the <ADD JAR/FOLDER> button on the right. Navigate to the JavaFX SDK folder directory (C:\Program Files\Java\javafx-sdk-11.0.2) and add the <LIB> folder. Click on <ADD JAR/FOLDER>, then click on the <OK> button.
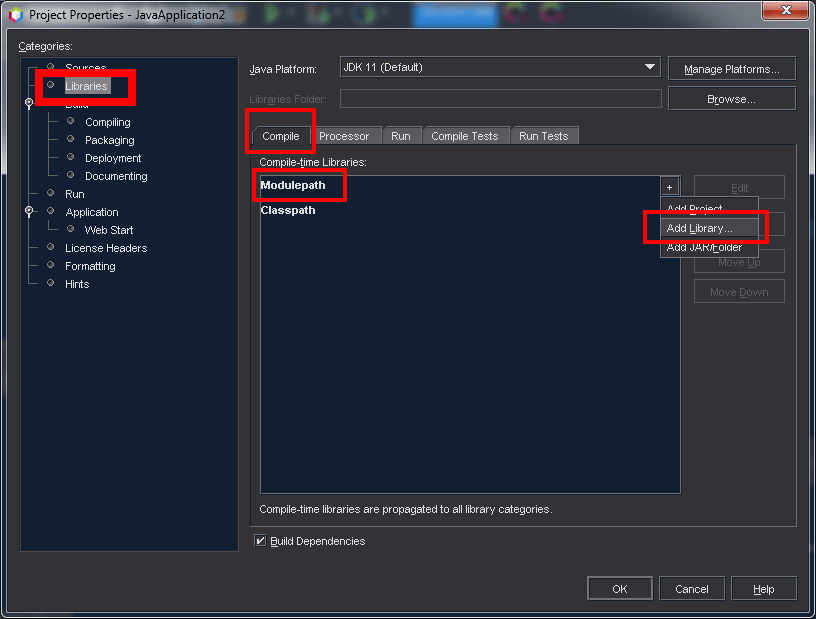
 N) In the top left pane of the main NetBeans IDE window, right-click the java project and click <PROPERTIES> from the contextual menu. In the left pane of the new window, select the <LIBRARIES> tab. In the right pane, click on <ADD MODULEPATH> then click on <ADD LIBRARY>.
 O) In the new window that pops up, scroll down and select the JavaFX SDK library, then click on <ADD LIBRARY> at the bottom of the window.
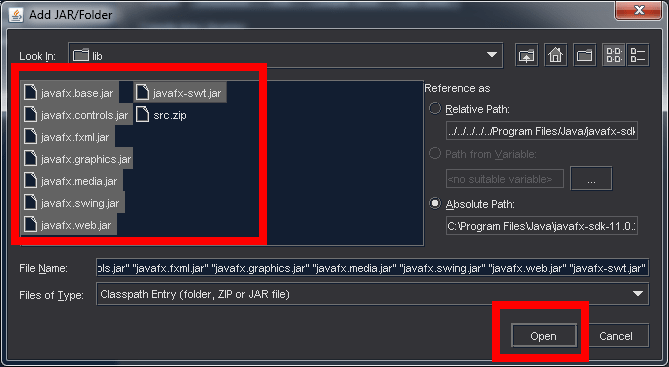
 P) In the right pane again, click on <ADD CLASSPATH> then click on <ADD JAR/FOLDER>. Navigate to the location of the JavaFX SDK libraries (C:\Program Files\Java\javafx-sdk-11.0.2\lib), then select everything except the “SRC.ZIP” file and then click on the <OPEN> button at the bottom of the window.
 Q) At this point, you should see all the JavaFX libraries in the right pane. Check the <BUILD DEPENDENCIES> checkbox below and click on <OK> to close the window.NB: With all the JavaFX libraries installed, the errors appearing in the right pane of the main window should be fixed.
 R) In the top left pane of the main NetBeans IDE window again, right-click the java project and click <PROPERTIES> from the contextual menu. In the left pane of the new window, select the <DEPLOYMENT> tab. In the right pane, click on the <SWITCH PROJECT TO JAVAFX DEPLOYMENT MODEL> button. In the new window, select the Java Class you want to switch and click <MODIFY PROJECT>, and finally on <OK>.
 NB: The above procedure will switch the Java Application to a JavaFX project.S) In the top left pane of the main NetBeans IDE window again, right-click the java project and click <PROPERTIES> from the contextual menu. In the left pane of the new window, select the <RUN> tab. Insert the VM Option path (–module-path “C:\Program Files\Java\javafx-sdk-14.0.2.1\lib” –add-modules=javafx.controls,javafx.fxml) then click <OK> below.T) Compile the Java package, then run the JavaFX Main Class. If everything is fine, you should see a “HELLO WORLD” window with a button in its center. When the button is clicked, “Hello World” should be displayed in the console.
 NB: Each time you will have to start a new JavaFX project, you will 2have to add the JavaFX libraries, switch the default application to the JavaFX Deployment Platform and add the JavaFX VM (Virtual Machine), as shown in Step 8.
Download and Install Scene Builder
A) Download the most appropriate Scene Builder for your NetBeans IDE and operating system (the most appropriate version for me will be Scene Builder 11 or higher, since I use Java JDK 11, NetBeans 11, JavaFX SDK 11 and Windows, as my operating system). You can download it from here.
 B) Run the Installation execution file and follow the instructions till the end to install Scene Builder.

Set up Apache NetBeans With Scene Builder
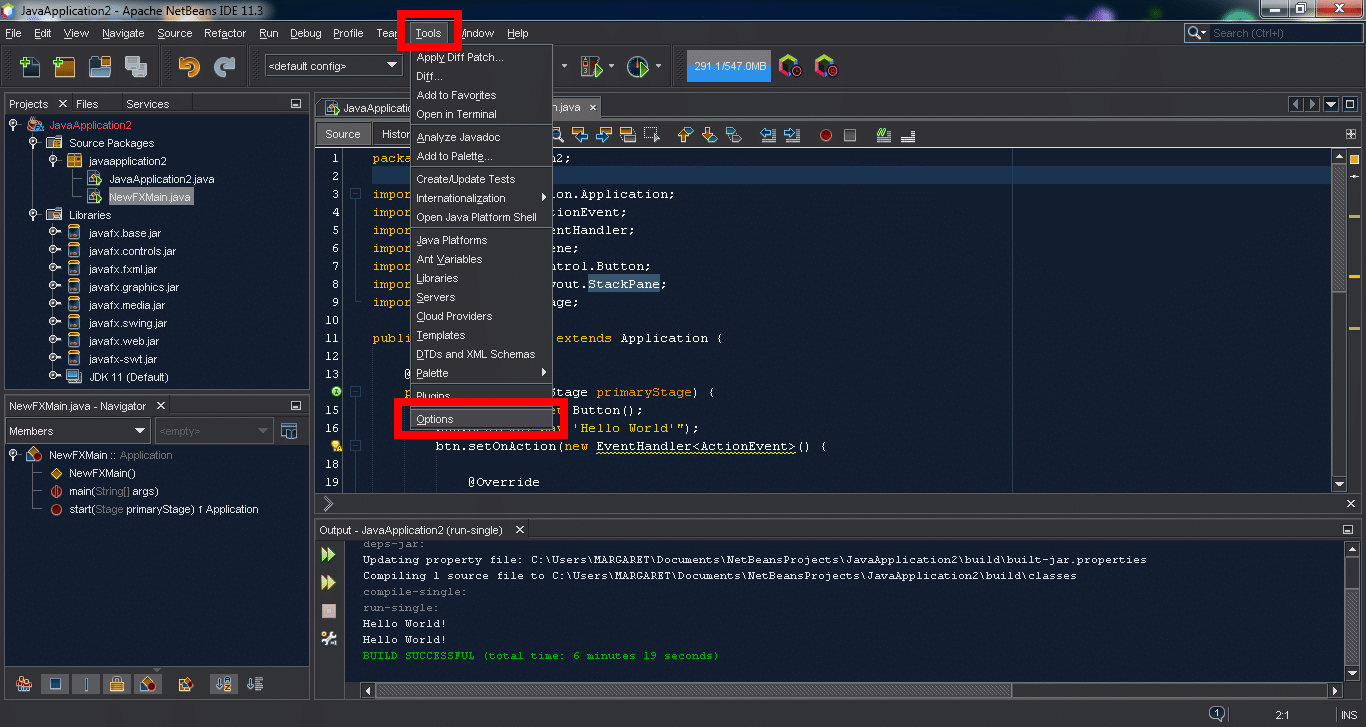
A) Run NetBeans IDE, click on <TOOLS> at the top menu bar, then click on <OPTIONS> in the pop-up menu.
 B) In the <OPTIONS> window, select <JAVA> in the main menu.C) In the <JAVA> menu, select the <JAVAFX> tab.
 D) Browse for the Scene Builder installation location in your PC (C:\Program Files\SceneBuilder). Click on <OK> at the bottom of the window when done.
 E) You can also import or export other installations.NB: The above procedure will point NetBeans to Scene Builder.
Test Your Apache Netbeans and Scene Builder Association
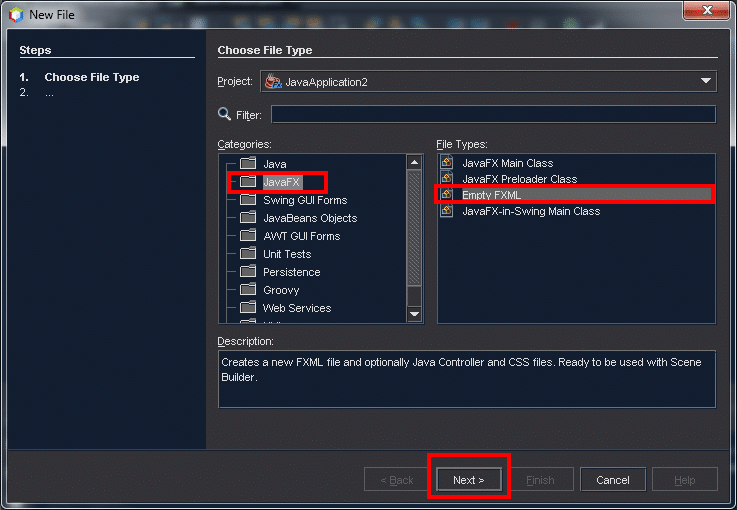
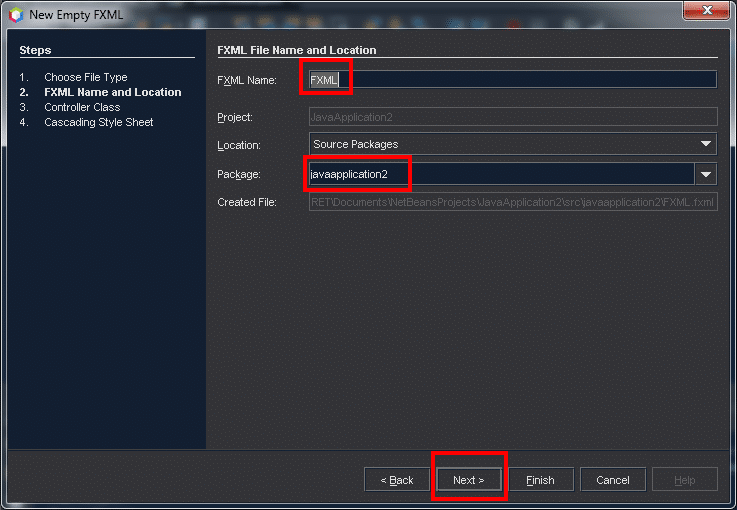
NB: After installing your NetBeans, Java SDK, Java JDK, JavaFX Scene Builder, you will have to test if everything works fine together by building a simple Graphical User Interface (GUI) application.A) In the JavaFX project earlier created, create an FXML Class. This class will contain the XML code for the Front End of the application.
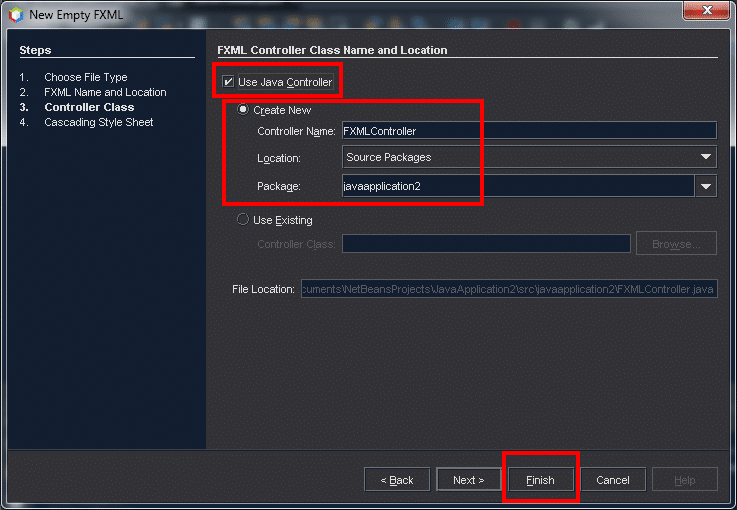
B) Make sure that the FXML file has been created, and that the controller is linked with the application model.NB: For the FXMain Class to work with Scene Builder, it has to point to the correct FXML file, and also, it has to stop using the default JavaFX code (the one that appears when a JavaFX Class is created).C) Make sure that the FXMain Class is linked with the FXML file, by giving it the same name in your code, as shown in the following image.D) You can use the following source code to speed up your work.JAVAFX MAIN CLASS SOURCE CODEpackage javaapplication1;import javafx.application.Application;import javafx.fxml.FXMLLoader;import java.io.IOException;import javafx.scene.Parent;import javafx.scene.Scene;import javafx.stage.Stage;public class NewFXMain extends Application {@Overridepublic void start(Stage stage) throws IOException {Parent root = FXMLLoader.load(getClass().getResource(“FXML.fxml”));Scene scene = new Scene(root);stage.setScene(scene);stage.show();}public static void main(String[ ] args) {launch(args);}}E) Right-click on the FXML file in the top left pane of the main NetBeans IDE window, and click on <OPEN> to open it with Scene Builder.F) Add the <BUTTON> and <LABEL> components to your scene in Scene Builder. G) Give the components an fx:id. I decided to name my button as “buttonOne”, and my label “labelOne”. Define your button with its Action Event name, which will be used by the FXML Controller (Mine was named as “buttonAction”). Finally, save your scene in Scene Builder and get back to the NetBeans IDE.
 H) Update the controller with the new components added to the scene. Set the label text to switch to “Hello World” when the button is pressed. You can use the source code after the image to speed up your work.JAVA FXML CONTROLLER SOURCE CODEpackage javaapplication1;import java.awt.event.ActionEvent;import java.net.URL;import java.util.ResourceBundle;import javafx.fxml.FXML;import javafx.fxml.Initializable;import javafx.scene.control.Button;import javafx.scene.control.Label;public class FXMLController implements Initializable {@FXMLprivate Button buttonOne;@FXMLprivate Label labelOne;@Overridepublic void initialize(URL url, ResourceBundle rb) {
}@FXMLprivate void buttonAction (javafx.event.ActionEvent event) {labelOne.setText(“Hello World”);}}I) Clean and Build your Java project, then Compile and Run the FXMain Class. If everything is fine, you should have a GUI program with a button and a label that displays “Hello World” when the button is clicked on.
 C) On the left pane of the Properties window, click on <ADVANCED SYSTEM SETTINGS>.D) Click on <ENVIRONMENT VARIBLES> at the bottom of the <ADVANCED> tab.
 E) Click on <NEW> under user varibale under <USER VARIABLE> pane.F) In the <VARIABLE NAME> text field, input “JAVA_HOME“.G) In the <VARIABLE VALUE> text field, input the file location of the java JDK installation “c:\Program Files\Java\jdk-11.0.8” then click on “OK” below.
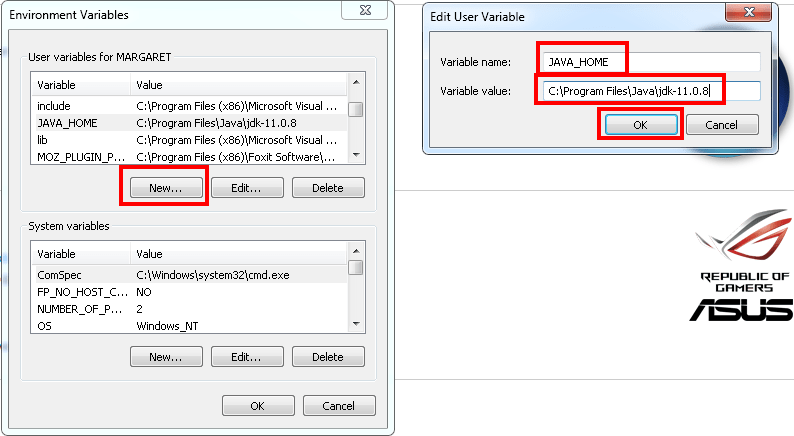 H) Select <PATH> click <NEW> and input “%JAVA_HOME%\bin” in the new text field.
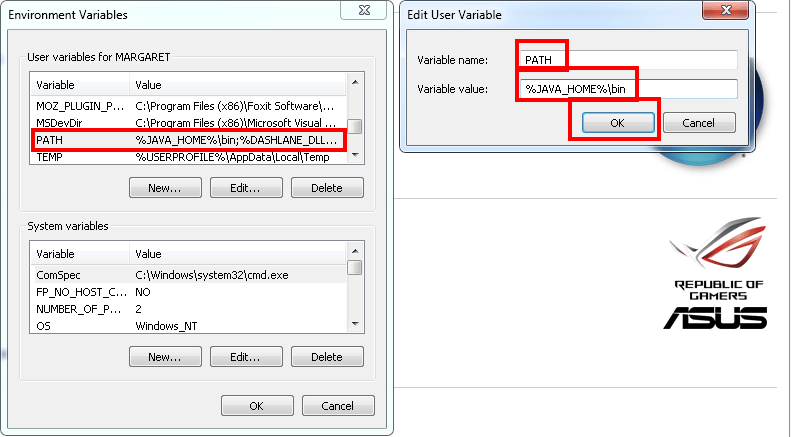 I) Under <USER VARIABLE> panel once more, click <NEW> and input “CLASSPATH” in the <VARIABLE NAME> text field.J) Add a FULL STOP “.” in the <VARIABLE VALUE> text field and click “OK”.
 K) Run ”Command Prompt” application and input <javac –version>. The currently installed version of Java should show (11.0.8).
 NB: It is recommended to install the current JDK release at the time when a particular NetBeans was released. For example; NetBeans 11 should work with JDK 11, NetBeans 8 should work with JDK 8 and so on.

 B) Go to the NetBeans installation folder (C:\Program Files\NetBeans-11.3\netbeans\etc\netbeans.conf) and open the configuration file <netbeans.conf> by dragging it and dropping in notepad (you may need to run notepad as an administrator).
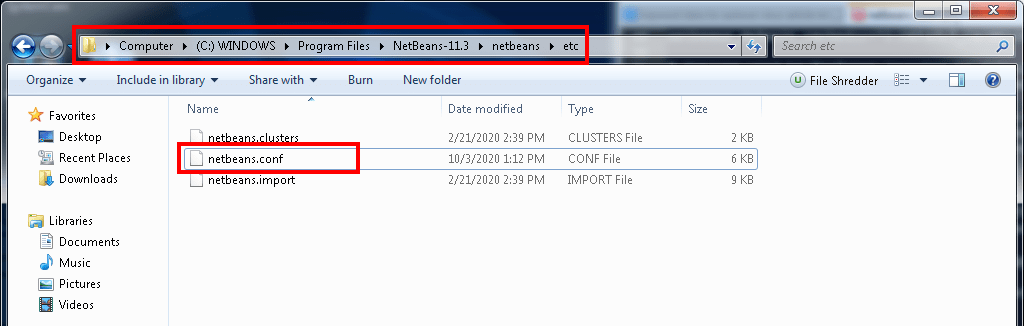 C) Scroll down the opened notepad document until you see the JDK installation path. If the JDK installation path in this document is different from your JDK installation path, remove it and replace it with the path you earlier copied and pasted in notepad then save it.
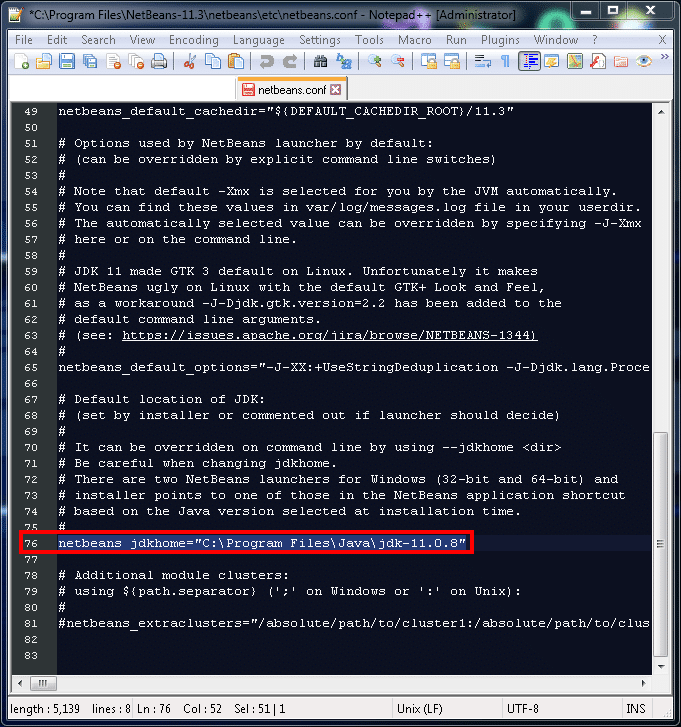 NB: The above steps will permit the NetBeans IDE to use the JDK you have installed.
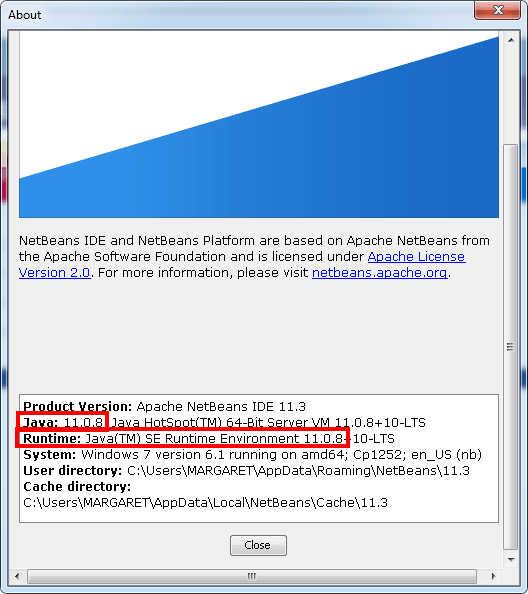 C) Click the <TOOLS> button on the top menu bar, and in the drop-down menu, click the <PLUGINS> button. Check for new updates, download and install them if necessary.
 D) For those who like using the dark theme, click the <TOOLS> button on the top menu bar, and in the drop-down menu, click the <OPTIONS> button.
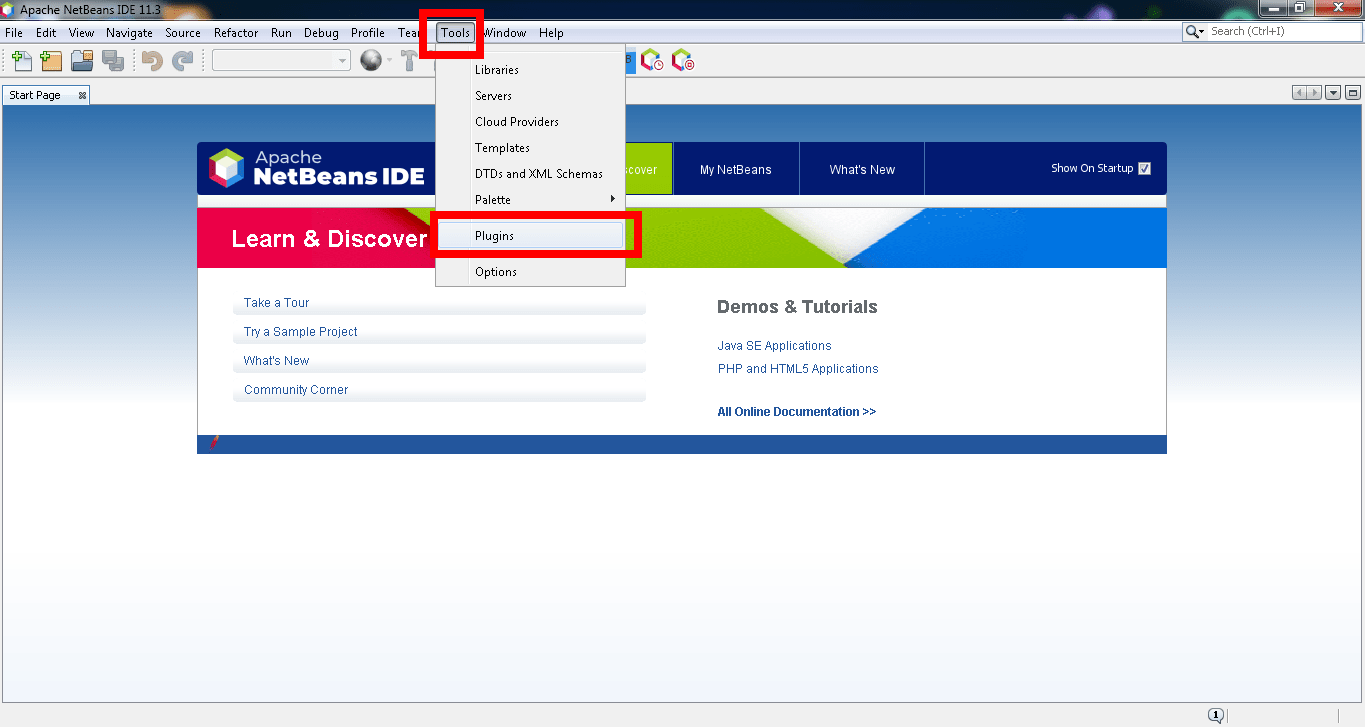 E) In the <OPTIONS> menu, click the <LOOK AND FEEL> tab, then click on the drop-down menu to select your preferred NetBeans IDE theme.
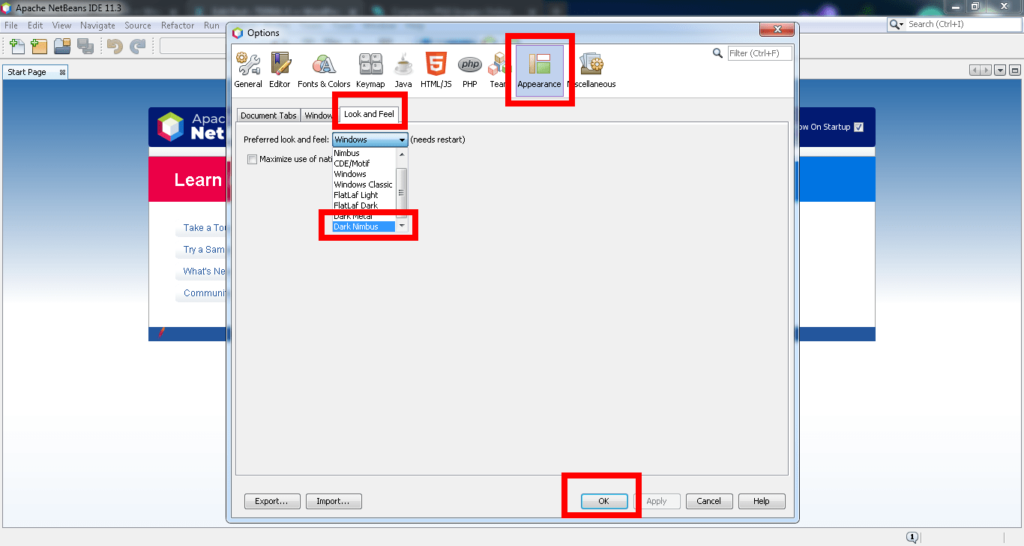 NB: You can further customize the interface of your IDE by tweaking settings in the other tabs, such as the <MISCELLANEOUS>, <FONT & COLORS> and <EDITOR> tabs.
 NB: Some changes may need the IDE to restart in order to take place.NB: You can also import or export previously made setting from a previous NetBeans installation.
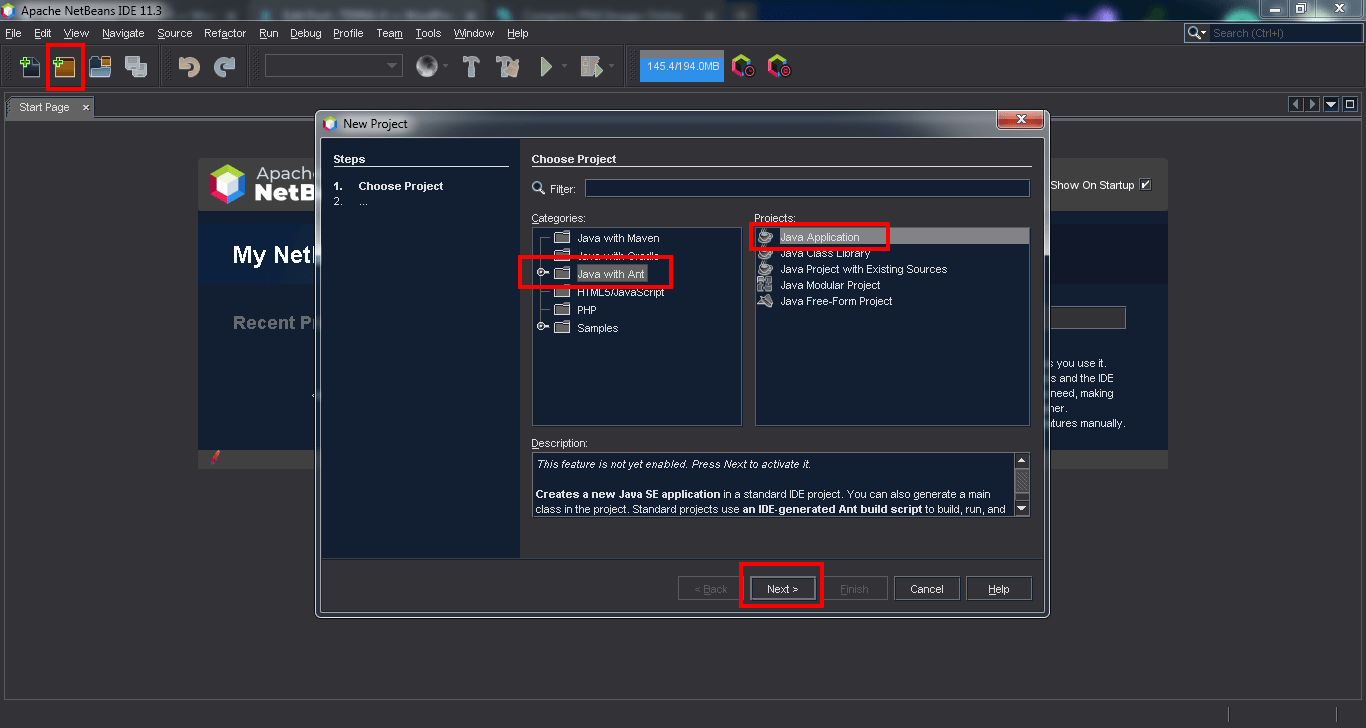 D) Check the <CREATE A MAIN CLASS> checkbox and click on the <FINISH> button, at the bottom of the window.
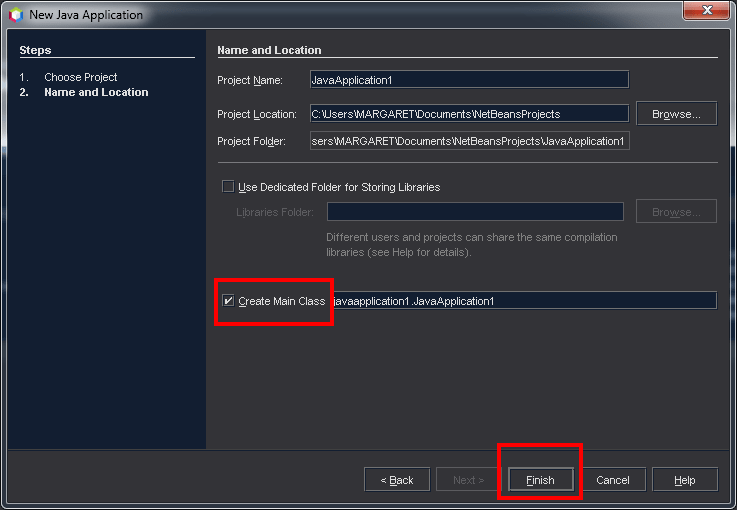 NB: If it is the first time you are using a feature in NetBeans IDE, after clicking on <NEXT> in the step above, you will have to download and install that feature as shown below.
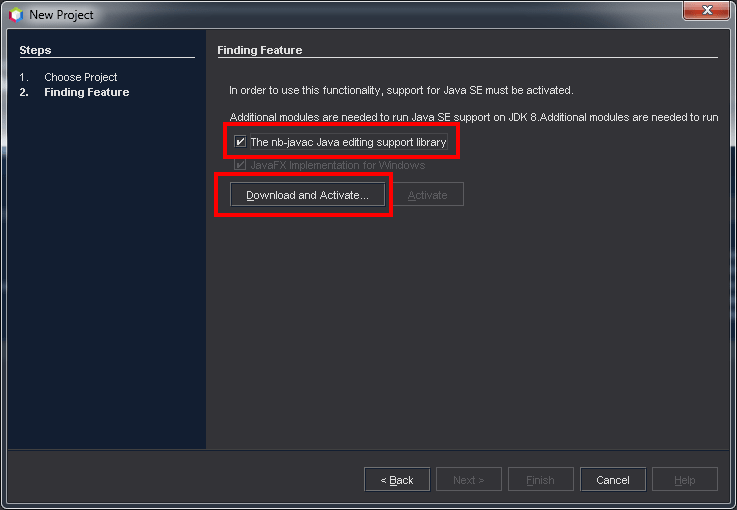 JAVA APPLICATION SOURCE CODEpackage javaapplication1;public class JavaApplication1 {
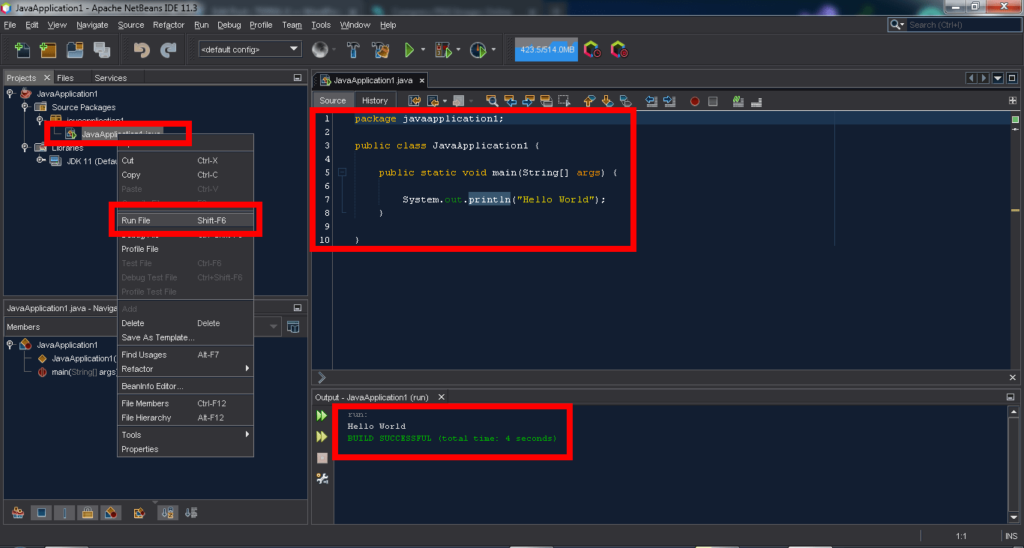 NB: If the program does not successfully run, go back to step 6 and point apache NetBeans to the appropriate JDK.NB: To create a JavaFX application the default way (through the main menu) using any NetBeans above NetBeans 8 will result in an error. To solve the problem, you will have to create a default Java application, then convert it into a JavaFX application as shown in the following steps.
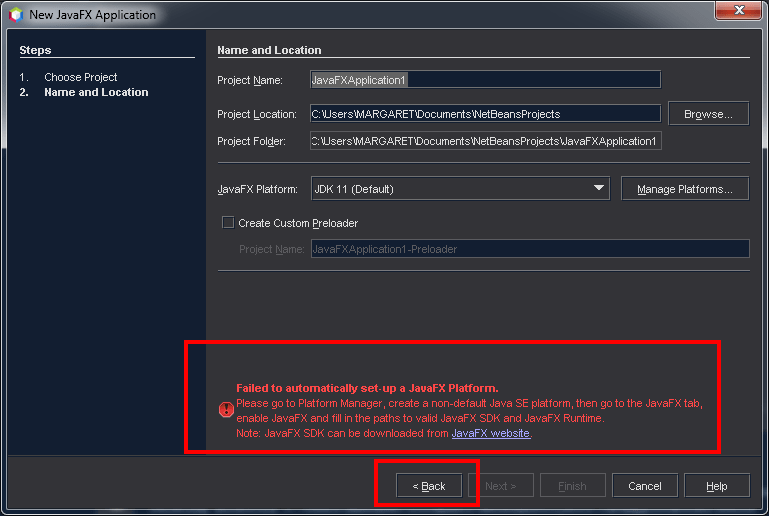 E) Click on the <NEW PROJECT> icon on the toolbar again.F) Select <JAVA WITH ANT> on the left pane and select <JAVA APPLICATION> on the right pane, then click on the <NEXT> button at the bottom of the screen.
 G) Check the <CREATE A MAIN CLASS> checkbox and click on the <FINISH> button, at the bottom of the window.
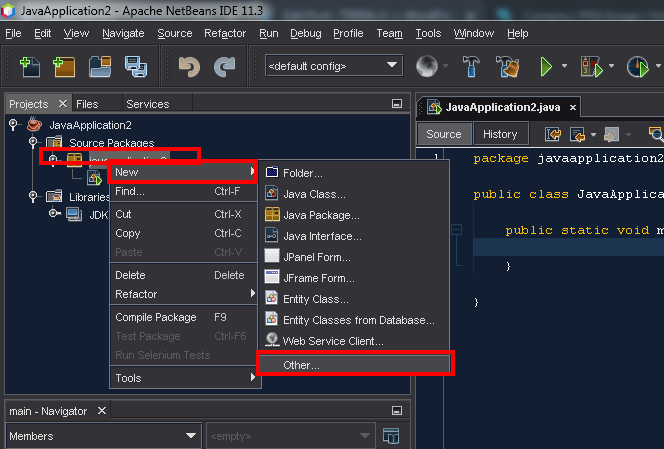
 I) Name the JavaFX Class, then click on <FINISH> at the bottom of the window.
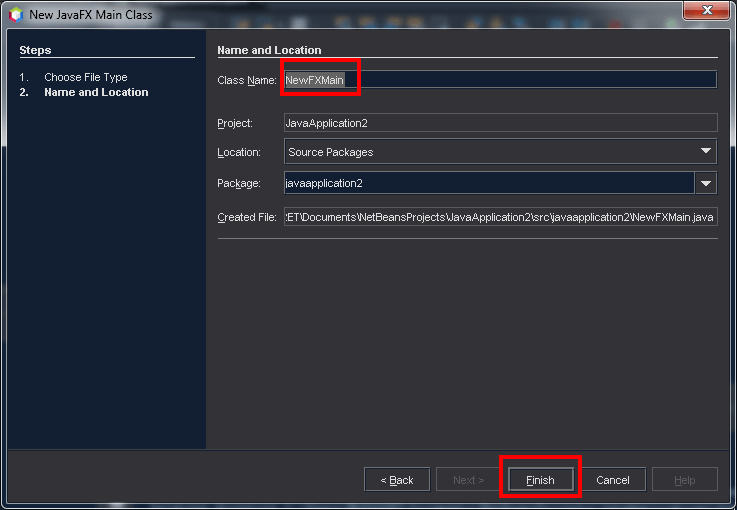 NB: At this point, you should see errors within the main NetBeans pane. The errors are caused by the absence of the JavaFX libraries, which we are going to install in the following steps.J) Download the most appropriate JavaFX SDK for your NetBeans IDE and operating system (the most appropriate version for me will be JavaFX Windows SDK 11 or higher, since I use Java JDK 11, NetBeans 11 and Windows, as my operating system). You can download it from
 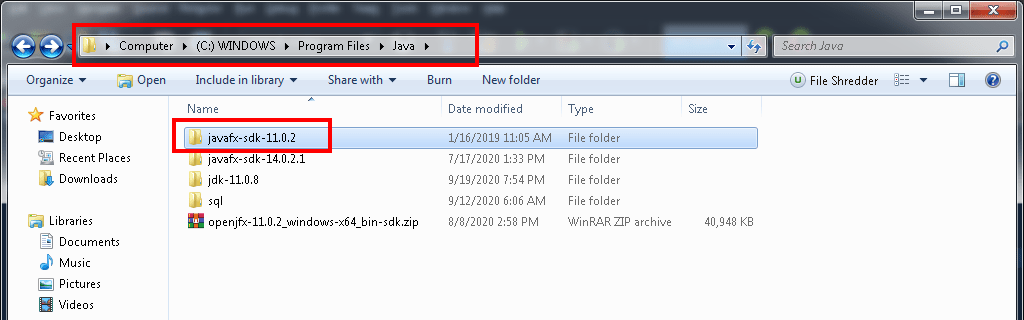 L) On the top menu bar, click on <TOOLS> then click on <LIBRARIES> in the drop-down menu. In the new window that pops up, click on the <NEW LIBRARY> button under the left pane. In the new window that pops up, insert the name of the JavaFX SDK folder earlier extracted and click on the <OK> button at the bottom of the window.
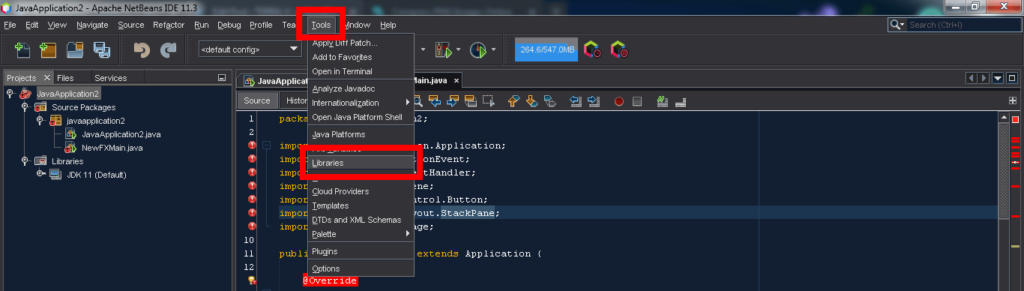
 M) Make sure the above newly created library is selected in the left pane. In the right pane, click on the <ADD JAR/FOLDER> button on the right. Navigate to the JavaFX SDK folder directory (C:\Program Files\Java\javafx-sdk-11.0.2) and add the <LIB> folder. Click on <ADD JAR/FOLDER>, then click on the <OK> button.
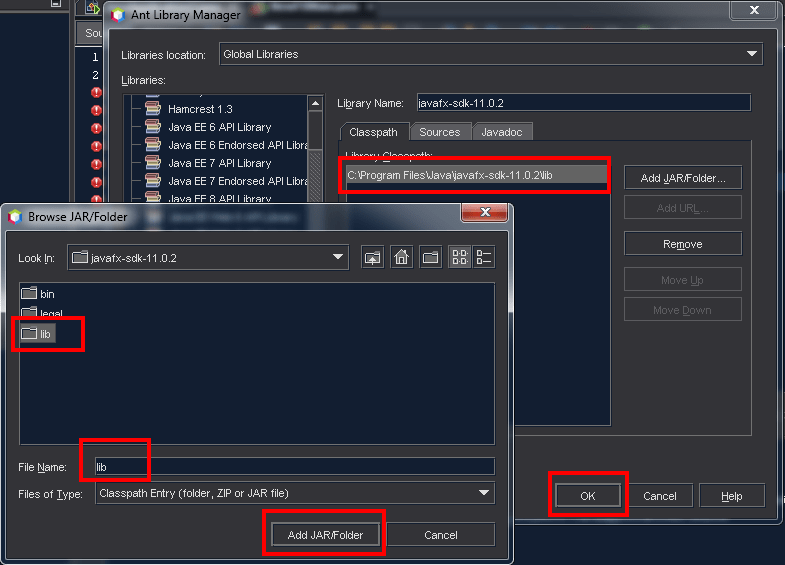 N) In the top left pane of the main NetBeans IDE window, right-click the java project and click <PROPERTIES> from the contextual menu. In the left pane of the new window, select the <LIBRARIES> tab. In the right pane, click on <ADD MODULEPATH> then click on <ADD LIBRARY>.
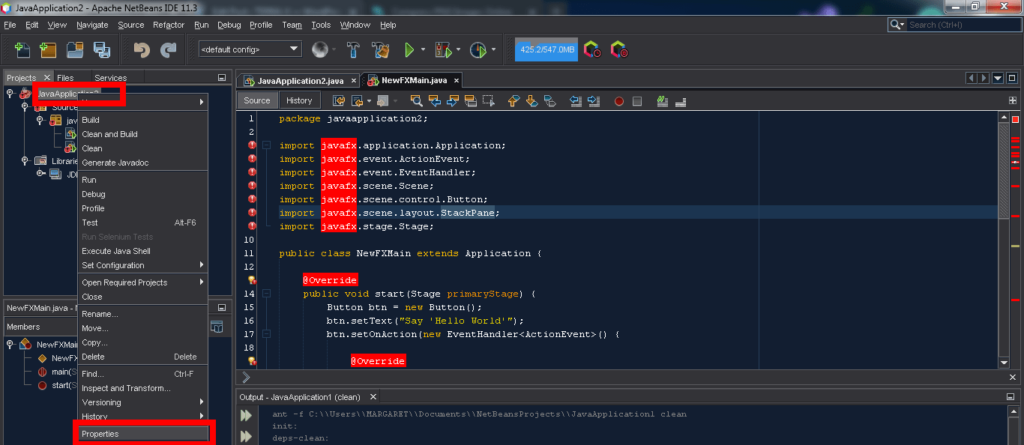
 O) In the new window that pops up, scroll down and select the JavaFX SDK library, then click on <ADD LIBRARY> at the bottom of the window.
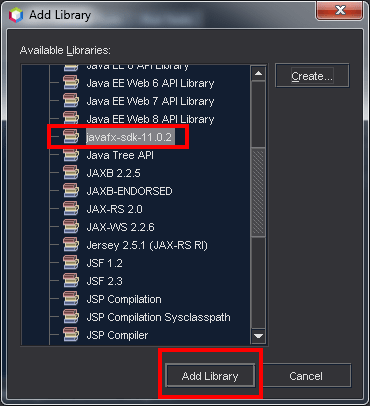 P) In the right pane again, click on <ADD CLASSPATH> then click on <ADD JAR/FOLDER>. Navigate to the location of the JavaFX SDK libraries (C:\Program Files\Java\javafx-sdk-11.0.2\lib), then select everything except the “SRC.ZIP” file and then click on the <OPEN> button at the bottom of the window.
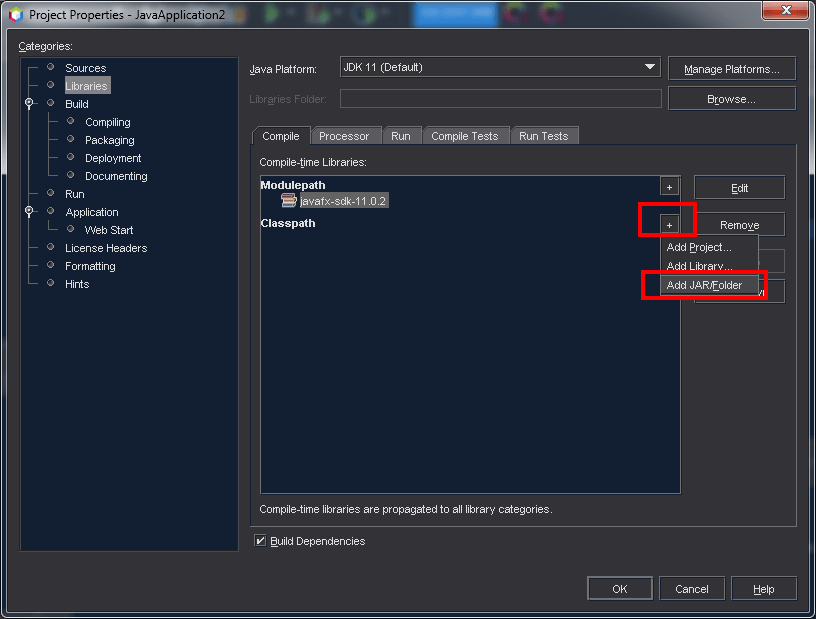
 Q) At this point, you should see all the JavaFX libraries in the right pane. Check the <BUILD DEPENDENCIES> checkbox below and click on <OK> to close the window.
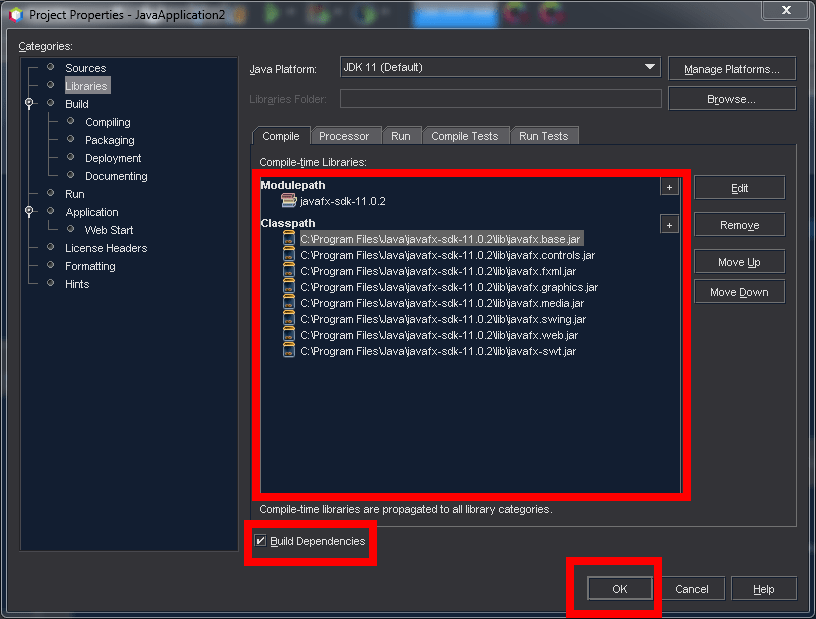 NB: With all the JavaFX libraries installed, the errors appearing in the right pane of the main window should be fixed.
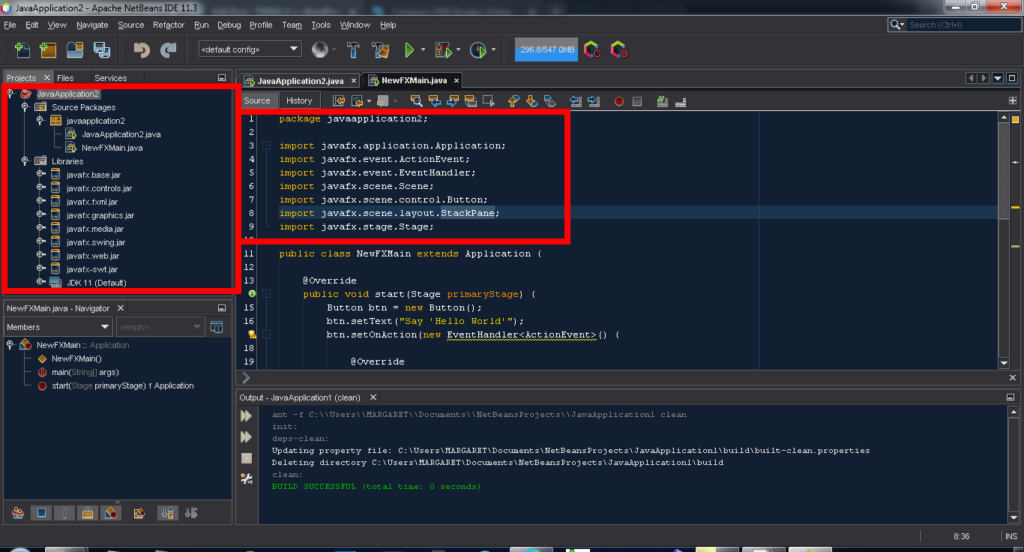 R) In the top left pane of the main NetBeans IDE window again, right-click the java project and click <PROPERTIES> from the contextual menu. In the left pane of the new window, select the <DEPLOYMENT> tab. In the right pane, click on the <SWITCH PROJECT TO JAVAFX DEPLOYMENT MODEL> button. In the new window, select the Java Class you want to switch and click <MODIFY PROJECT>, and finally on <OK>.
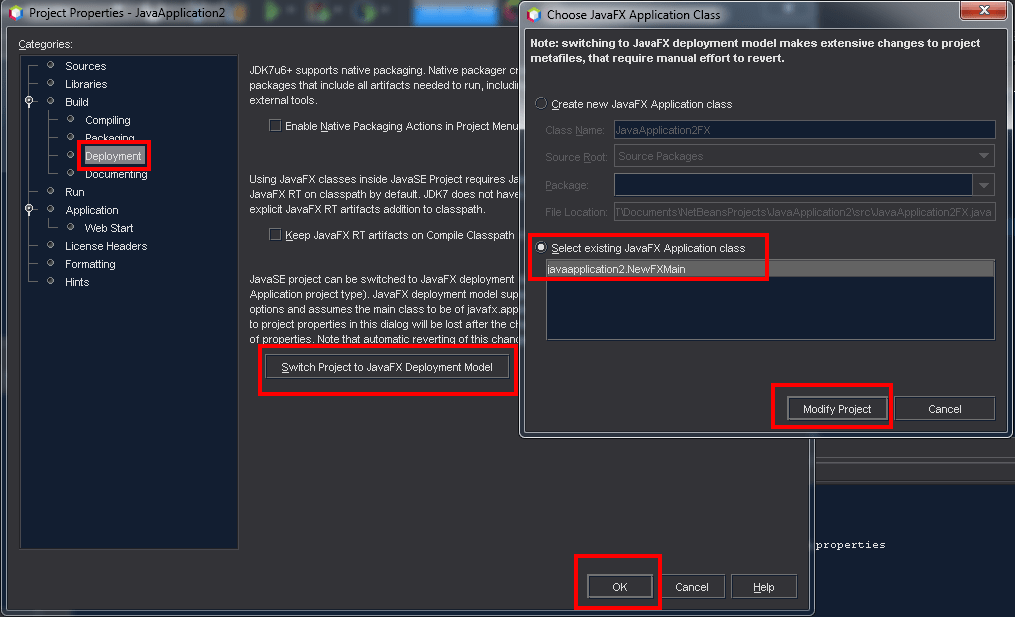 NB: The above procedure will switch the Java Application to a JavaFX project.S) In the top left pane of the main NetBeans IDE window again, right-click the java project and click <PROPERTIES> from the contextual menu. In the left pane of the new window, select the <RUN> tab. Insert the VM Option path (–module-path “C:\Program Files\Java\javafx-sdk-14.0.2.1\lib” –add-modules=javafx.controls,javafx.fxml) then click <OK> below.
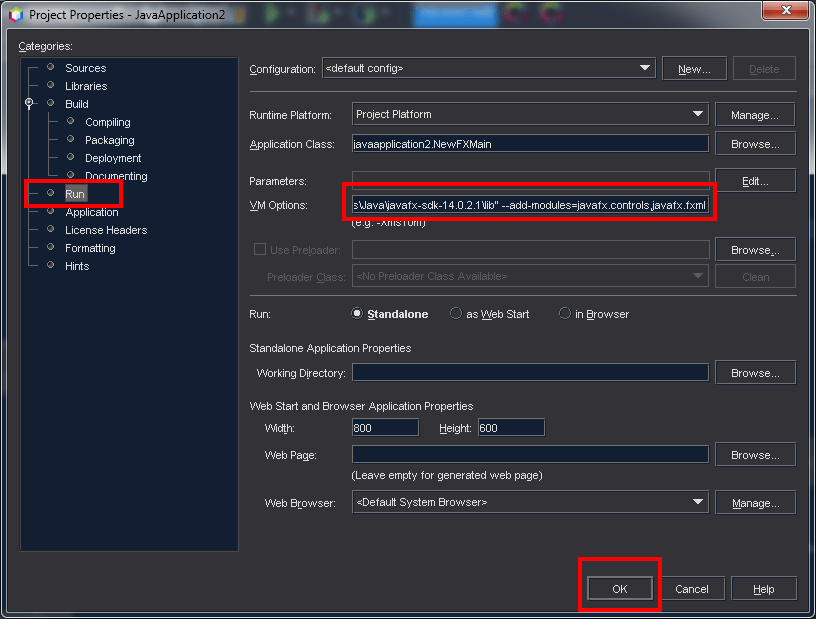 T) Compile the Java package, then run the JavaFX Main Class. If everything is fine, you should see a “HELLO WORLD” window with a button in its center. When the button is clicked, “Hello World” should be displayed in the console.
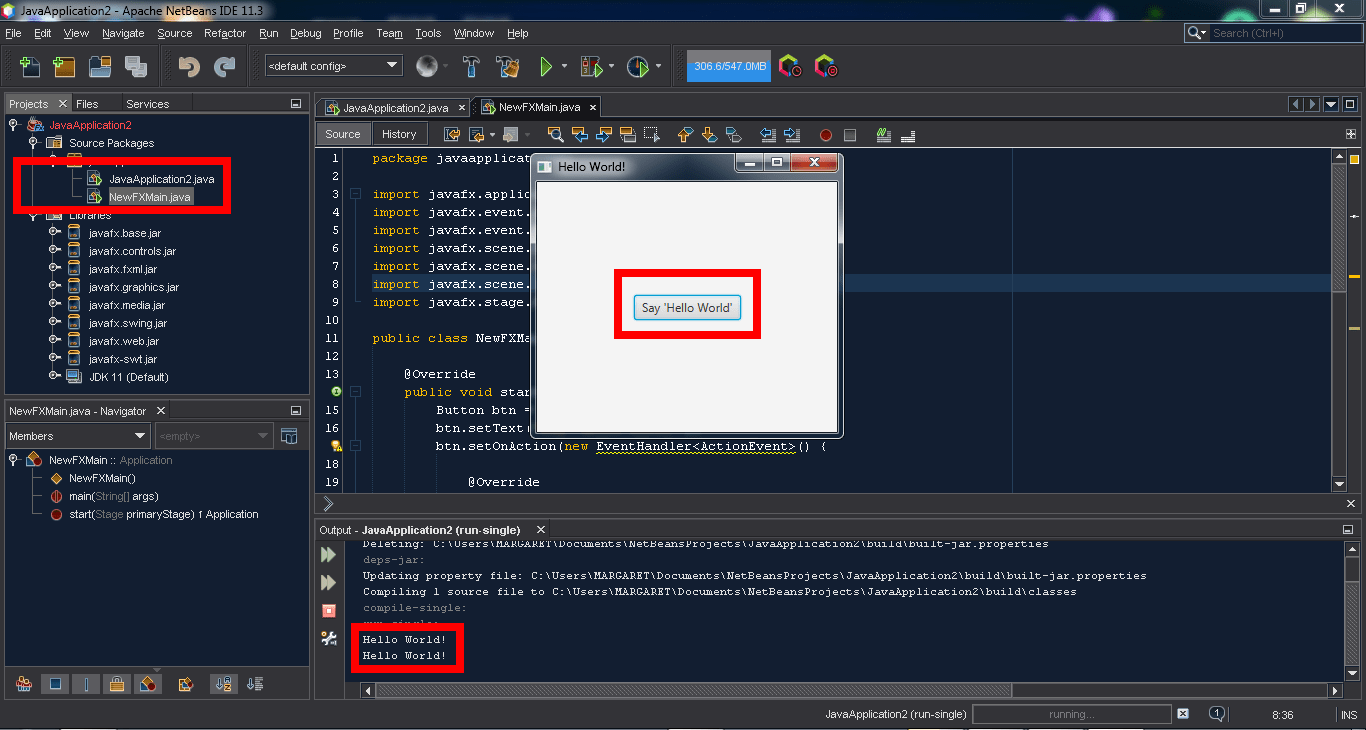 NB: Each time you will have to start a new JavaFX project, you will 2have to add the JavaFX libraries, switch the default application to the JavaFX Deployment Platform and add the JavaFX VM (Virtual Machine), as shown in Step 8.
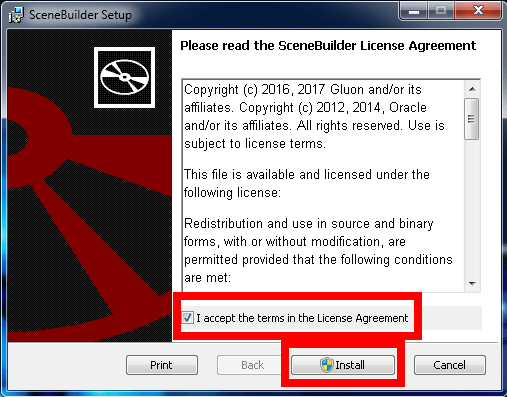
 B) In the <OPTIONS> window, select <JAVA> in the main menu.C) In the <JAVA> menu, select the <JAVAFX> tab.
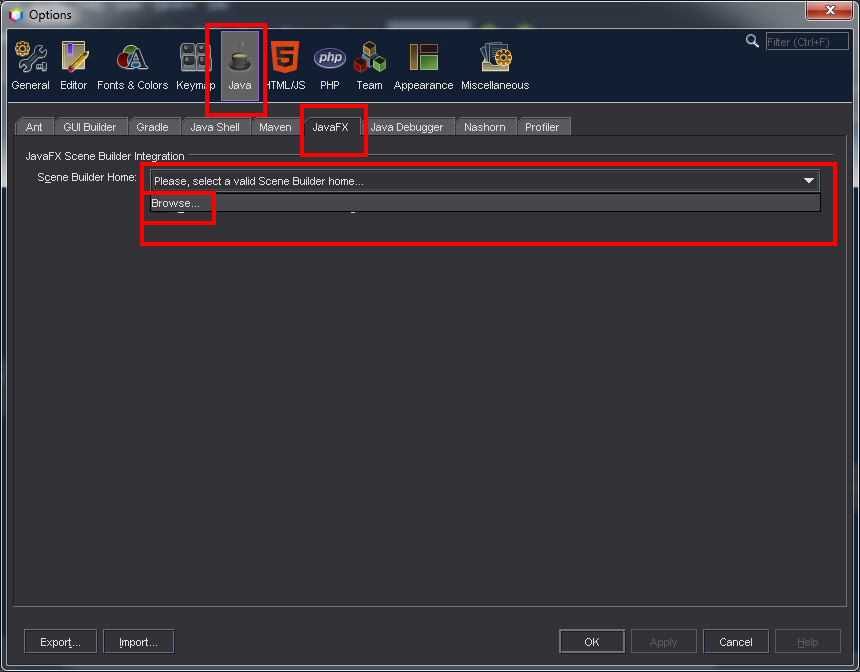 D) Browse for the Scene Builder installation location in your PC (C:\Program Files\SceneBuilder). Click on <OK> at the bottom of the window when done.
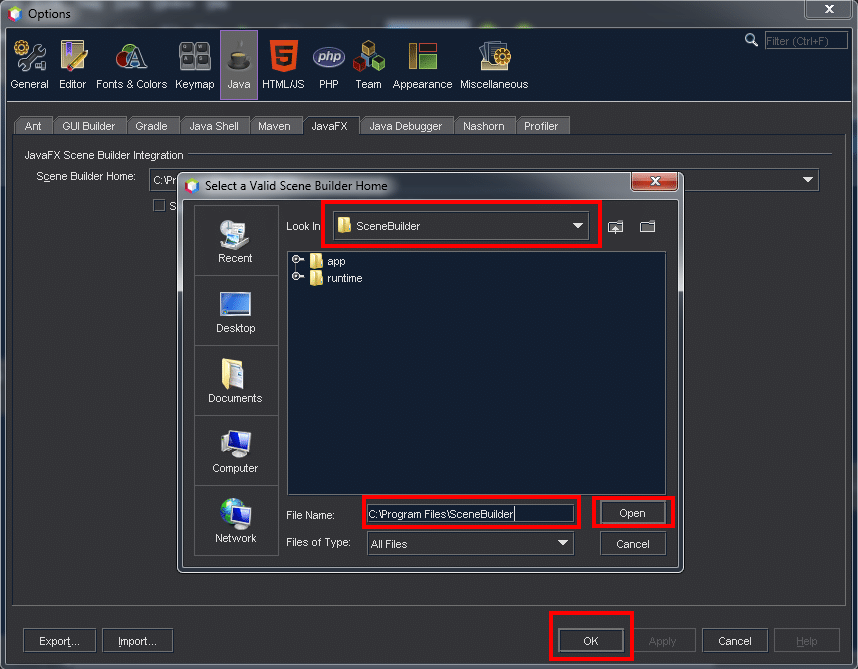 E) You can also import or export other installations.
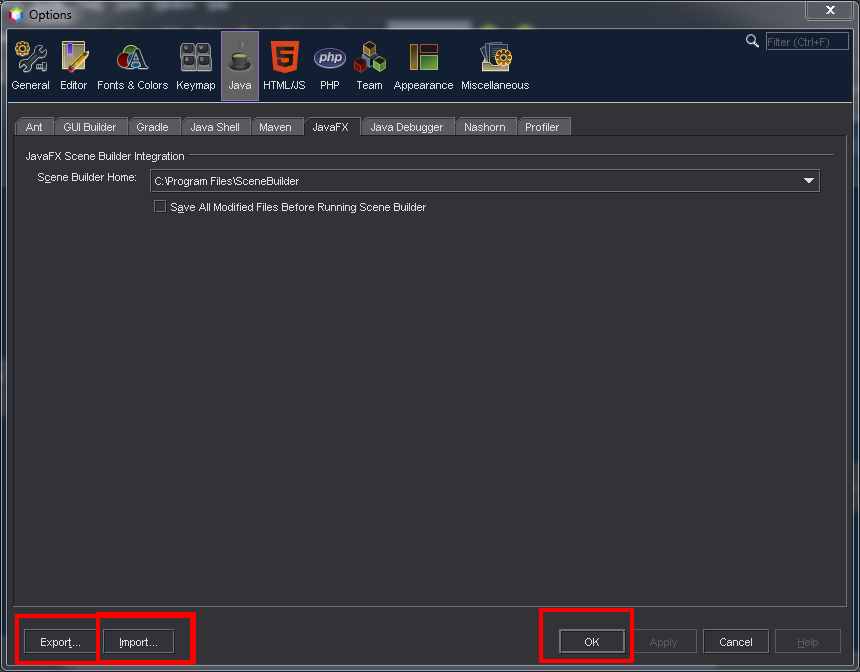 NB: The above procedure will point NetBeans to Scene Builder.
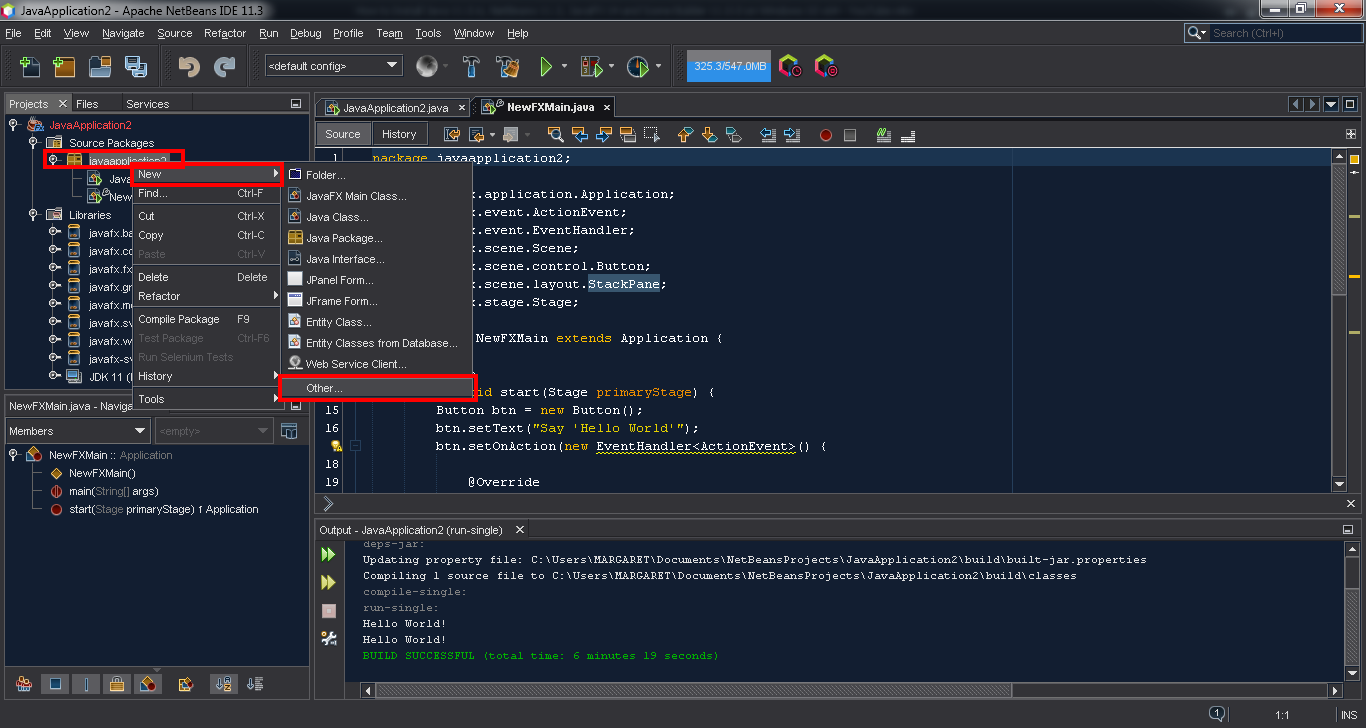
 B) Make sure that the FXML file has been created, and that the controller is linked with the application model.
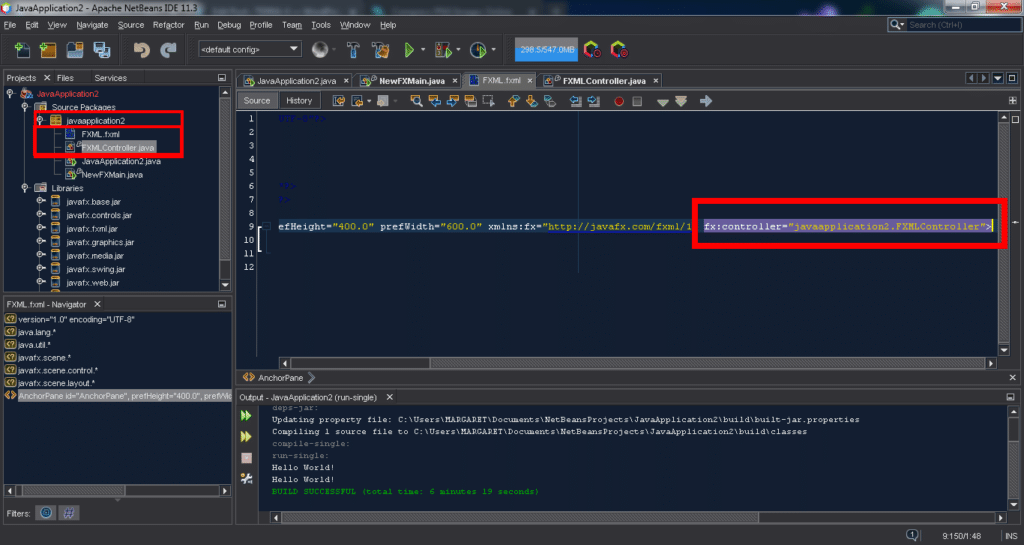 NB: For the FXMain Class to work with Scene Builder, it has to point to the correct FXML file, and also, it has to stop using the default JavaFX code (the one that appears when a JavaFX Class is created).C) Make sure that the FXMain Class is linked with the FXML file, by giving it the same name in your code, as shown in the following image.
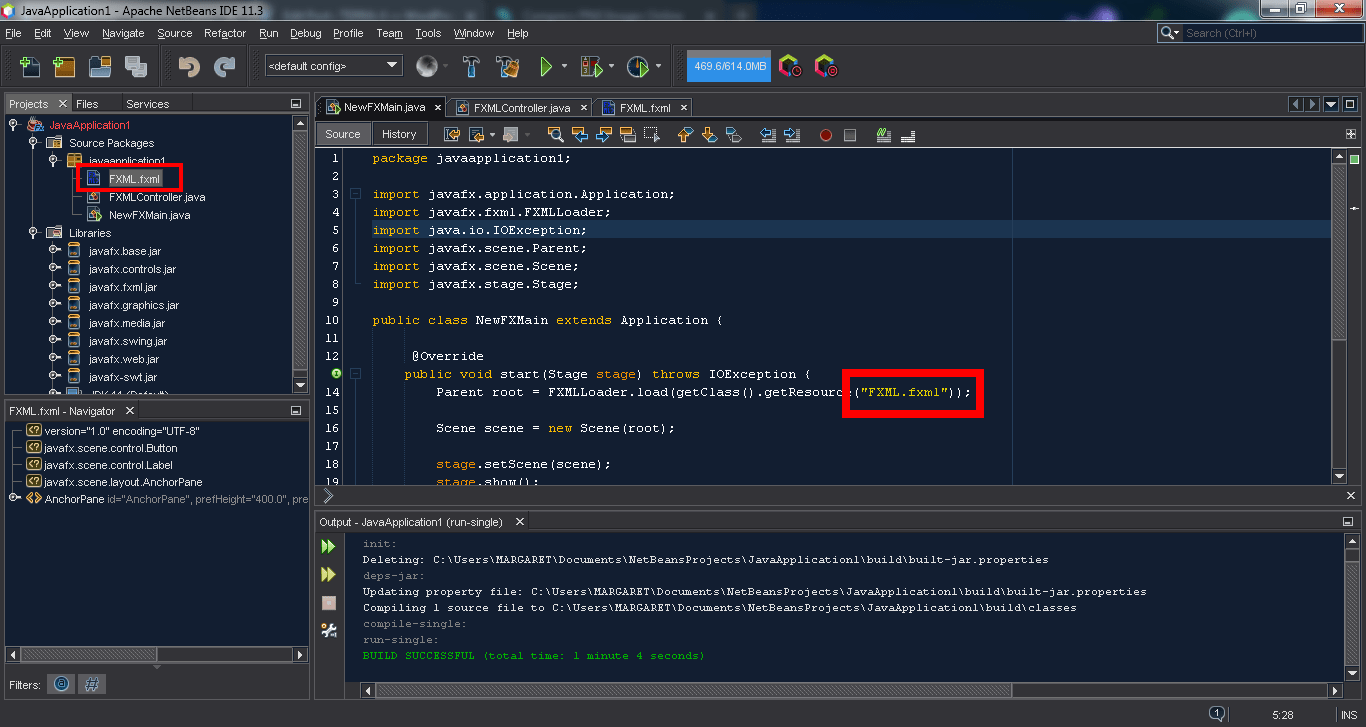 D) You can use the following source code to speed up your work.JAVAFX MAIN CLASS SOURCE CODEpackage javaapplication1;import javafx.application.Application;import javafx.fxml.FXMLLoader;import java.io.IOException;import javafx.scene.Parent;import javafx.scene.Scene;import javafx.stage.Stage;public class NewFXMain extends Application {@Overridepublic void start(Stage stage) throws IOException {Parent root = FXMLLoader.load(getClass().getResource(“FXML.fxml”));Scene scene = new Scene(root);stage.setScene(scene);stage.show();}public static void main(String[ ] args) {launch(args);}}E) Right-click on the FXML file in the top left pane of the main NetBeans IDE window, and click on <OPEN> to open it with Scene Builder.
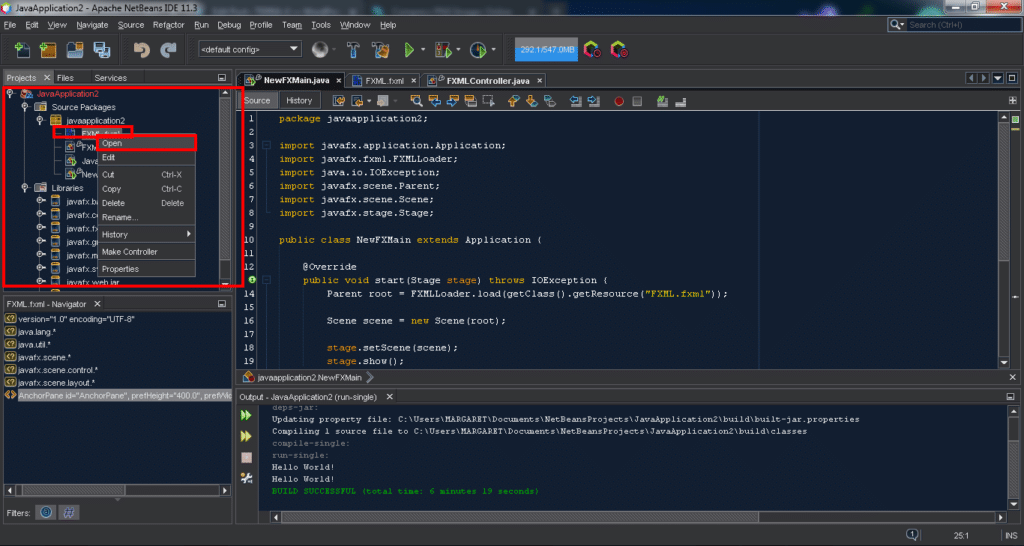 F) Add the <BUTTON> and <LABEL> components to your scene in Scene Builder.
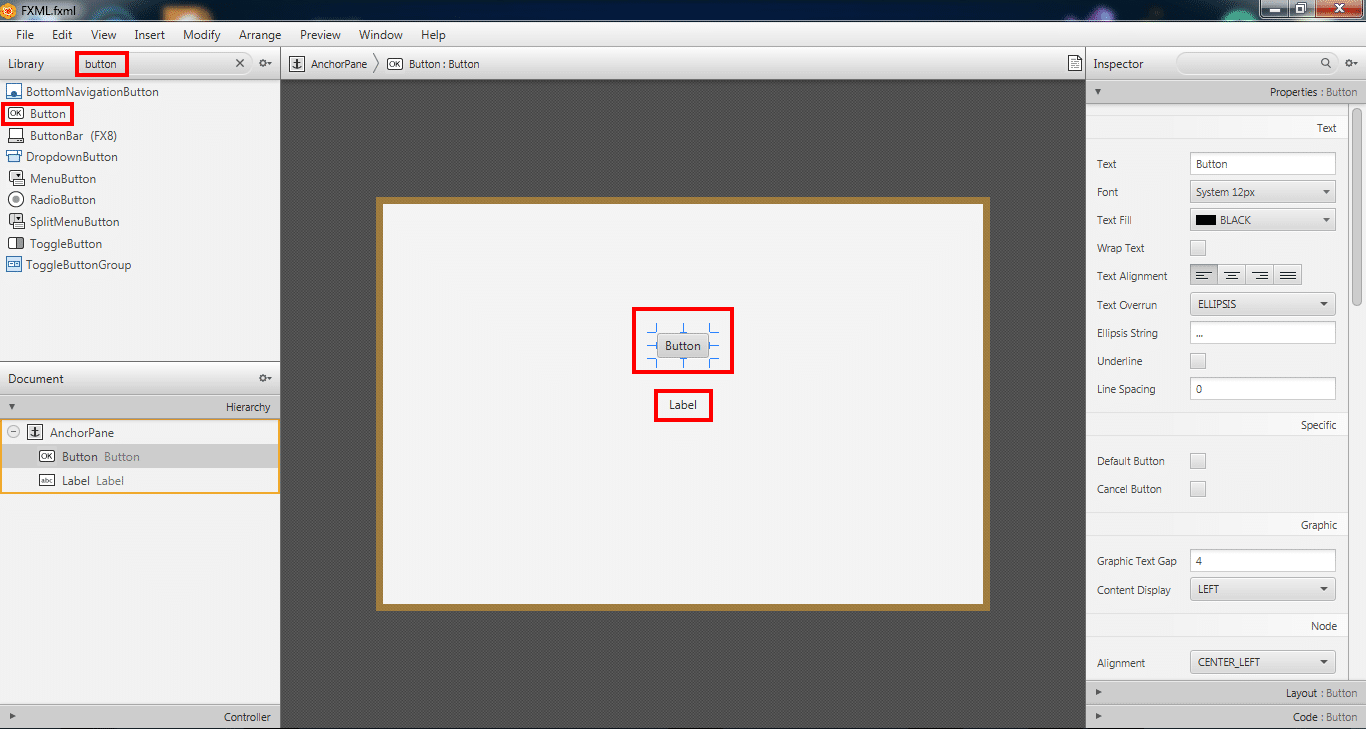 G) Give the components an fx:id. I decided to name my button as “buttonOne”, and my label “labelOne”. Define your button with its Action Event name, which will be used by the FXML Controller (Mine was named as “buttonAction”). Finally, save your scene in Scene Builder and get back to the NetBeans IDE.
 H) Update the controller with the new components added to the scene. Set the label text to switch to “Hello World” when the button is pressed. You can use the source code after the image to speed up your work.
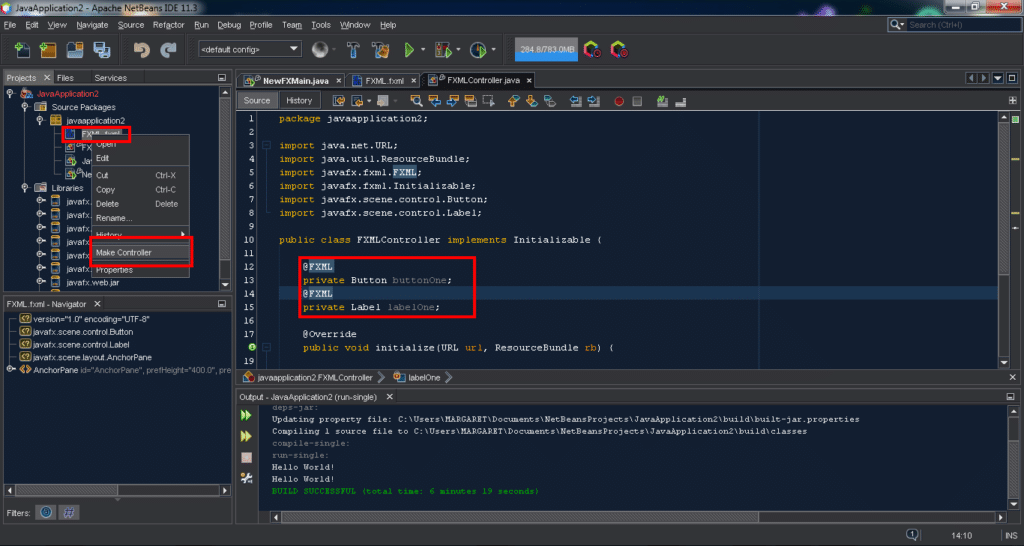 JAVA FXML CONTROLLER SOURCE CODEpackage javaapplication1;import java.awt.event.ActionEvent;import java.net.URL;import java.util.ResourceBundle;import javafx.fxml.FXML;import javafx.fxml.Initializable;import javafx.scene.control.Button;import javafx.scene.control.Label;public class FXMLController implements Initializable {@FXMLprivate Button buttonOne;@FXMLprivate Label labelOne;@Overridepublic void initialize(URL url, ResourceBundle rb) {
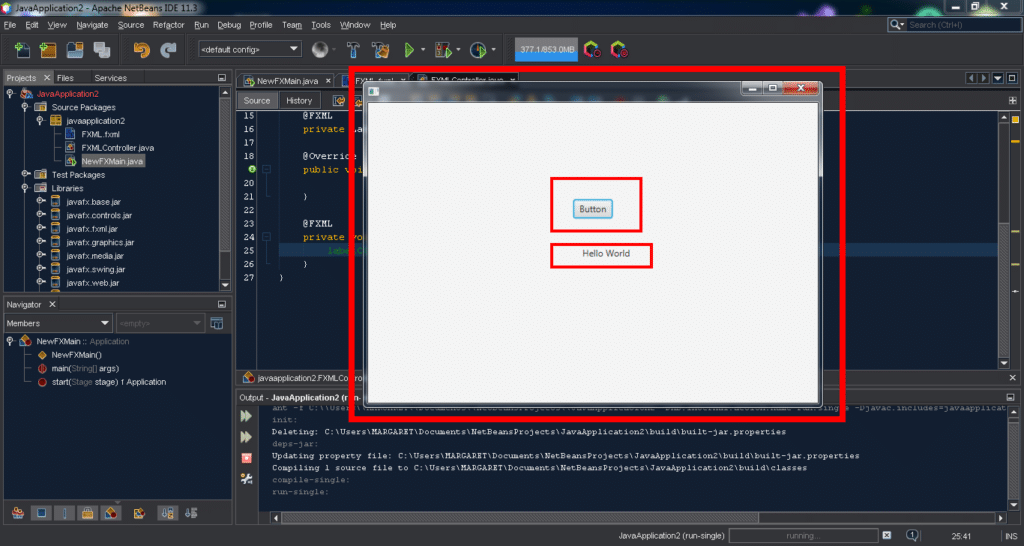
Conclusion on JavaFX Scene Builder Installation
Thanks for following up this tutorial until the end, the complete JAVA TEST PROJECT of this tutorial can be downloaded below. You can extract it, open it in NetBeans and use it to test if your configuration is working.
Download “JAVA TEST PROJECT”
JavaApplication1.rar – Downloaded 986 times – 7.42 MBHit the notifications and stay alert for our next set of tutorials which will involve building complete applications from scratch (start to finish), even for people who have never developed applications using Java before. For mobile users, you can switch to the desktop version of this website using the link at the bottom of the page and subscribe to our notifications.
In case of any problems, questions or suggestions, write them down in the comment section below, and they will be gladly responded to, as soon as they are seen.
Other Interesting Tutorials
- Fix Slow Windows 10 OS [Full Guide With Images]
- Avast BSOD Windows 10!!! How to Fix Easily and Quickly
Reference of JavaFX Scene Builder Installation
Common Questions & Answers
Yes, it can be installed on all major operating systems.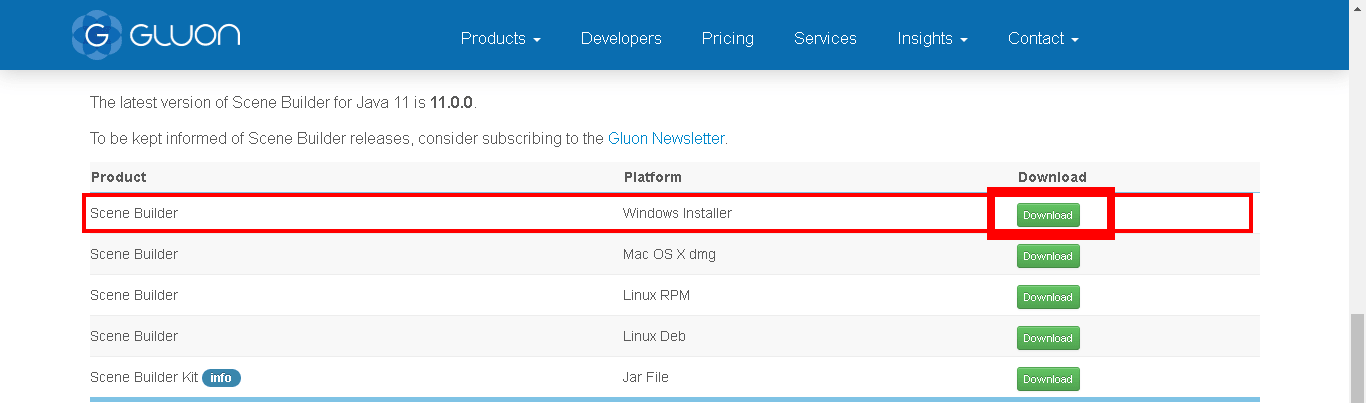
Yes, it can be installed on all major operating systems.
It may have been corrupt or poorly installed. Re-install Scene Builder, and point NetBeans to the re-installed Scene Builder, as seen in step 10 of this tutorial.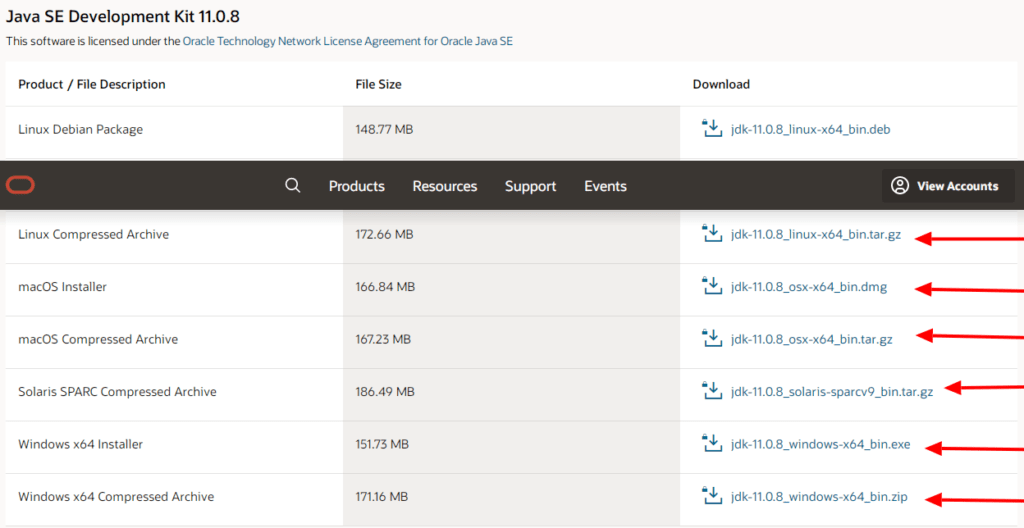
Yes, it can be installed on all major operating systems.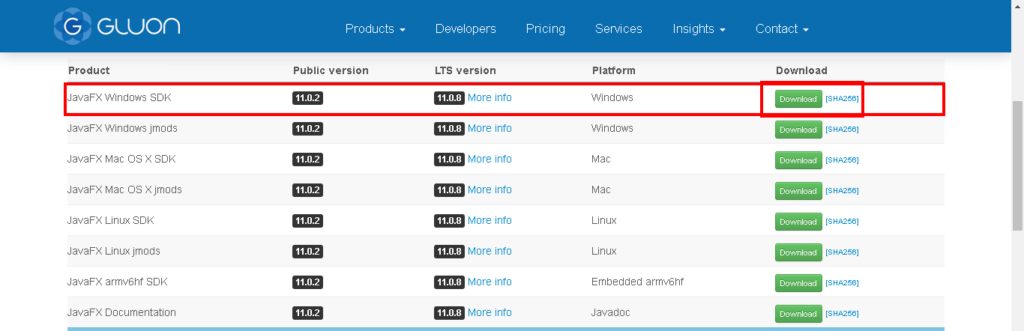
Yes, it can be installed on all major operating systems.
Re-install Scene Builder, and point NetBeans to the re-installed Scene Builder, as seen in step 10 of this tutorial.
Yes, it can be installed on all major operating systems.
Yes, it can be installed on all major operating systems.
Re-install Scene Builder, and point NetBeans to the re-installed Scene Builder, as seen in step 10 of this tutorial.
Yes, it can be installed on all major operating systems.
Yes, it can be installed on all major operating systems.