


Avast BSOD Windows 10!!! How to Fix Easily and Quickly
Introduction
Avast is an excellent anti-virus which grants users lots of protection. Their protection ranges from offline to online quality protection, which has gained the trust of many users.
But some times Windows OS users may encounter an error known as BSOD (Blue Screen of Death) while installing avast. In this article, we are going to show you how to get avast BSOD Windows 10 fixed in less than 30 minutes.
Avast BSOD Windows 10!!! How to Fix Easily and Quickly
Description
When this error occurs, the screen background will suddenly become blue and will display a message like ”Your PC ran into a problem, and needs to restart. We’re just collecting some error info, and then we’ll restart for you”.
This message may also come along with an error code like ”0xc000002fa”. This tends to be frustrating since you will continue to see the blue screen, error message and error code over and over even if you restart your PC.

Versions to Be Careful With
It was discovered that, this problems usually affect the following avast products;
- The Avast Premier 2015 R3 – 2016
- Avast Internet Security 2015 R3 – 2016
- The Avast Pro Antivirus 2015 R3 – 2016
- Avast Free Antivirus 2015 R3 – 2016
Troubleshooting Avast BSOD Windows 10
Time Needed : 30 minutes
When the blue screen occurs do not panic, just follow the steps below to quickly and easily fix the avast BSOD Windows 10.
Automatic Repair / Advanced Options
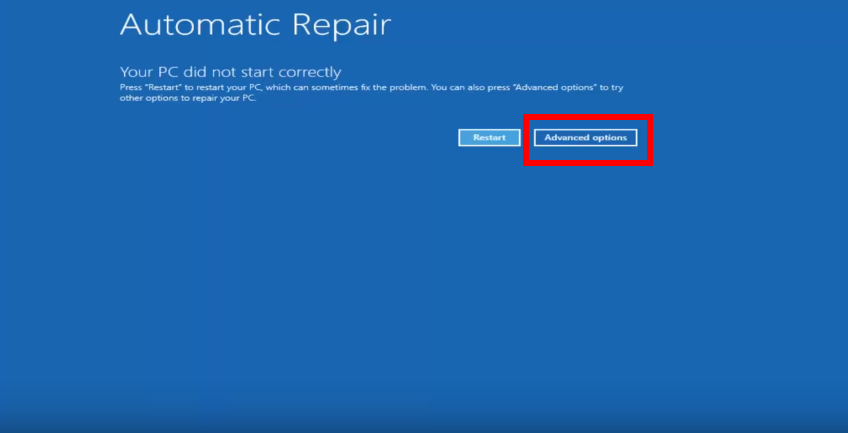
The first thing to do is to restart your PC in safe mode. To do this, from your blue screen of death window, just restart your PC (using hard power off with your power button if necessary) until you see a window with a title ”Automatic Repair” having 2 buttons namely;
The ”Restart” button on the left and the ”Advanced Options” button on the right.
Windows 10 OS will automatically launch the ”Automatic Repair” window after 3 times of Boot Up failure or after 3 times of BSOD error. When this window pops up, you will have to click on the ”Advanced Options” button on the right, as seen in the image below.
Choose an Option / Troubleshoot
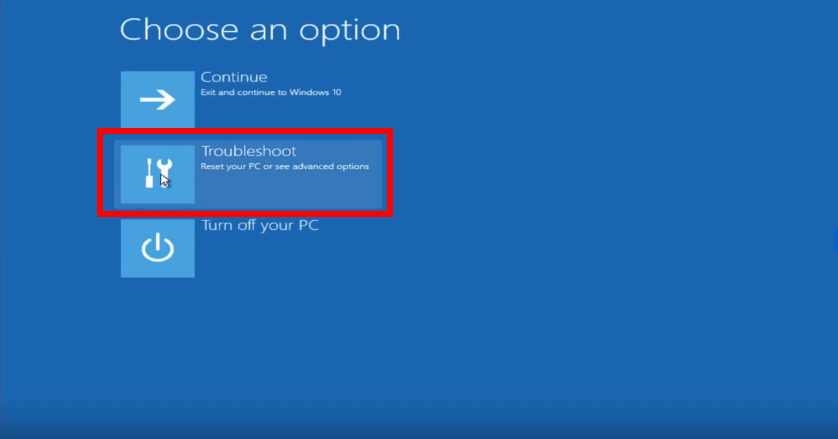
After clicking the ”Advanced Options” button, another window with the title ”Chose an Option” will pop up. When this window appears you should see 3 options namely;
The ”Continue” button on top, the ”Troubleshoot” button in the middle and the ”Turn off your PC” button at the bottom.
Click on the ”Troubleshoot” button in the middle as shown in the image below.
Troubleshoot / Advanced Options
The ”Troubleshoot” window is the next window that will pop up after having clicked the ”Troubleshoot” button on the previous window.
At this point, 2 buttons will appear namely;
The ”Reset This PC” button at the top, and the ”Advanced Options” button below. Click on the ”Advanced Options” button below, as shown in the following image.
Advanced Options / Startup Settings
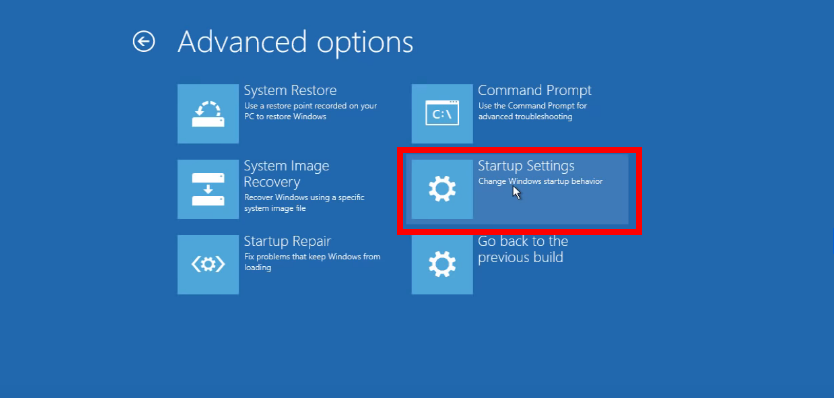
The ”Advanced Options” window is going to pop up next, after having clicked the ”Advanced Options” button on the previous window.
Alright! at this point, 6 buttons will appear and the one you will choose will be the ”Startup Settings” button, found in the middle on the right as illustrated in the image below.
Startup Settings / Restart
After clicking the ”Startup Settings” button, the ”Startup Settings” window will pop up. When this window appears you should see a list of the 7 Boot Up modes which Windows 10 OS provides and the ”Restart” button at the bottom right.
Clicking on the ”Restart” button at the bottom right, will proceed to restarting the PC and preparing all the Boot Up modes for Windows 10 OS. Click on the ”Restart” Button, as shown below.
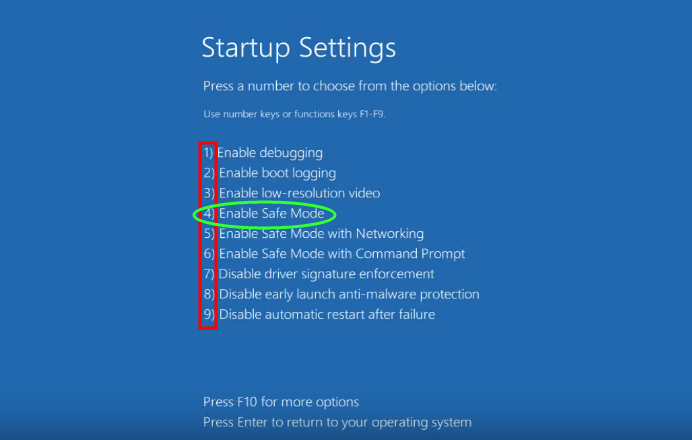
Startup Settings / Enable Safe Mode
After clicking the ”Restart” button the PC will restart and the ”Startup Settings” window will pop up again, but this time labeling each Boot Up mode with a number.
To Boot Up in safe mode, just press ”4” on your number pad, or press ”’F4” on your function key pad. Note that some PCs will require you to press and hold the ”Fn” key while you press the ”F4” key.
Sign in Windows OS
After booting up using ”Safe Mode”, Windows OS will Boot Up with its minimum functions. At a certain point you should see your lock screen.
If there is more than 1 user profile, make sure you select the user profile which has administrator rights. If you use a password, then you will have use it to sign in as usual.
After you login to your desktop you may also want to ensure that no other applications are running before you continue the next step.
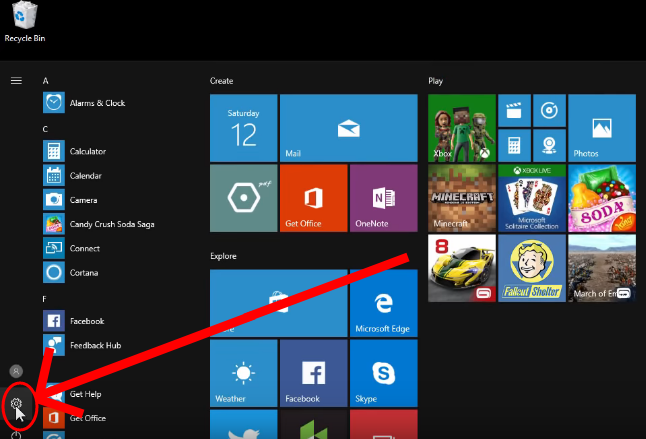
Start Menu
Open the ”Start” menu by either pressing the ”Windows” key on your keyboard, or by clicking the ”Start” button on the bottom left (on the task bar) of your desktop.
Once the ”Start Menu” is opened, click on the ”Settings” button (the gear-like icon) which is just above the power button as illustrated in the image below.
Settings / Apps
After clicking on the ”Settings” button, the settings panel will pop up with 10 different options in it. Just choose the ”Apps” option, found at the top right corner of the window, as shown in the image below.

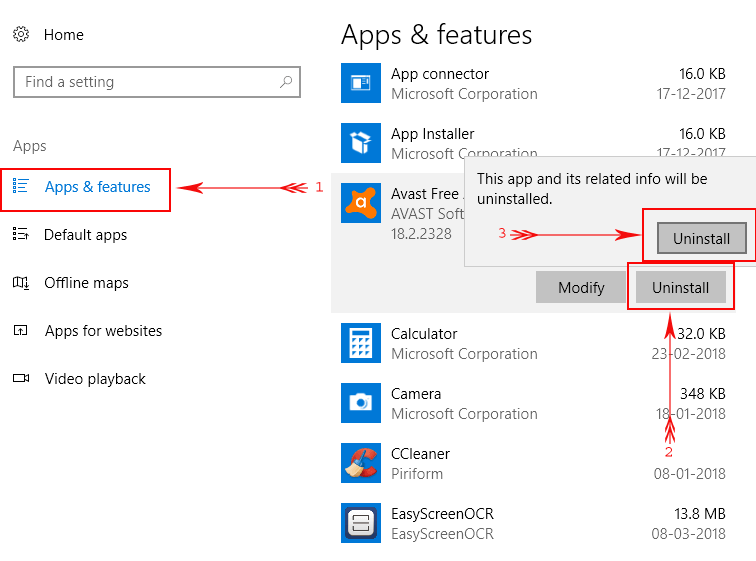
Apps and Features / Uninstalling Avast
Once in the ”Apps and Features” menu, search for avast antivirus application and click on it. A dialog box is going to pop up, showing the ”Modify” button on its bottom left and ”Uninstall” button on its bottom right.
Click the uninstall button found on the dialog box’s bottom right, to launch uninstallation procedure. If administrator rights are requested by avast accept and continue.
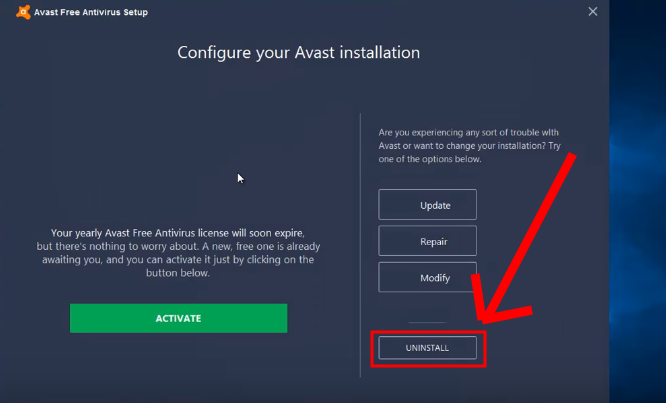
Uninstalling Avast Proper
After validating administrator rights in the pop up window, the avast setup wizard will launch. When the wizard launches an ”uninstall” button will be found at the bottom of the setup window.
The exact position of the ”uninstall” button might change, depending on the version to be uninstalled. You might want to check the window carefully and be sure of what you are clicking. This uninstallation procedure will be most applicable to the following avast products;
Avast Premium Security 19.x
Avast Free Antivirus 19.x
Avast Omni 1.x
Avast Premier 19.x
Avast Internet Security 19.x
Avast Pro Antivirus 19.x
Click the ”Uninstall” button to remove all avast files and make sure you click ”Yes” on the dialog box that follows immediately after, as shown in the image below.
Uninstalling Process
After clicking the ”Uninstall” button and the ”Yes” button in the resulting dialog box, the uninstalling process will begin and its progress will be indicated with a blue progress bar.

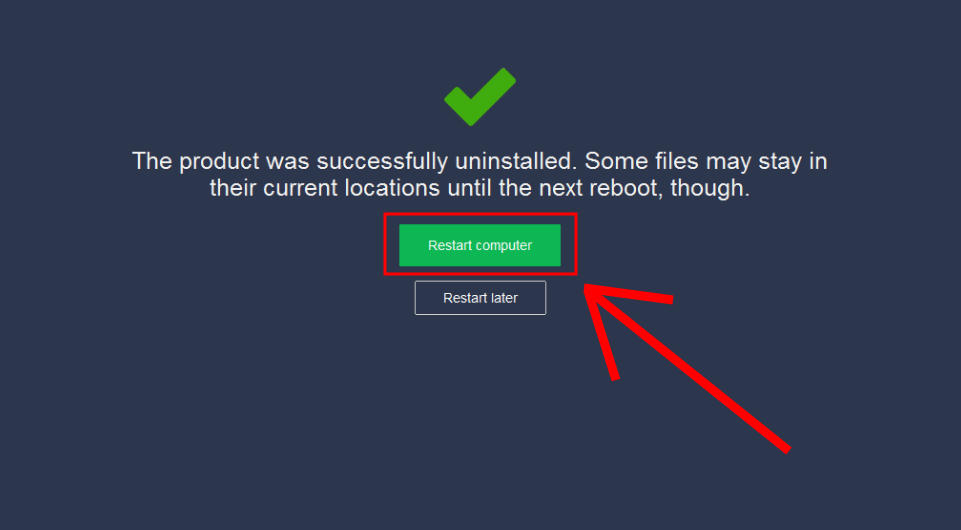
Restart Computer
When avast is done with its uninstallation, it will display a success message in its setup window and ask you to click the ”Restart” button, to quickly restart your computer or to click the ”Restart Later” button, to later restart your computer when you want.
Click the Restart button to quickly restart your computer, letting your computer boot normally this time. Click as shown in the image below.


Conclusion on Avast BSOD Windows 10
After restarting your PC, it should be fine and ready for use. We have also answered some commonly asked questions below, so you might want to take a look at them to further understand this problem.
More Info on This Problem Can Be Found Here
Bonus on Avast BSOD Windows 10
So, what do you think about this problem?
Have you ever encountered it?
Did you succeed to fix it?
Feel free to tell us in the comment section.
Other Interesting Articles
- Fix Slow Windows 10 OS [Full Guide With Images]
- Thunder Spy Assault: Vulnerability in Windows, Mac and Linux
- Kaspersky Causing Blue Screen [SOLVED]
- How To Speed Up Windows 11 [Full Guide With Images]
Some Frequently Asked Questions and Their Answers
Has avast fixed this issue?
Yes, avast released a patch which fixed this problem and makes it safe to perform an online installation of their anti-virus on any windows PC.
What causes BSOD (blue screen of death) when installing avast anti-virus?
This issue is mostly caused by incompatibilities between the user’s current version of windows and the user’s installed avast version. To avoid any issues, always install your avast using an online setup, so as to enable avast detect your system version and auto download the most compatible version of avast which can work with your system. Avoid trying to manually download avast and install offline.
Can avast cause BSOD (blue screen of death) to someone who installs the Windows 10 Anniversary Update?
Yes, this problem can occur to someone who installs the Windows 10 Anniversary Update on a computer which has avast already installed on it.
Can avast cause BSOD (blue screen of death) to someone who’s PC has the Intel Skylake CPUs with Intel® Virtualization Technology?
Yes, this problem can occur to someone who’s PC has the Intel Sky lake CPUs with Intel® Virtualization Technology enabled in their BIOS.
Can other installed anti-viruses cause BSOD (blue screen of death) of death?
Yes, as far as avast is concerned, any other anti-virus installed at the same time with avast may cause this error, due to incompatibility.
Is avast compatible with windows defender?
No, windows defender will deactivate when any other anti-virus is installed to avoid compatibility issues.


![How To Speed Up Windows 11 [Full Guide With Images]](https://terraexploration.space/wp-content/uploads/how-to-speed-up-windows-11-full-guide-with-images-324x160.jpg "How To Speed Up Windows 11 [Full Guide With Images]")