
Fix Error 0x80070490
Introduction
If you have issue 0x80070490 with the Windows 11 Mail App, you may not be able to send, receive, or view emails. This error number often indicates a problem with your system files or settings and stops the Mail App from functioning correctly.
Fortunately, you have a number of options for handling this situation and sending your email. You can follow the instructions on this page to figure out how to fix problem 0x80070490 with the Windows 11 Mail App.

Causes of Error 0x80070490
A message with the error code 0x80070490 may appear while attempting to utilize the Windows 11 Mail App. This error may be caused by a variety of issues, including incorrect security settings, damaged system files, and inaccurate user account information.
Incorrect User Account Information
The most frequent reason for Error 0x80070490 is incorrect user account information. If the user configured the Windows 11 Mail App with the incorrect credentials, this can occur. In order to resolve this issue, the user must ensure that the appropriate user account information is entered.
Incorrect Security Settings
Insufficient security settings can also result in error 0x80070490. If the user has chosen security settings that contradict with the Windows 11 Mail App, this can occur. In order to resolve this issue, the user must confirm that the proper security settings are enabled.
Corrupted System Files
Finally, the cause of Error 0x80070490 may be faulty system files. This can take place if a user installs malicious software or the system contracts a virus. To solve this issue, the user should conduct a full system scan with a current antivirus program.
Error 0x80070490 can be caused by a variety of issues, including incorrect user account information, improperly configured security settings, and corrupted system files. To resolve this issue, the user must ensure that the correct user account information is input, the necessary security settings are turned on, and the machine is checked for any malicious software or viruses.
Fixing Error 0x80070490
The error code for the Windows 11 Mail App is 0x80070490, and it shows when utilizing the program. This problem is typically the result of the user’s account settings or the Windows 11 Mail App itself.
Time Needed : 01 hours 30 minutes
The following 5 techniques can be used to remedy this issue:
Method 1: Run Windows Update Troubleshooter
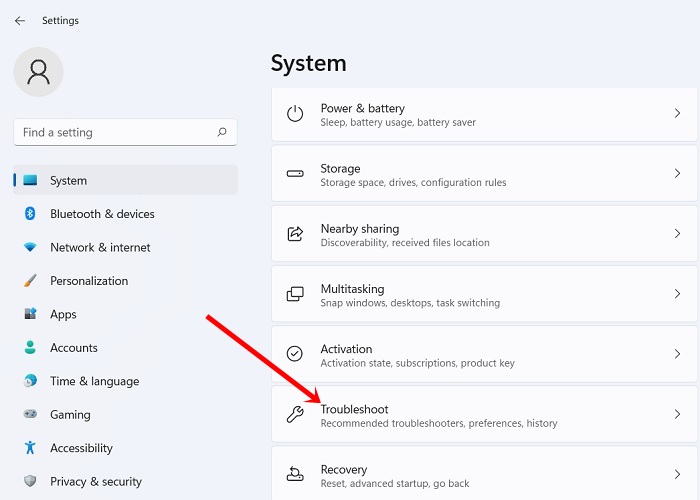
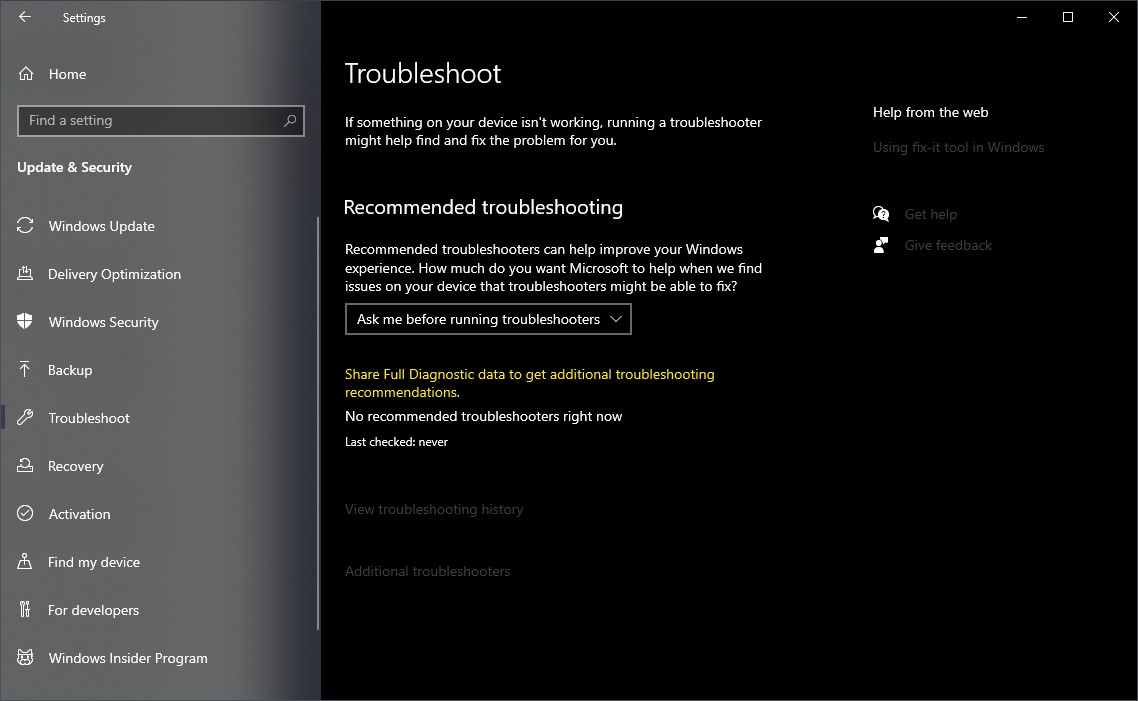
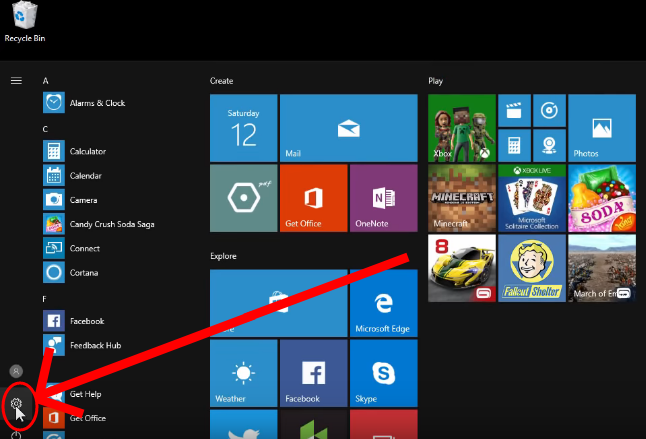
 You might be able to discover and resolve common problems with Windows updates, such as a broken Mail App, with the help of a built-in tool called the Windows Update Troubleshooter. To use this troubleshooter, follow these steps:1. By tapping the Windows key + I, you may open Settings. 2. Click update and secure.3. Choose Troubleshoot. 4. Select Windows Update by scrolling all the way down. 5. Launch the troubleshooter. 6. Allow the troubleshooter to search for and fix any Windows Update problems by according to the on-screen directions.
Method 2: Reset the Mail App
 The Mail App may be restarted to clear its cache and settings to fix issue 0x80070490. To reset the Mail App, adhere to these steps: 1. Press Windows key + I to open Settings. 2. You should choose your apps. 3. Select Calendar and Mail. 4. Select Advanced choices. 5. To reset, scroll down and choose it. 6. Click on Reset once again to confirm.
Method 3: Reinstall Mail App
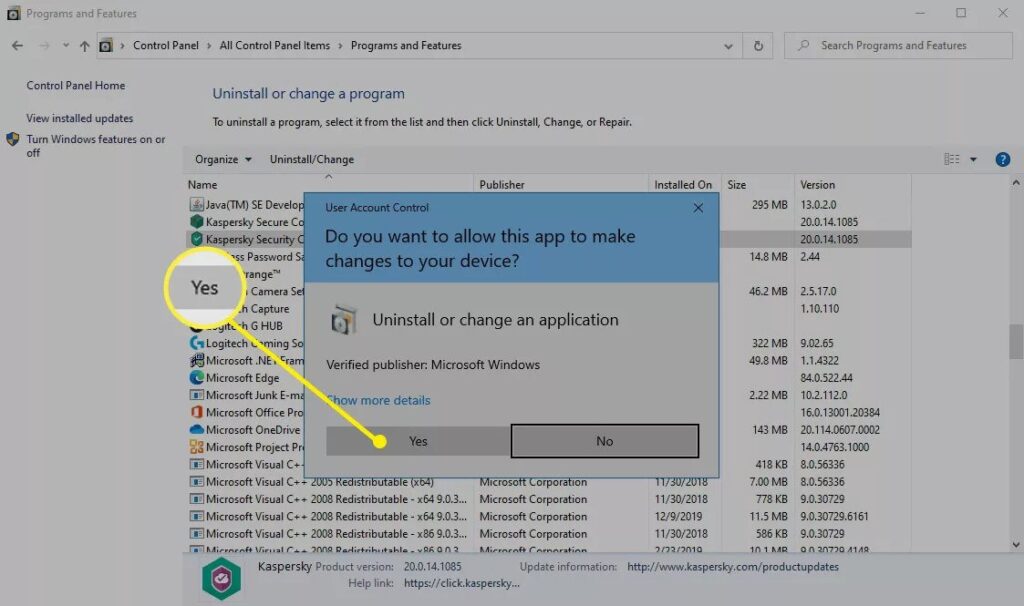
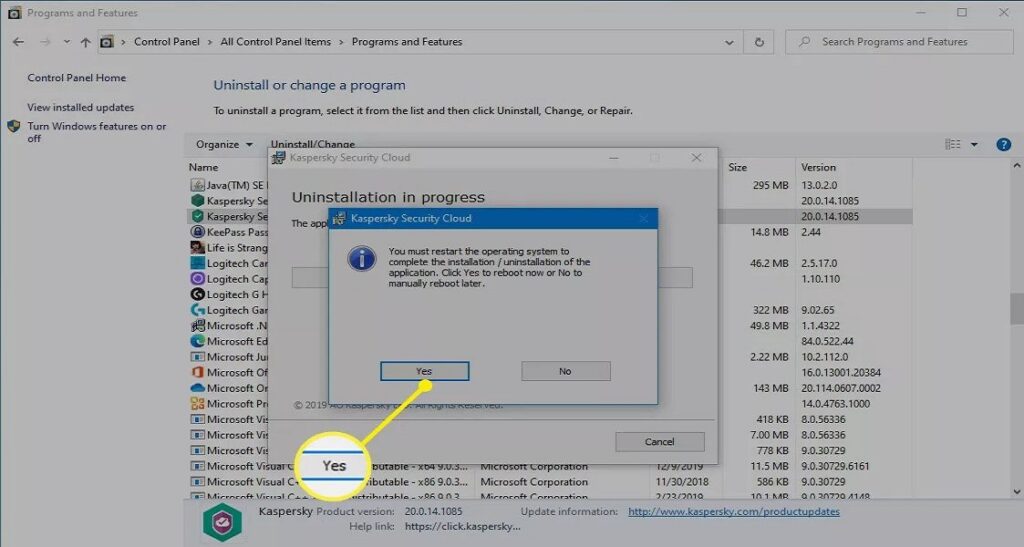
 If resetting the Mail App does not fix the issue, you can reinstall it from the Microsoft Store. To do this, adhere to the following guidelines: 1. Press Windows key + I to open Settings. 2. You should choose your apps. 3. Select Calendar and Mail. 4. Select Uninstall. 5. Re-click Uninstall to confirm. 6. Open the Microsoft Store now. 7. Look for Calendar and Mail. 8. Select Install.
 Method 4: Check System Files
 Error 0x80070490 might also be brought on by damaged or missing system files, which Mail App depends on. To validate and repair system files, adhere to the following steps: 1. Launch Command Prompt or Windows Power Shell by pressing the Windows key plus X. (Admin). 2. On the command line, type “sfc /scannow” (without quotation marks). 3. Give the system file checker permission to examine and fix any system file issues.
Method 5: Perform Clean Boot
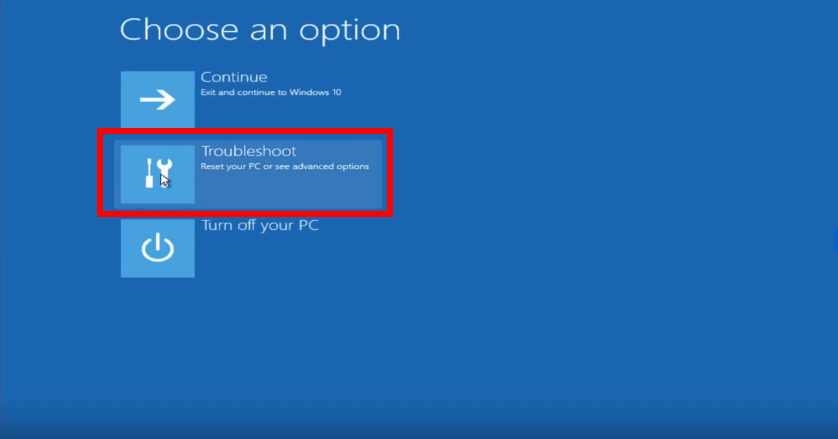
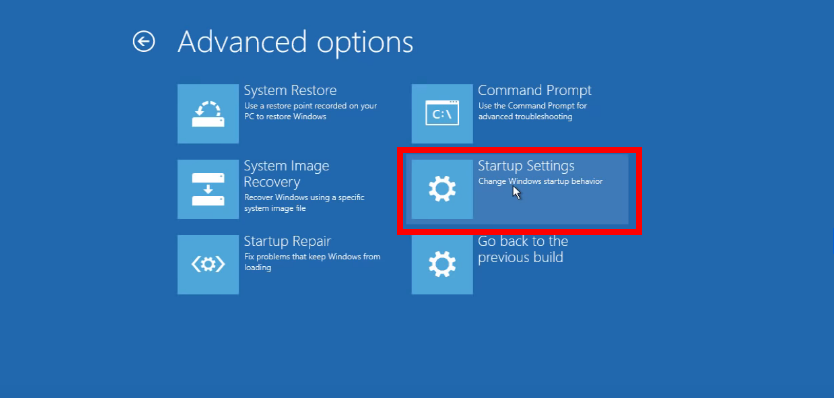
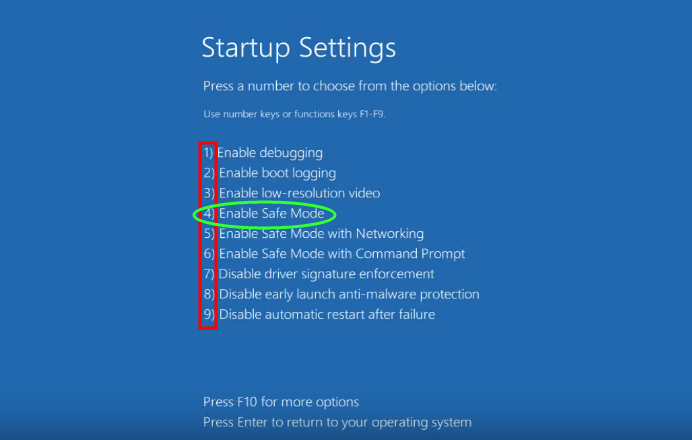
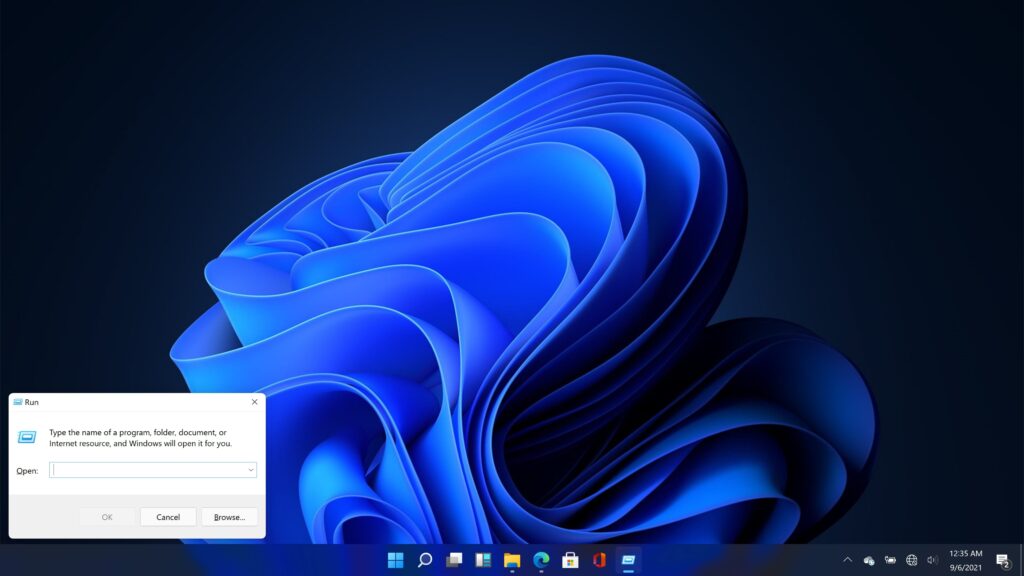
 A Clean Boot can assist you in locating and determining the root cause of issue 0x80070490 by stopping non-Microsoft services and launching applications that may conflict with Mail App. To do a clean boot, adhere to the following steps: 1. To launch Run, press Windows key + R. 2. Press Enter after entering “msconfig” (without the quotations). 3. Select Services. 4. “Hide all Microsoft services” is selected. 5. Then select “Disable all.” 6. Select Startup. 7. Then choose Open Task Manager. 8. Turn off all starting applications. 9. Shut off Task Manager. 10. Select OK. 11. Reboot your computer.
 You might be able to discover and resolve common problems with Windows updates, such as a broken Mail App, with the help of a built-in tool called the Windows Update Troubleshooter. To use this troubleshooter, follow these steps:1. By tapping the Windows key + I, you may open Settings. 2. Click update and secure.3. Choose Troubleshoot. 4. Select Windows Update by scrolling all the way down. 5. Launch the troubleshooter. 6. Allow the troubleshooter to search for and fix any Windows Update problems by according to the on-screen directions.
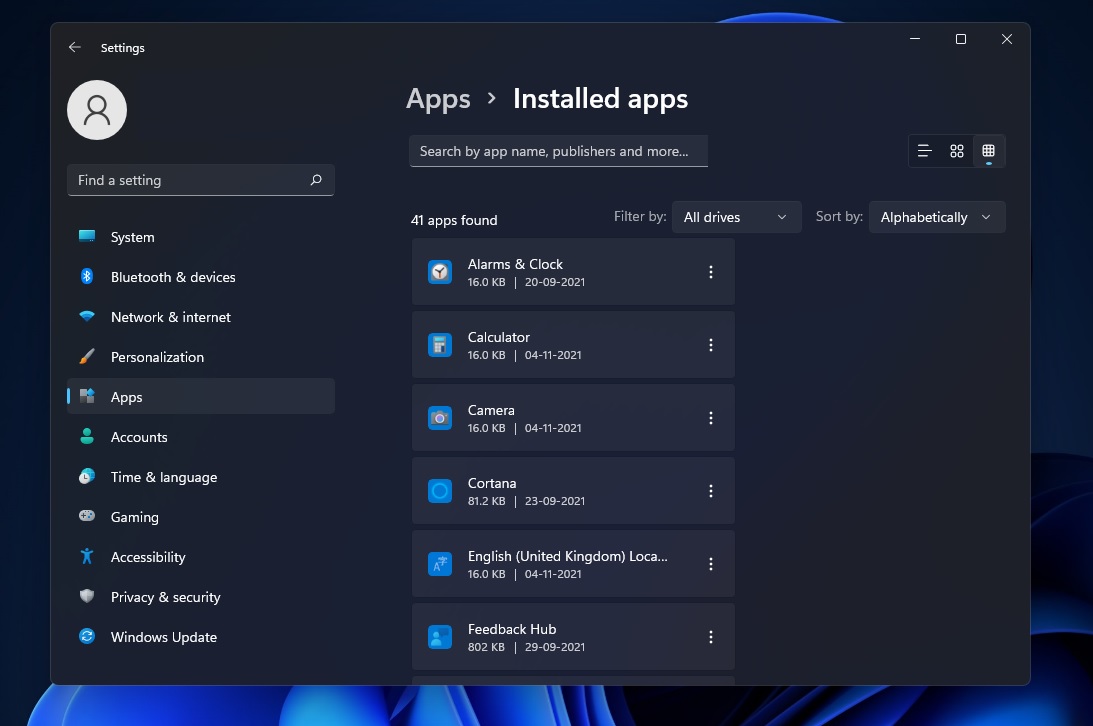 The Mail App may be restarted to clear its cache and settings to fix issue 0x80070490. To reset the Mail App, adhere to these steps: 1. Press Windows key + I to open Settings. 2. You should choose your apps. 3. Select Calendar and Mail. 4. Select Advanced choices. 5. To reset, scroll down and choose it. 6. Click on Reset once again to confirm.
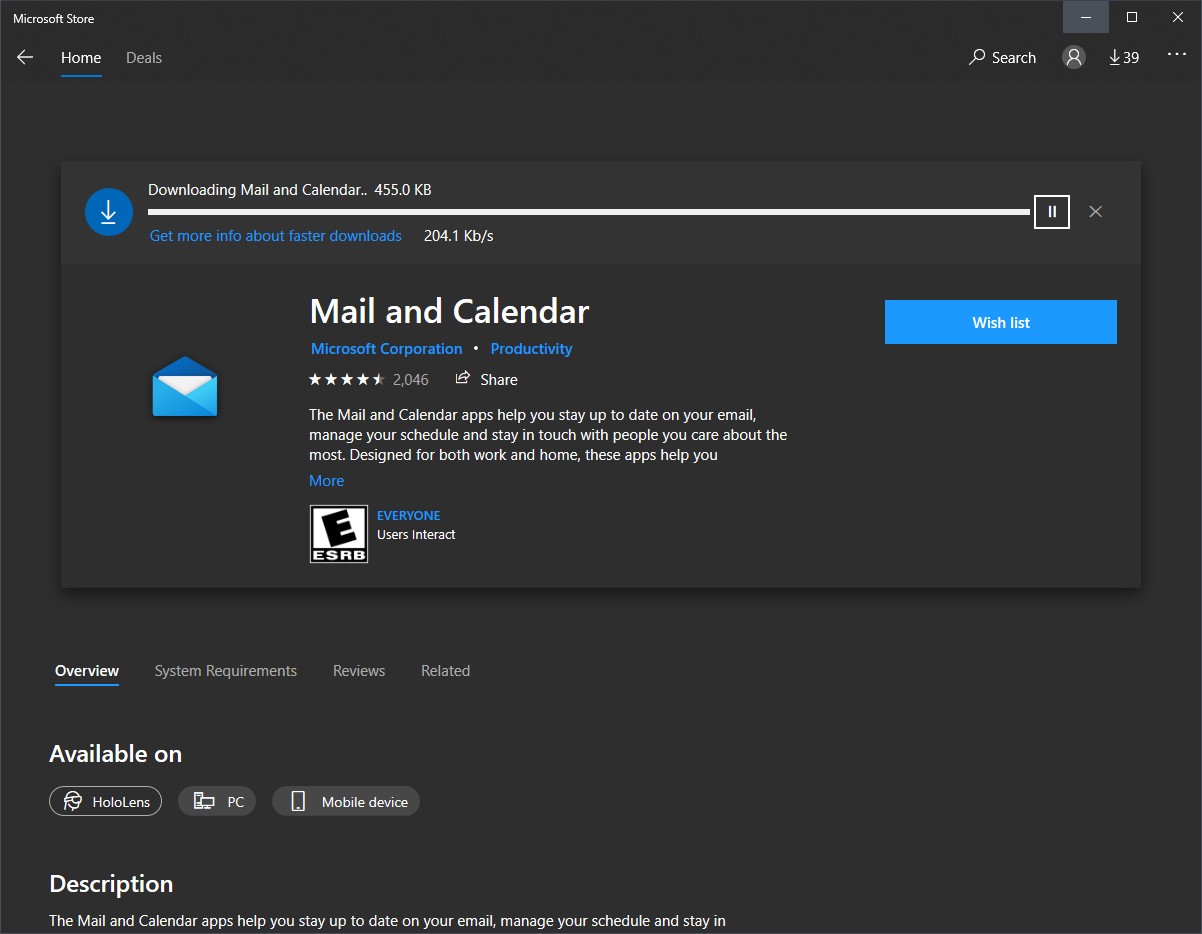 If resetting the Mail App does not fix the issue, you can reinstall it from the Microsoft Store. To do this, adhere to the following guidelines: 1. Press Windows key + I to open Settings. 2. You should choose your apps. 3. Select Calendar and Mail. 4. Select Uninstall. 5. Re-click Uninstall to confirm. 6. Open the Microsoft Store now. 7. Look for Calendar and Mail. 8. Select Install.
 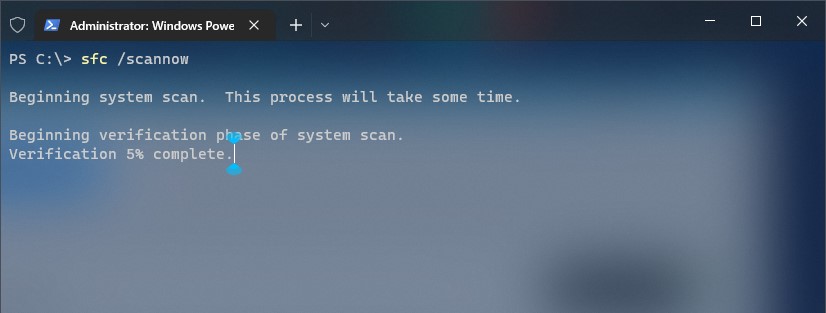 Error 0x80070490 might also be brought on by damaged or missing system files, which Mail App depends on. To validate and repair system files, adhere to the following steps: 1. Launch Command Prompt or Windows Power Shell by pressing the Windows key plus X. (Admin). 2. On the command line, type “sfc /scannow” (without quotation marks). 3. Give the system file checker permission to examine and fix any system file issues.
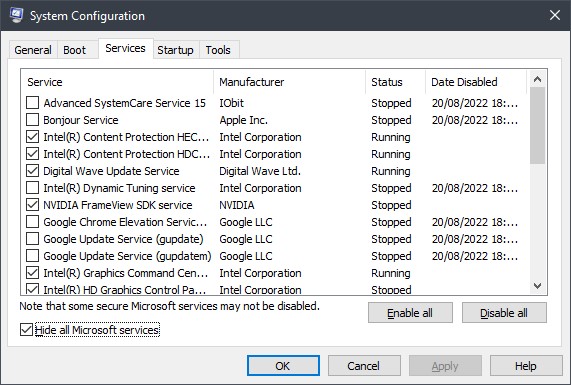 A Clean Boot can assist you in locating and determining the root cause of issue 0x80070490 by stopping non-Microsoft services and launching applications that may conflict with Mail App. To do a clean boot, adhere to the following steps: 1. To launch Run, press Windows key + R. 2. Press Enter after entering “msconfig” (without the quotations). 3. Select Services. 4. “Hide all Microsoft services” is selected. 5. Then select “Disable all.” 6. Select Startup. 7. Then choose Open Task Manager. 8. Turn off all starting applications. 9. Shut off Task Manager. 10. Select OK. 11. Reboot your computer.
 The following diagram visualizes the steps outlined in this article, making it easier to follow the instructions for troubleshooting error 0x80070490 on Windows 11 Mail App.
Mermaid Diagram:
Graph from Left to Right
A[Start] --> B[Press Windows key + I]
B --> C[Click on Update & Security]
C --> D[Click on Troubleshoot]
D --> E[Scroll down and click on Windows Update]
E --> F[Click on Run the troubleshooter]
F --> G[Follow the on-screen instructions]
G --> H[Press Windows key + I]
H --> I[Click on Apps]
I --> J[Click on Mail and Calendar]
J --> K[Click on Advanced options]
K --> L[Scroll down and click on Reset]
L --> M[Click on Reset again to confirm]
M --> N[Press Windows key + I]
N --> O[Click on Apps]
O --> P[Click on Mail and Calendar]
P --> Q[Click on Uninstall]
Q --> R[Click on Uninstall again to confirm]
R --> S[Open Microsoft Store]
S --> T[Search for Mail and Calendar]
T --> U[Click on Install]
U --> V[Press Windows key + X]
V --> W[Type "sfc /scannow" (without quotes)]
W --> X[Wait for the system file checker to scan and repair any problems with system files]
X --> Y[Press Windows key + R]
Y --> Z[Type "msconfig" (without quotes)]
Z --> A[End]
Even while error 0x80070490 in the Windows 10 Mail App is annoying, it is not harmful. By following the recommendations in this article, you may locate and resolve this problem with ease. Reinstall or reset the Mail App, check the system files, use the Windows Update Troubleshooter, and, if necessary, do a clean boot.
Conclusion
Contact Microsoft Support or a qualified expert if none of these fixes works. You should be able to use your Windows 10 Mail App to send and receive emails with simplicity and reliability after using these methods to resolve issue 0x80070490.
We really hope that our page was helpful in laying out the steps necessary to help you address this problem. Use the space below to leave any comments or questions. If you found this information useful, please share it with others who might be experiencing a like problem.
Thank you for reading, and we wish you a successful resolution of your Mail App error.

Some Frequently Asked Questions and Their Answers
What does error code 0x80070490 mean in the Windows 11 Mail app?
Error code 0x80070490 in the Windows 11 Mail app typically indicates that there is a problem with the app’s files or settings. Specifically, the error suggests that there is a file missing or corrupt in the Windows registry, preventing the Mail app from functioning properly.
What are the common causes of error 0x80070490 in the Mail app?
The most common causes of error 0x80070490 in the Mail app on Windows 11 include corrupt system files, an outdated or corrupted Mail app, issues with the Windows registry, a problem with the user account, or an issue with the Windows 11 operating system itself.
How can I troubleshoot error 0x80070490 in the Mail app on Windows 11?
To troubleshoot error 0x80070490 in the Mail app on Windows 11, users can try several solutions, including resetting the Mail app, repairing corrupt system files using the System File Checker tool, running a malware scan, or using the Deployment Imaging and Servicing Management tool.
Is there a specific fix for error 0x80070490 in the Mail app on Windows 11?
Yes, there are several fixes for error 0x80070490 in the Mail app on Windows 11, including resetting the Mail app, repairing corrupt system files, reinstalling the Mail app, or performing a system restore. Users can also try updating the Mail app or performing a clean boot of the system.
Can I uninstall and reinstall the Mail app to fix error 0x80070490?
Yes, uninstalling and reinstalling the Mail app can sometimes fix error 0x80070490 in Windows 11. To do so, users can open the PowerShell command prompt as an administrator, enter the appropriate command to uninstall the app, and then reinstall it from the Microsoft Store.
Will resetting the Mail app resolve error 0x80070490 on Windows 11?
Resetting the Mail app can sometimes resolve error 0x80070490 on Windows 11. This solution will delete the app’s data and settings, and restore it to its default state. To reset the Mail app, users can open the app’s settings, select “Reset”, and then follow the prompts to complete the process.
Does error 0x80070490 in the Mail app affect other Windows 11 apps?
Error 0x80070490 in the Mail app on Windows 11 does not typically affect other apps on the system. However, if the error is caused by a larger issue with the Windows 11 operating system, it is possible that other apps may also be affected.
Can I use third-party software to fix error 0x80070490 in the Mail app?
Yes, there are several third-party software programs that claim to fix error 0x80070490 in the Mail. But be careful what kind of software you install on your PC. If the standard fixes for this problem don’t work, then it is recommended to contact Microsoft or any accredited technician for support.


 A built-in program called the Windows Update Troubleshooter may be able to assist you identify and fix frequent issues with Windows updates, such failing Mail App. Follow these instructions to launch this troubleshooter: 1. You may access Settings by pressing Windows key + I. 2. Click update and secure. 3. Choose Troubleshoot. 4. Select Windows Update by scrolling all the way down. 5. Launch the troubleshooter. 6. Allow the troubleshooter to search for and fix any Windows Update problems by according to the on-screen directions.
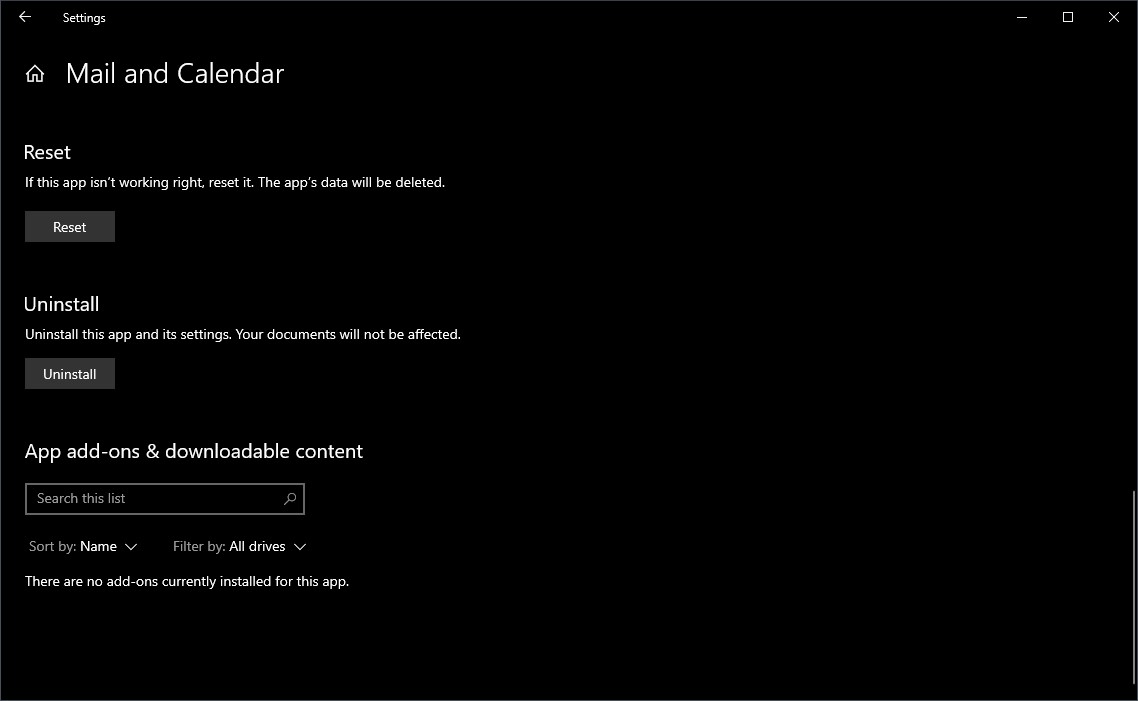 To resolve problem 0x80070490, the Mail App may be reset to remove its cache and settings. Follow these steps to reset the Mail App: 1. Press Windows key + I to open Settings. 2. You should choose your apps. 3. Select Calendar and Mail. 4. Select Advanced choices. 5. To reset, scroll down and choose it. 6. Click on Reset once again to confirm.


![How To Speed Up Windows 11 [Full Guide With Images]](https://terraexploration.space/wp-content/uploads/how-to-speed-up-windows-11-full-guide-with-images-696x465.jpg "How To Speed Up Windows 11 [Full Guide With Images]")
![How To Speed Up Windows 11 [Full Guide With Images]](https://terraexploration.space/wp-content/uploads/How-To-Speed-Up-Windows-11-Full-Guide-With-Images61.jpg)
![How To Speed Up Windows 11 [Full Guide With Images]](https://terraexploration.space/wp-content/uploads/How-To-Speed-Up-Windows-11-Full-Guide-With-ImagesBanner20-1024x576.png)
 B) While in the run app, type ”msconfig.exe” and hit enter to launch the ”System Configuration” menu.NB: OK, SO AS FROM HERE YOU’VE GOT TO BE VERY CAREFUL BECAUSE YOU DON’T WANT TO MESS UP WITH YOUR BOOT-UP PROCESS SO DO ONLY WHAT IS SHOWN IN THIS TUTORIAL.
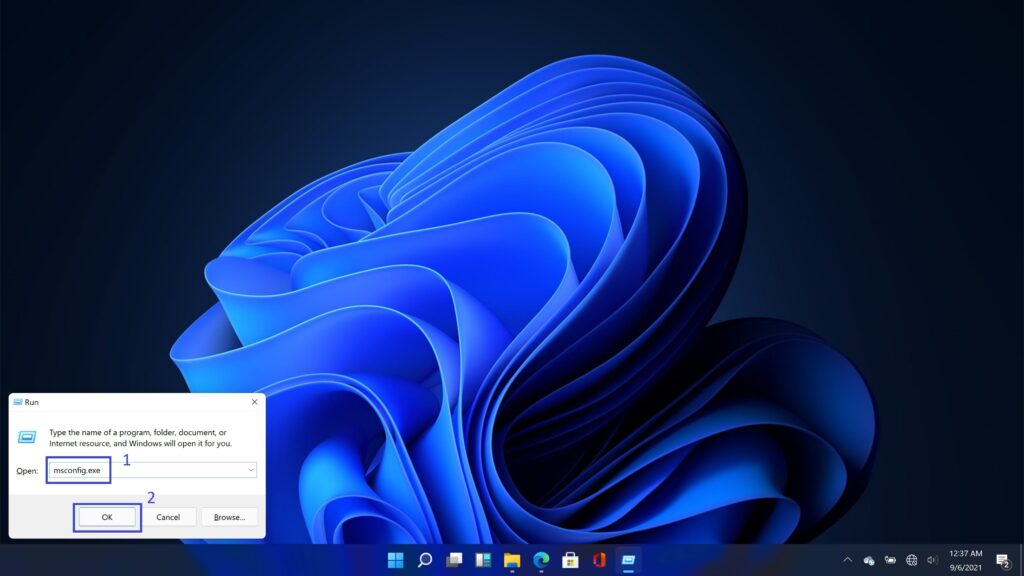 C) Click on the ”Boot” tab, which is the second tab from the left.
 D) While in the boot tab, hit the ”Advanced options” button.
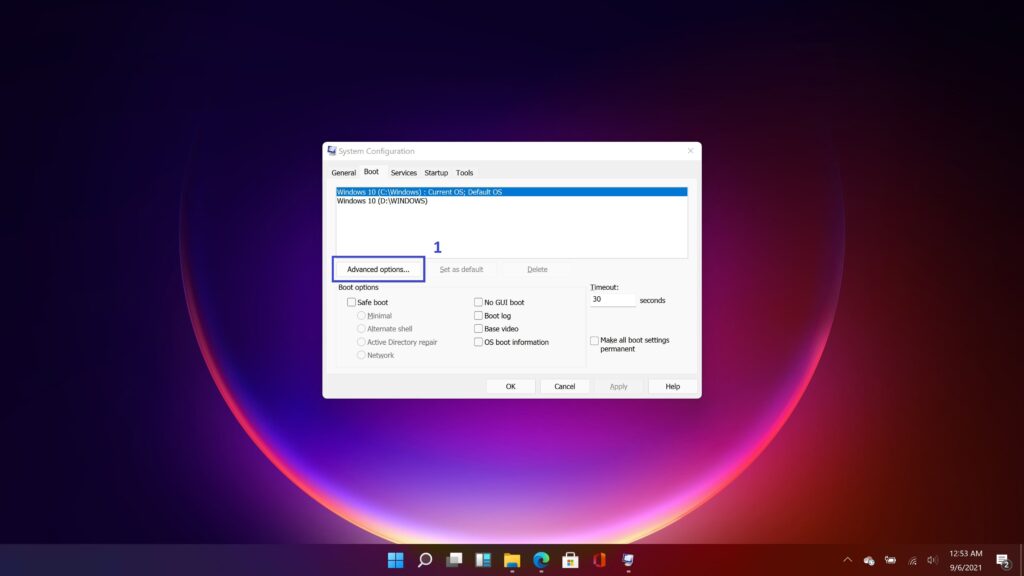 E) A new window will pop up. At its top left side, you will find a checkbox labeled ”Number of processors’‘ with a drop-down menu containing the total number of processors.F) At the top right of this window, appears a checkbox labeled ”Maximum memory” with an input value box under it.G) Check the box labeled ”Maximum number of processors”, click the drop-down menu under it, and select the highest value in that menu. This sets the Windows OS to use the highest number of threads available on your PC, which will go a long way in fixing a slow Windows 11 OS.H) Check the box labeled ”Maximum memory”, adjust the values to reach the PC’s maximum RAM then click ”OK” at the bottom of the window.This will automatically set Windows OS to use the maximum available memory (RAM), which can greatly contribute to fixing a slow Windows 11 OS.I) Click ”Apply” in the MS-Config window and click ”OK” to confirm changes then restart Your PC.
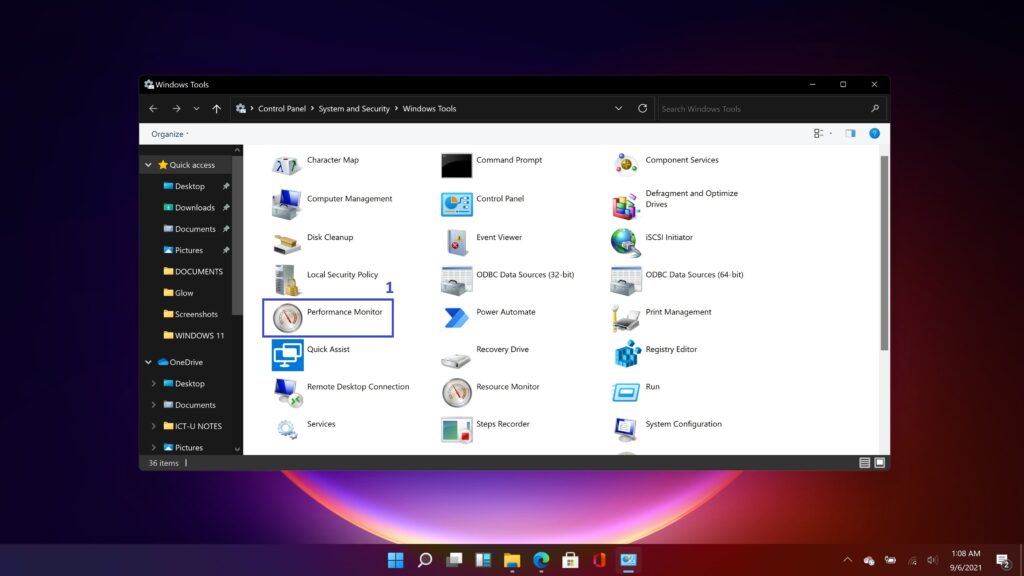 B) In the ”Performance Monitor” left side pane, click on the ”Data Collector Sets” drop-down menu.C) Under “data collector sets”, click ”User Defined”.D) Right-click within the main window pane and select ”New>Data Collector Set” in the expansion menu.
 E) In the new window, rename the data collector set and click ”Create manually (Advanced)” then click on ”Next”.
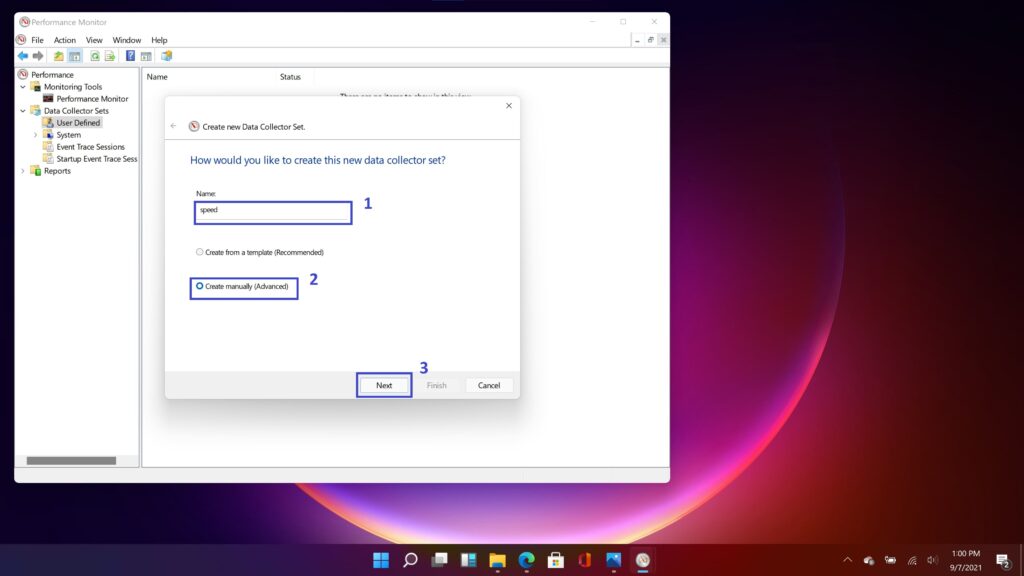
 G) In the next window, click ”Add” at the top right.
 H) At the bottom left pane of the next window scroll down to the highest number you see and click the ”Add” button.
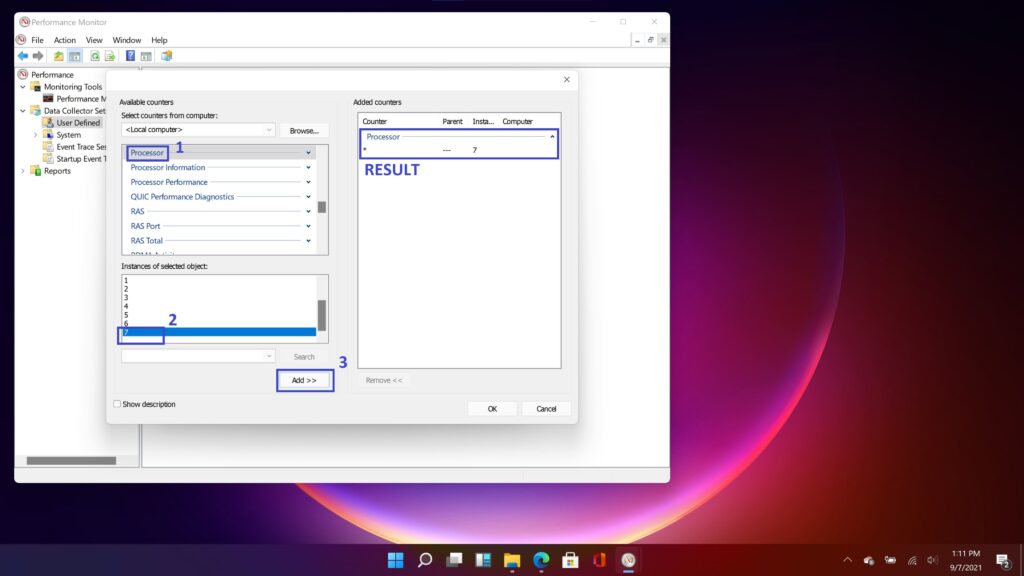 I) In the top-left pane, scroll down to process and click the drop-down menu arrow, then scroll down to the ”Thread Count” select it, and click ”Add”.
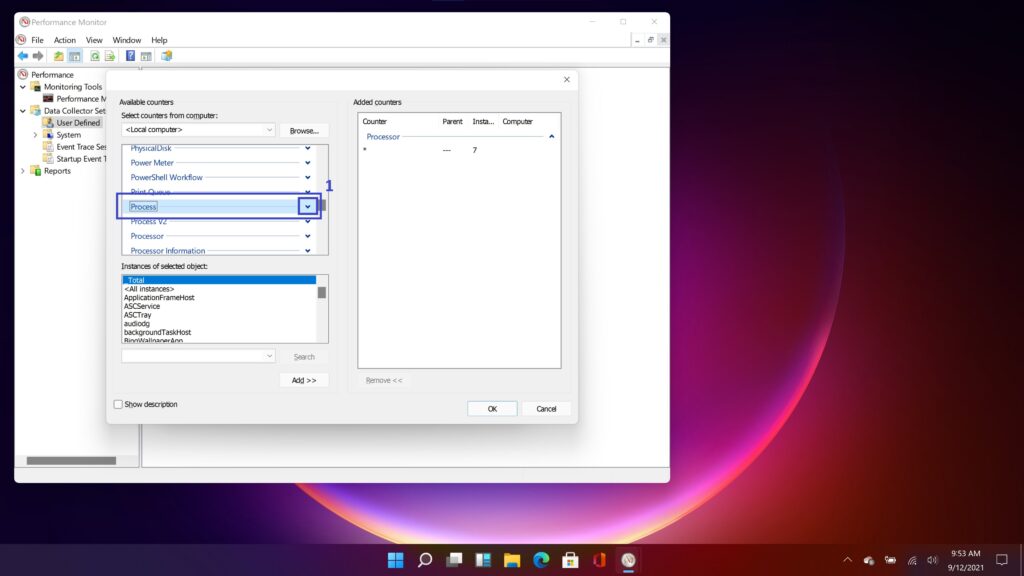
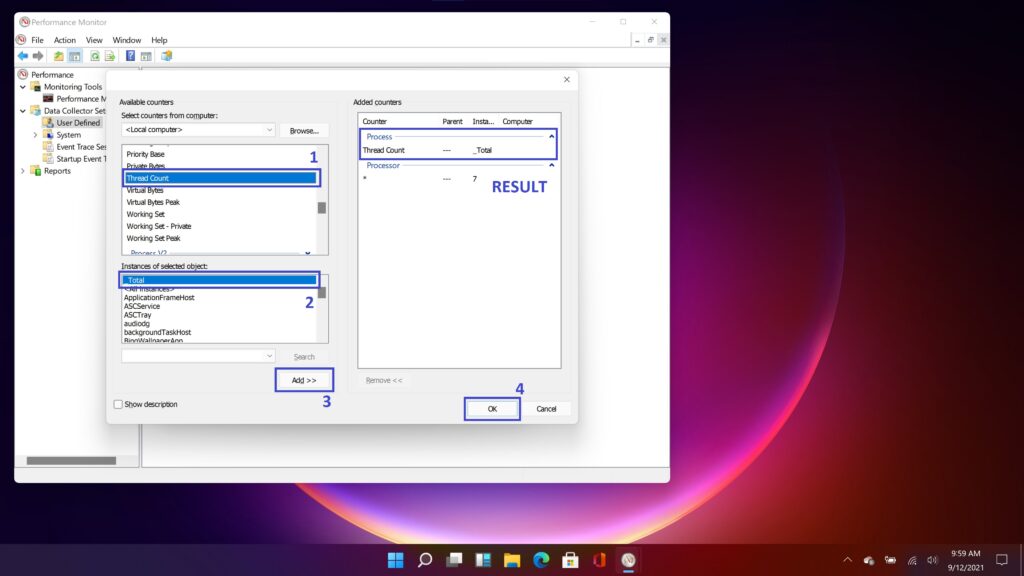 This will make Windows OS detect the threads which were activated using the system configuration menu and will, in turn, dedicate applications to use them.
 J) Click ”OK” on this window, then click ”Next” till the last window where you will select the ”Save and close’‘ option, then click on ”Finish”.
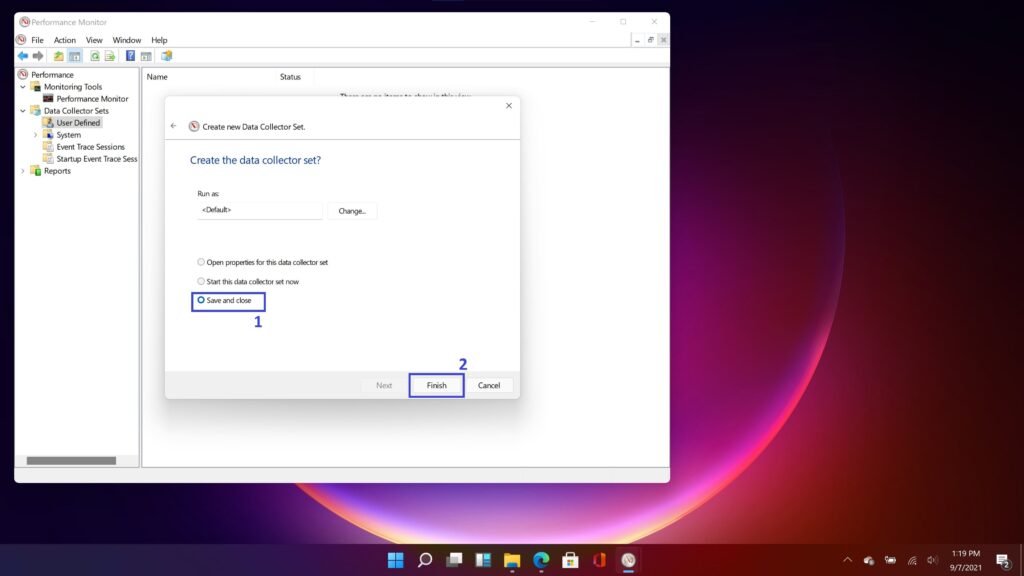 You will notice a cube-like icon in the performance monitor window, which is a save profile of your configuration and will take place immediately after a Fresh Reboot.
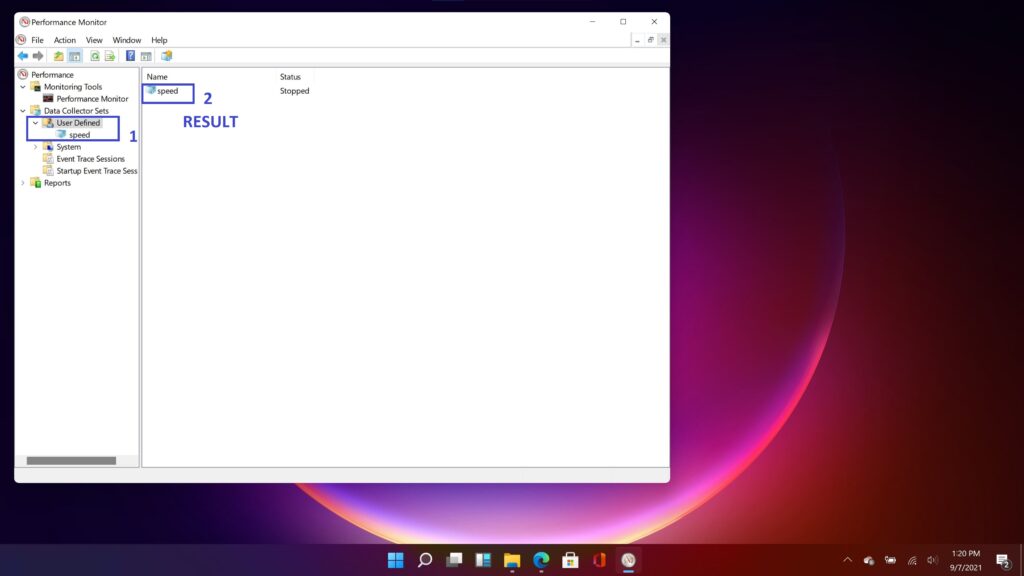
 B) Within the opened window right-click on any empty space and click properties. This will open the ”System Properties” window.
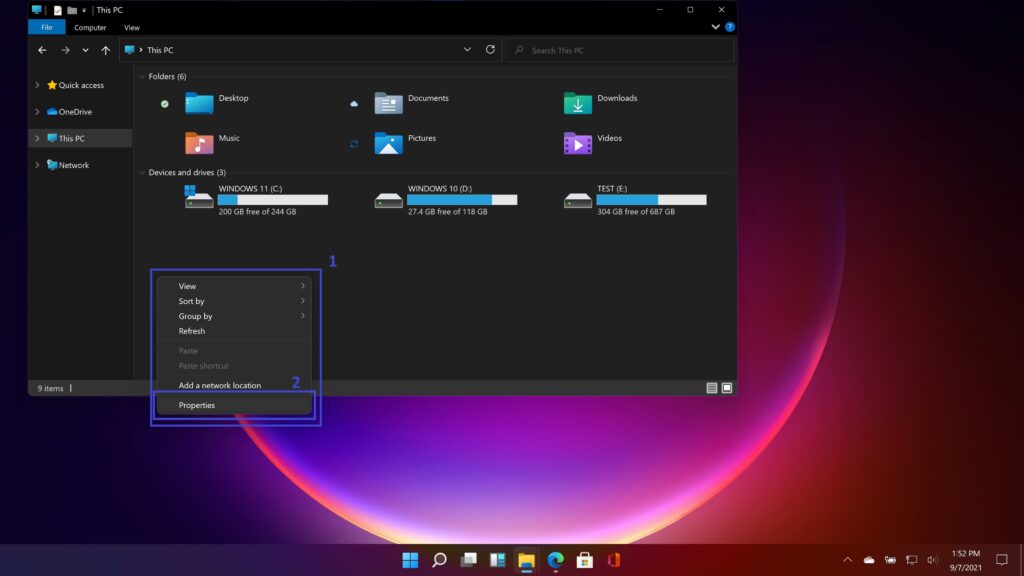 C) On the main window-pane of the newly opened window click on ”Advanced system settings” which will open the ”Advanced” tab within the “Advanced properties window“, with administrator privileges.
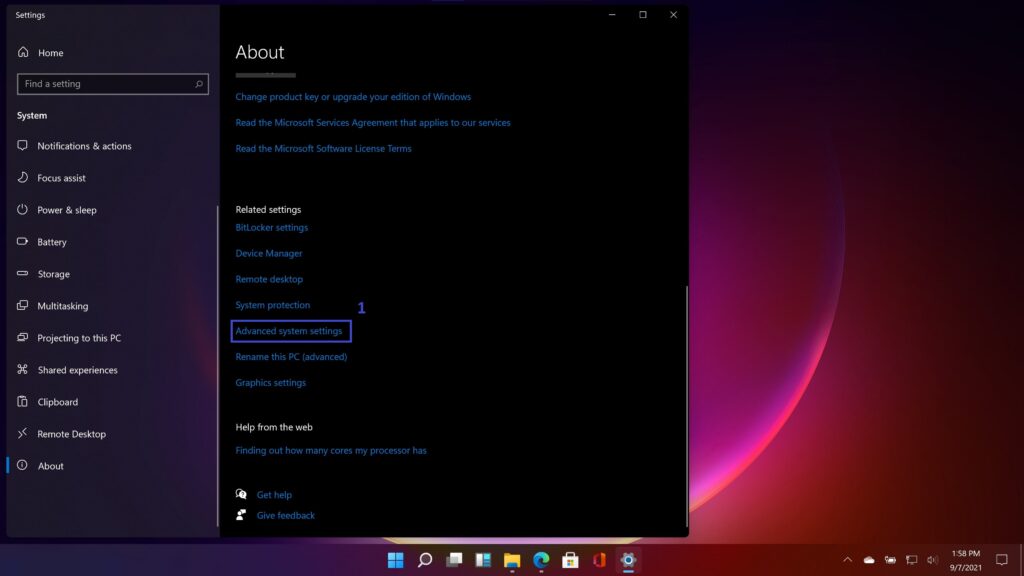 D) In the ”Advanced” tab, click on ”Settings” to open the ”Performance” menu.
 E) In the newly opened window, you can select the option ”Let Windows choose what is best for my computer”.If you are looking forward to boosting a low-end PC, select ”Adjust for best performance” but Note that your windows interface appearance will greatly be sacrificed to free the RAM for more performance.
 F) Within that same window, click the ”Advanced” tab, which is next to the “Visual Effects” tab, then click the ”Change” button under that tab.In the newly opened window, we will be trying to increase the available RAM by borrowing some memory from the hard disk drive to add to the existing RAM.This can be a big booster to a PC and can help you speed up Windows 11 PC.
 G) In the ”Virtual Memory” window, uncheck the box for ”Automatically manage paging file size for all drives” at the top, to unlock all other options in this window.Select the drive where Windows 11 OS is installed.H) Select the ”Customize size” option below, which will permit you to edit your paging file size.I) In the ”Initial size” section enter your default PC RAM size in megabytes.My RAM is 16 GB, but since 1024 MB makes 1 GB my initial size will be 1024 x 16 giving 16384 MB.
 J) The next thing is to enter the ”Maximum size in (MB)”. Now don’t just go putting crazy figures because you want to increase your performance. There is an optimum value that can be input.To get this value, the rule of thumb is to first multiply your actual RAM by 1.5 and add the answer to your actual RAM.Next, multiply all your GB values by 1024 to convert them to MB values.For example;My RAM is 16 GB so we have to multiply 16 x 1.5 = 24Then add 24 + 16 = 40And finally multiply 40 x 1024 = 40960 MB.We can then type the value 40960 in the ”Maximum size in (MB)” box.(Feel free to correct my math in the comments)K) Click on ”Set”, ”Apply”, ”OK” and Restart your PC.
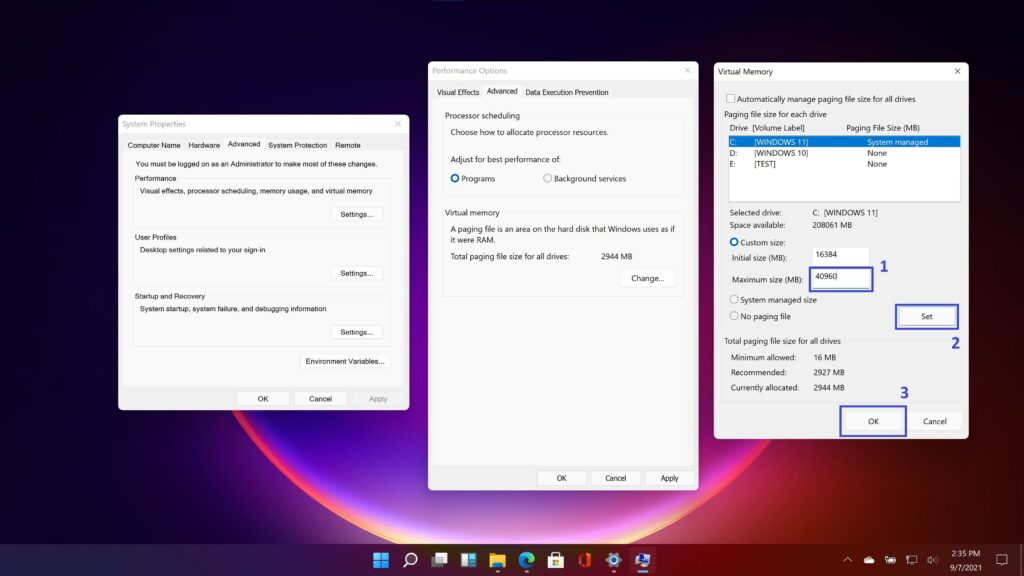
 C) Select a ”Drive” from the drop-down menu and click ”OK”.
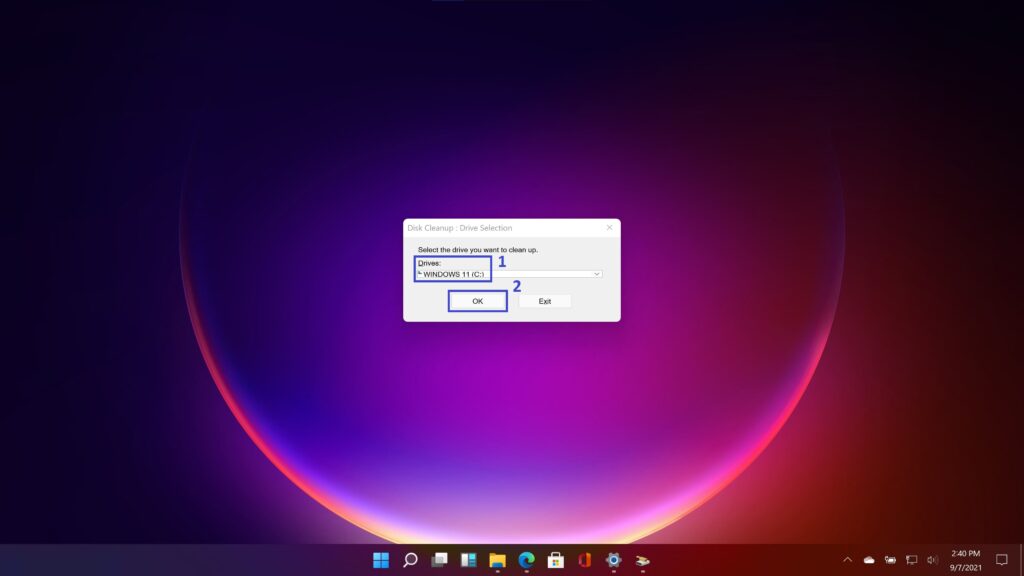 D) After a short while of loading, another window appears. Click on ”Clean up system files” at the bottom and wait for a while.
 E) Select your ”(C:)” Drive or the drive that contains your system files, from the drop-down menu.
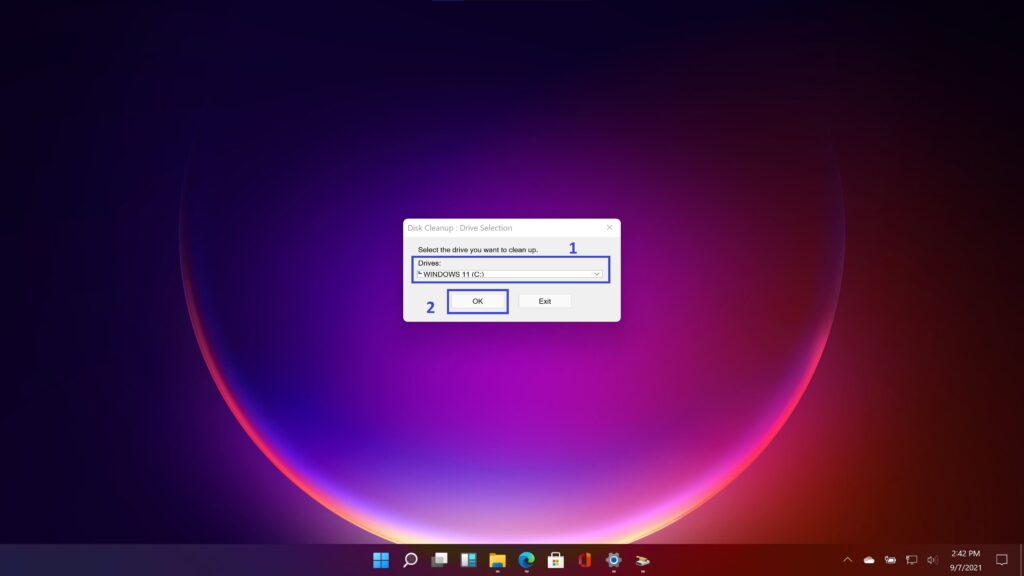 F) Select all the system files you want to permanently delete by checking the boxes beside them, click on ”OK” to permanently delete them.This process helps clean your system drive from hidden files, which when accumulated, can begin to slow your PC down. Doing this once in a while can help you speed up Windows 11.
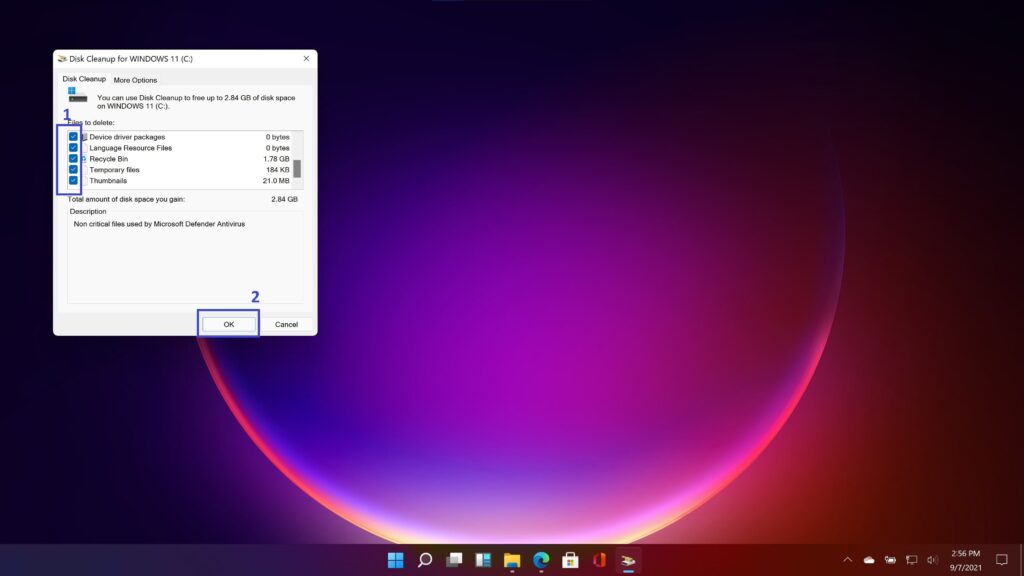
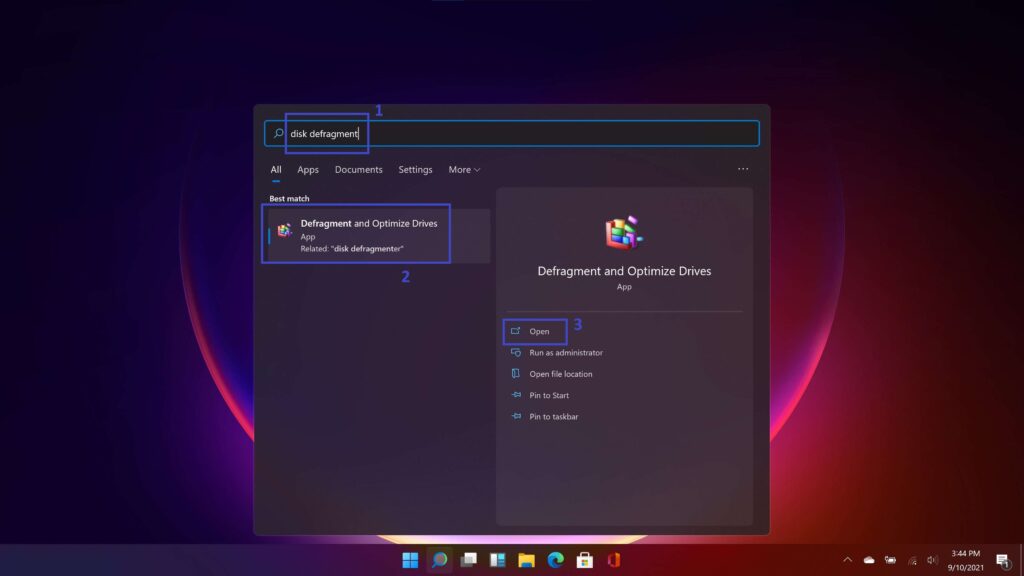 C) Select all your drives by holding down the “CTRL” key while clicking on all the drives.D) Click on “Analyze“, wait for some time let your PC analyze your Drives. After the analysis is complete, click on “Optimize“.
 NB: MAKE SURE YOUR OPTIMIZATION IS SCHEDULED TO AUTOMATICALLY OPTIMIZE YOUR DRIVES AFTER A CERTAIN AMOUNT OF TIME.NB: YOU CAN CHANGE YOUR AUTOMATIC OPTIMIZATION FREQUENCY BY CLICKING ON THE “Change Setting” BUTTON, THEN SCHEDULING OPTIMIZATIONS TO EITHER DAILY, WEEKLY, OR MONTHLY.E) After your drive optimization is done, click on the “Close” button at the bottom right.
 B) From your desktop right click your battery icon on your taskbar and select ”Power Options”. This will open the “Power Options” menu under the control panel.
 C) Click on the ”Change plan settings” at the right side of the window. This will open the ”Edit Plan Settings” window.
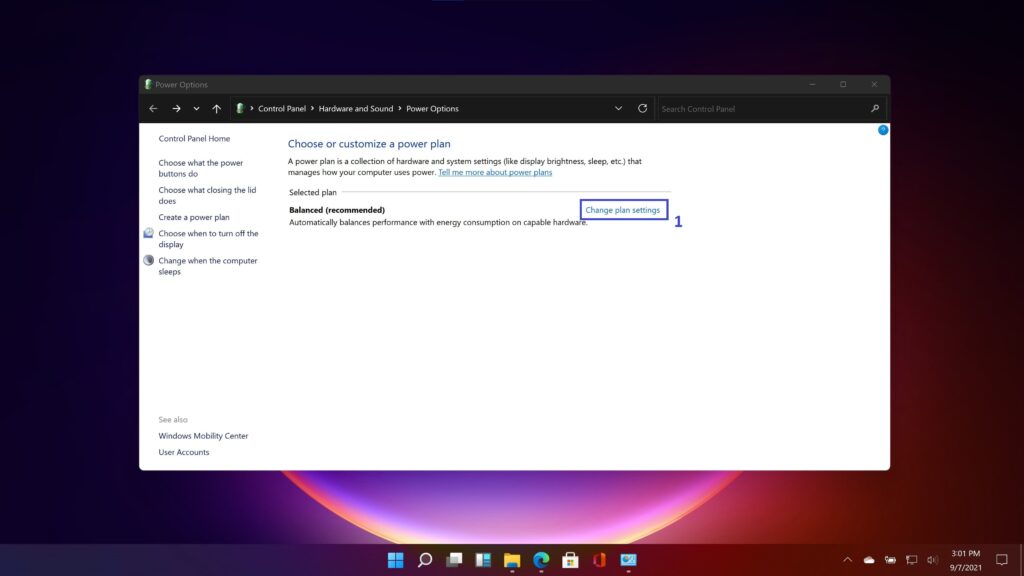 D) In the newly opened window, click on ”Change advanced power setting” at the bottom of the window.
 E) In the new window, scroll down to ”Processor power management” and click the ”+” sign, to open the drop-down menu.F) Click ”+” sign, on ”Minimum processor state”, and set the value to 100% when “Plugged in“.Click ”+” sign, on ”Maximum processor state”, and set the value to 100% when “Plugged in”.Finally, click on the ”Apply” and ”OK” buttons.G) If you have a dedicated GPU, make sure you set it to the “Maximum Performance” option, when “Plugged in“.
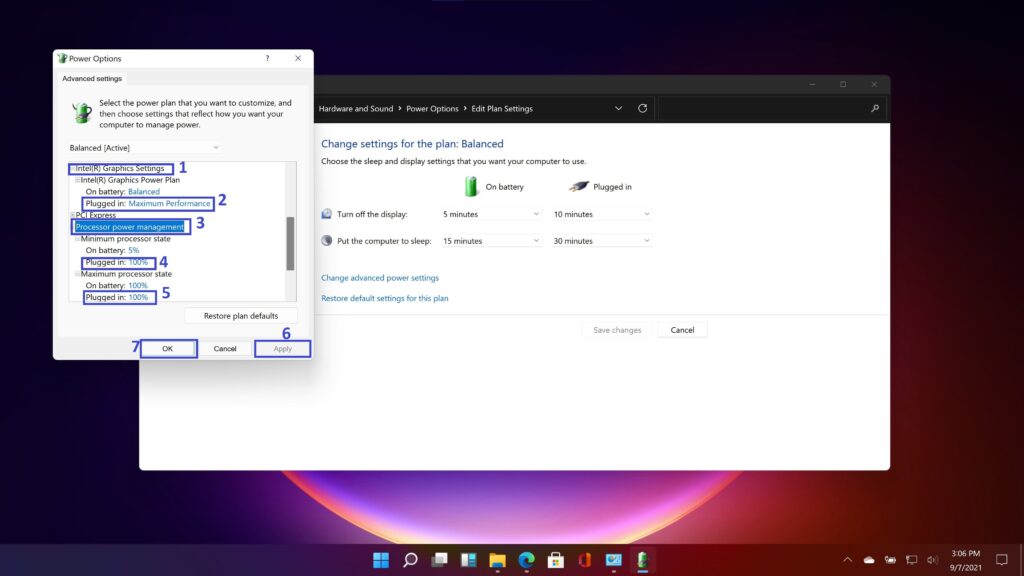 All the above settings will make the processor work at its optimum rate when the PC is plugged in, helping you to further speed up Windows 11.NB: IF YOUR PC HAS COOLING PROBLEMS, IGNORE THIS STEP AND RESET YOUR POWER SETTING TO DEFAULT. CHANGING YOUR COOLING POLICY CAN TRIGGER OVERHEATING
 B) Click the ”Services” tab, which is the third tab from the left.C) Click the checkbox labeled ”Hide all Microsoft services” at the bottom left of the window. This will hide all Microsoft services and leave all Non-Microsoft services visible.D) Then uncheck all non-essential services, like those from software not being used, and click ”Apply”.
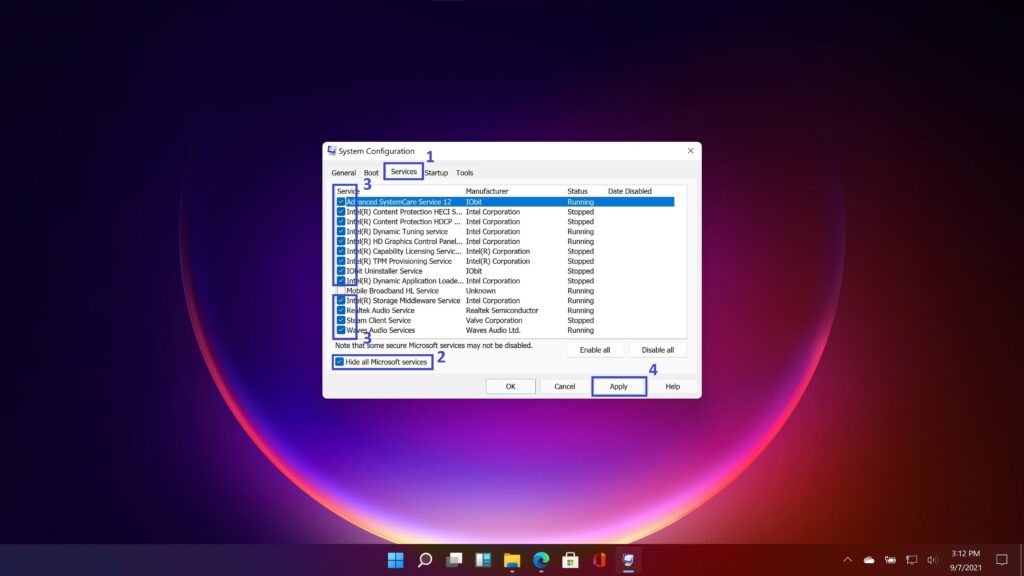 E) Click on the ”Startup” tab, which is the fourth tab from the left.F) While in that tab, click on ”Open Task Manager” to launch the ”Startup” tab in the task manager. Click on ”OK” in the “System Configuration” menu and click ”Exit Without Restart” on the following window that pops up.
 G) In the “Task Manager“ “Start-up” menu, select all the unnecessary programs that launch during bootup and disable them by clicking on the “Disable” button at the bottom right.
 B) Plug in a USB device.NB: MAKE SURE YOU BACKUP THE CONTENTS OF THE PLUGGED-IN USB TO A SAFE LOCATION, OTHER THAN THAT USB ITSELF, TO AVOID LOSING EVERYTHING.
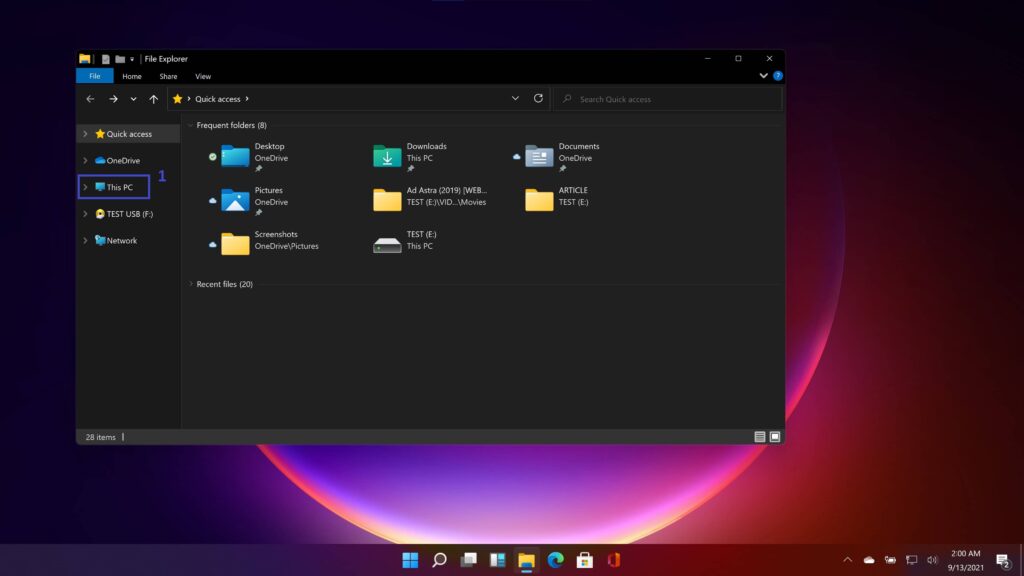
 C) Within the “This PC” window, locate the USB device you just plugged in and right-click on it. Click on the “Properties” option within the Windows contextual menu.
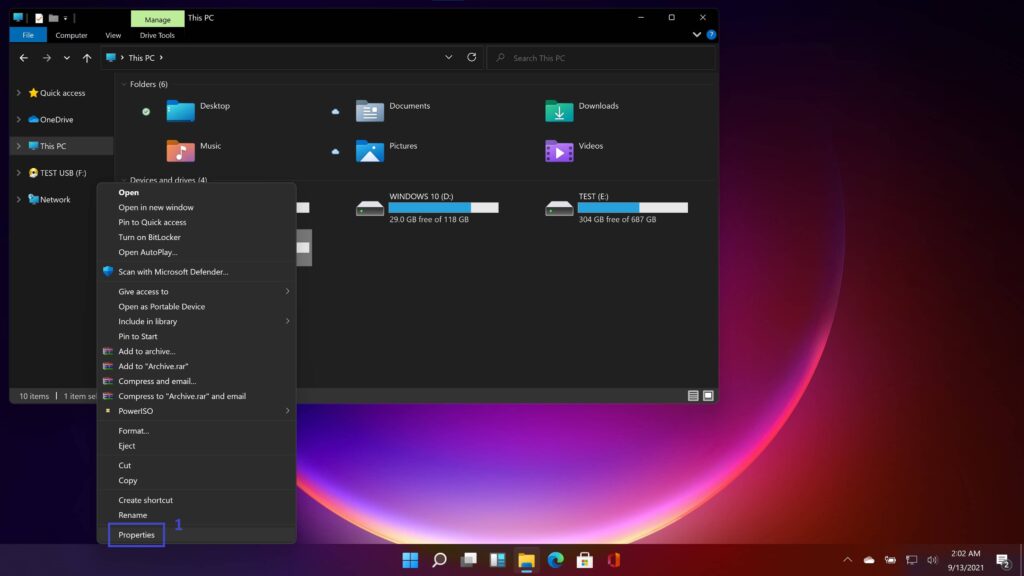 D) Within the “Properties” window, select the “ReadyBoost” tab.
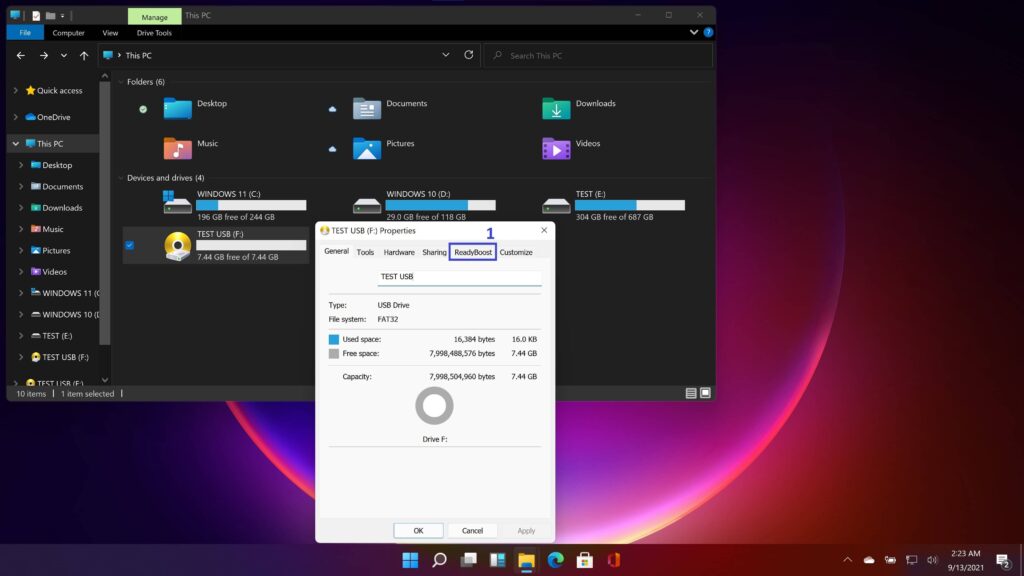 E) Within the “ReadyBoost” tab, click on the “Use this device” option, to use the current USB device to speed up Windows 11. If you have a spare USB (one which you don’t use, or don’t frequently use), you can choose the “Dedicate the device to ReadyBoost” option.By shifting your pointer to the right, set Windows 11 to use the maximum available space for “ReadyBoost“. Finally, click on “Apply” and “OK“.
 NB: WHATEVER YOU CHOOSE, CAN ALWAYS RE-CONFIGURE YOUR USB DEVICE TO NORMAL BY SELECTING THE “Do not use this device” option.NB: NOT ALL USB DEVICES ARE ELIGIBLE FOR THE ABOVE PROCESS. IF YOU ARE UNABLE TO SEE THE OPTIONS IN THE TAB ABOVE, TRY DISCONNECTING AND RECONNECTING YOUR USB, REFRESHING YOUR PC, AND CLICKING ON THE “TestAgain” OPTION, WITHIN THE “ReadyBoost” TAB.
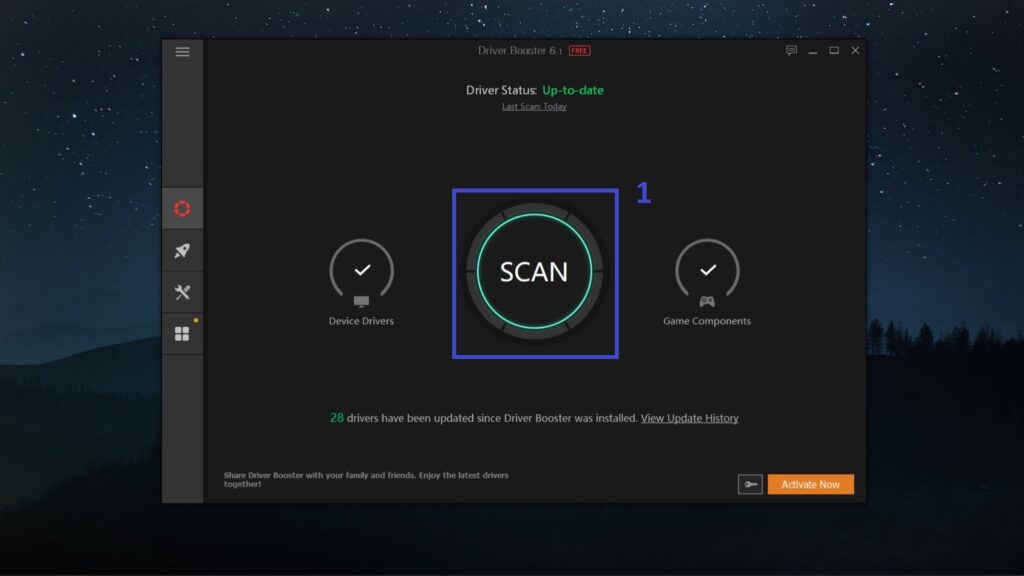
 C) Once the scanning process is completed, all the outdated drivers will be revealed. Select all of them and click the “UPDATE” button at the top right to update them to their latest versions.
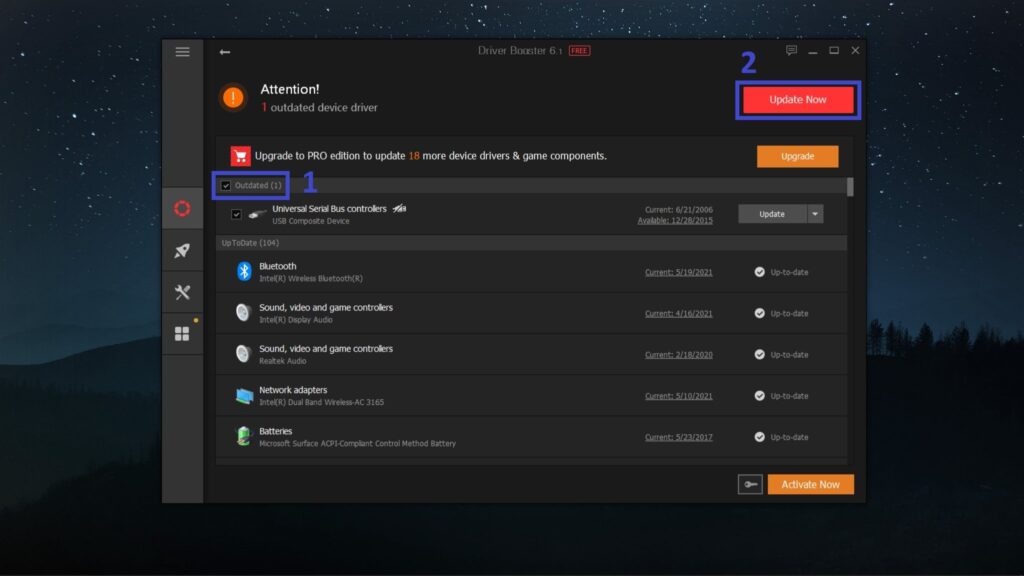 This software will also automatically create a system restore point for you, in case the update goes wrong and crashes your PC, you can always restore it.
 Updating your drivers can significantly boost your operating system speed. You can either manually download your drivers and install, or automatically install them.D) Restart your PC after the process is complete.NB: In this tutorial, we are going to automatically be installing drivers using a driver updating software called Driver booster. Nevertheless, you can always update your drivers using different software or methods
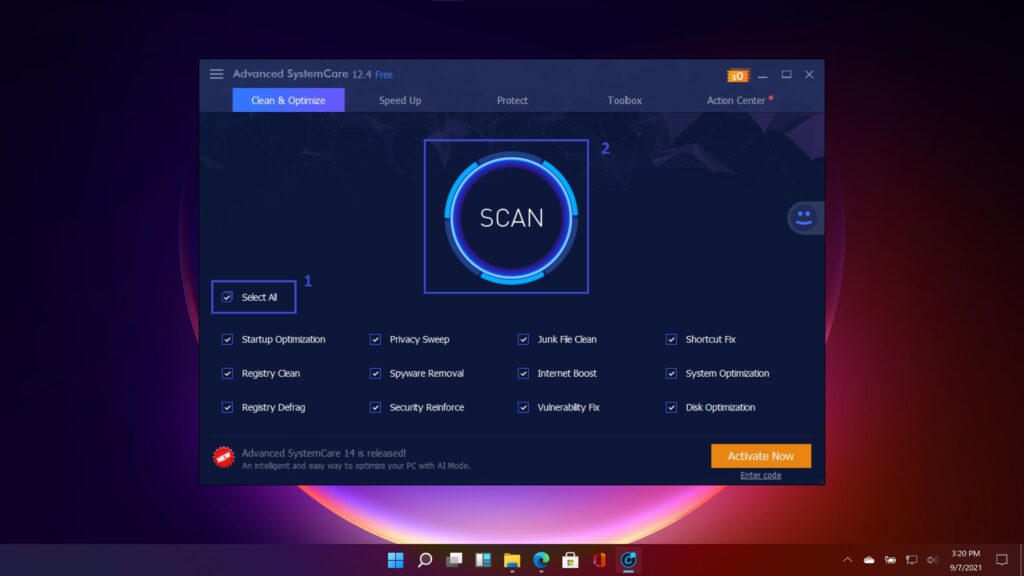 C) Click on ”SCAN” and click the checkbox below, making sure that the option ”Automatically fix” has been selected.This software will automatically carry out a number of optimizations such as optimizing start-up items, removing junk files, and so on. This will go a long way to boost your PC and speed up your Windows 11.
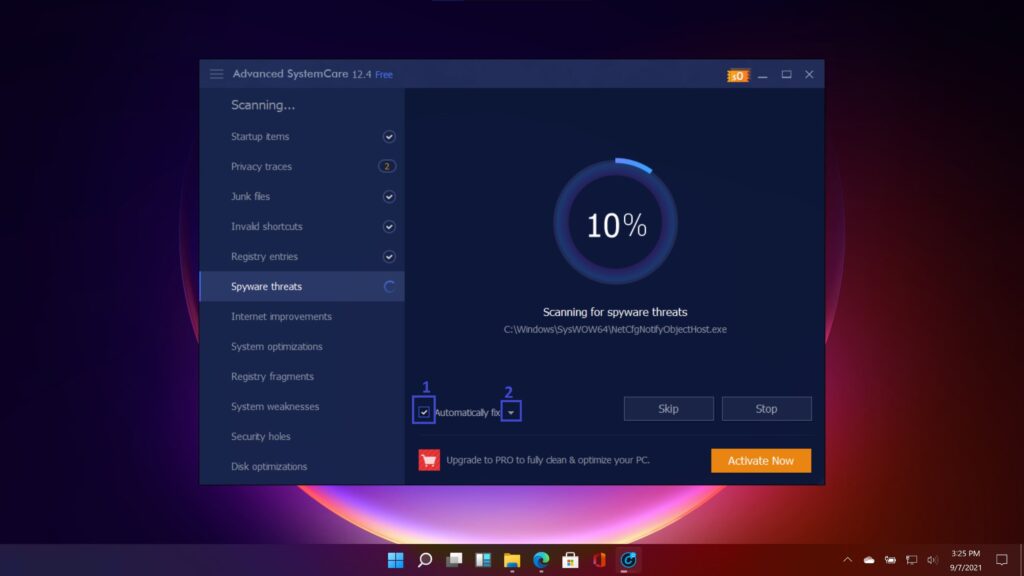 D) Download and install
  F) Use the various sorting options such as ”Recently Installed”, ”Infrequently Used” and ”Large Programs”.G) See which programs might be slowing down your PC, like programs under ”Infrequently Used”.H) Select them in bulk using their checkboxes on the left, and click uninstall.
 I) Click the “Software Health” option on the left windowpane. Within the “Software Health” menu option, click on the “Scan Now” button at the top right.
 J) After the scanning process is over, click on the “fix” button to the right of each of the items which have the “fix” option.
 This software will help you free disk space, optimize your software, and eventually speed up Windows 11.NB: THERE ARE MANY OTHER FIXES THAT CAN BE DONE WITH ALL THE SOFTWARE MENTIONED ABOVE, BUT YOU WILL NEED TO BUY THE SOFTWARE. I WILL ENCOURAGE YOU TO BUY THEM AND GET THE MOST OUT OF THEM, AS THEY CAN GO A LONG WAY IN FIXING, OPTIMIZING, AND MAINTAINING YOUR WINDOWS PC.
![Moto G7 Optimo Maxx Review [Specs & Analysis]3](https://terraexploration.space/wp-content/uploads/Moto-G7-Optimo-Maxx-Review-Specs-Analysis3-696x392.jpg "Moto G7 Optimo Maxx Review [Specs & Analysis]3")

![Moto G7 Optimo Maxx Review [Specs & Analysis]3](https://terraexploration.space/wp-content/uploads/Moto-G7-Optimo-Maxx-Review-Specs-Analysis2-1024x576.jpg)
![Moto G7 Optimo Maxx Review [Specs & Analysis]3](https://terraexploration.space/wp-content/uploads/Moto-G7-Optimo-Maxx-Review-Specs-Analysis5-1024x576.jpg)
![Moto G7 Optimo Maxx Review [Specs & Analysis]3](https://terraexploration.space/wp-content/uploads/Moto-G7-Optimo-Maxx-Review-Specs-Analysis1-1024x576.jpg)