Manipulating Images with OpenCV
Introduction
In the world of image processing, it’s essential to grasp the basics. This article explores key operations in OpenCV, guiding you through crafting digital images, handling image reading and display, and understanding colour space conversions. Let’s equip ourselves with the knowledge needed to navigate the intricacies of image manipulation.
Image Manipulation
Understanding Digital Images
A digital image is like a mosaic made up of pixels, each with specific spatial coordinates (x, y) and intensity values. Grayscale images, using values from 0 to 255, differ from RGB images, which blend Red, Green, and Blue channels to create a spectrum of colours. Knowing these basics sets the stage for a deeper exploration.
How to Read and Display Images in OpenCV
Time Needed : 00 hours 30 minutes
Carefully follow the next series of instructions to get the best results from this tutorial. This is going to be interesting, so, grab a cup of coffee, and let’s get started.
Step 1: Importing OpenCV and Reading Images
To begin, we import the
imreadmethod from the OpenCV library in Python. We then proceed to import the “car” image from the image folder within the project.For this tutorial, I used an image of a car, which you can get together with my source file by clicking here or using the download button at the bottom of this page. Nevertheless, you can use any image you want.The above operations can be done as shown in the following image: The output provides insights into the image structure: an 8-bit unsigned integer array with dimensions (1024, 1024, 3). This array allows for flexible manipulation.
Step 2: Accessing Pixel Values
Exploring the array, we look into the values of the first pixel at coordinates (0, 0). Pixels, represented by three values, unveil intensity information specific to each channel.
Step 3: Displaying Images
Both Matplotlib and OpenCV offer methods for image display. OpenCV’s
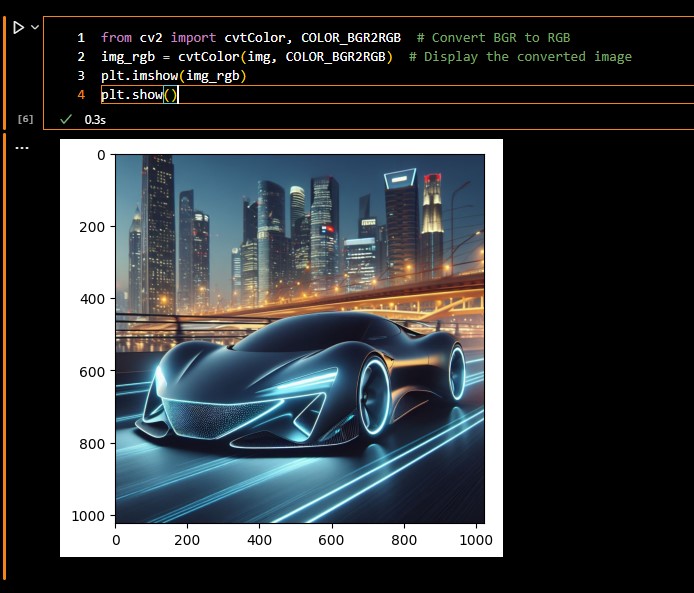
imshowmethod operates in BGR order, requiring careful consideration when transitioning to Matplotlib. A conversion from BGR to RGB ensures accurate representation.The above comparison is demonstrated with the following images:
 Understanding the differences between BGR and RGB representations facilitates seamless integration.
Step 4: Converting Between Colour Spaces
Colour space conversion, a crucial skill, uses OpenCV’s
cvtColormethod. Transitioning between BGR and RGB is demonstrated, emphasizing the importance of channel order.This is shown in the following image:
Step 5: Grayscale Conversion
Taking it a step further, the conversion from RGB to grayscale produces a single-channel image.This can be seen in the following image:
 A nuanced approach to grayscale conversion is presented, ensuring a clear understanding of image transformations.
In case you prefer copying parts of the code, or reading the full content of the downloaded source file before extracting and running it, check out the raw source code below.
Also, the code was written in a Jupyter Notebook, not with the default Python file, you might have to take note of that, as it determines how the code should be compiled to avoid any worries. (within Jupyter Notebook or Jupyter Lab) and not using the default Python compiler.
from cv2 import imread
img = imread('Images/car.jpg')  # Read an RGB image
print('Datatype:', img.dtype, '\nDimensions:', img.shape) # Check datatype and dimensionsimport matplotlib.pyplot as plt # Using Matplotlib
plt.imshow(img)
plt.title('Displaying image using Matplotlib')
plt.show()from cv2 import imshow, waitKey # Using OpenCV
imshow('Displaying image using OpenCV', img)
waitKey(0)from cv2 import cvtColor, COLOR_BGR2RGB # Convert BGR to RGB
img_rgb = cvtColor(img, COLOR_BGR2RGB) # Display the converted image
plt.imshow(img_rgb)
plt.show()from cv2 import COLOR_RGB2GRAY # Convert RGB to grayscale
img_gray = cvtColor(img_rgb, COLOR_RGB2GRAY) # Display the grayscale image
imshow('Grayscale Image', img_gray)
waitKey(0)Conclusion on OpenCV Image Manipulation
This tutorial explores fundamental OpenCV operations, empowering you to understand image formulation, access pixel values, display images, and navigate colour space conversions.
With this knowledge, you’re ready to tackle intricate image-processing tasks. If you have any questions, feel free to ask in the comments below. Dive into the world of image processing with confidence!
Some Frequently Asked Questions and Their Answers
What is OpenCV and how does it relate to image manipulation?
OpenCV is a powerful computer vision library widely used for image processing.
Can you provide practical examples of image processing using OpenCV?
Yes, there are practical examples demonstrating image preprocessing with OpenCV.
How can OpenCV be used for real-time image manipulation in Python?
OpenCV allows real-time image manipulation by capturing frames and applying edits in Python.
What are the essential concepts in computer vision and image processing for beginners?
A beginner’s guide to computer vision and image processing with OpenCV simplifies essential concepts in these cutting-edge fields.
OpenCV References
- medium.com: Real-Time Image Manipulation in Python…
- opencv organisation: Computer Vision and Image Processing: A Beginner’s Guide…
- analyticsvidhya.com: Image Processing – With Practical Examples…
- analyticsvidhya.com: A Beginner’s Guide to Image Processing and Python…
Other Interesting Articles
- OpenCV Beginner’s Guide: Explore official OpenCV Tutorials for in-depth learning on installation, core functionality, and image processing. Dive into OpenCV-Python…
- How to Use Canva’s Magic Edit for Awesome Photo Upgrades: Unleash your creativity with Canva’s Magic Edit for seamless photo enhancement. Learn to add, replace, and modify photos effortlessly…




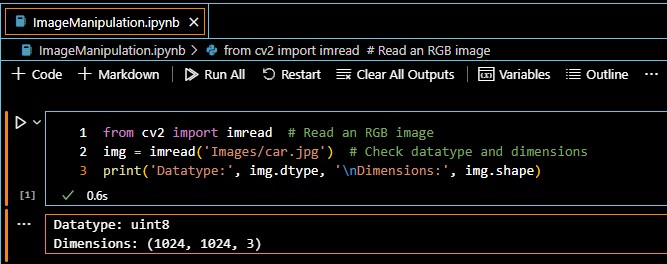 The output provides insights into the image structure: an 8-bit unsigned integer array with dimensions (1024, 1024, 3). This array allows for flexible manipulation.
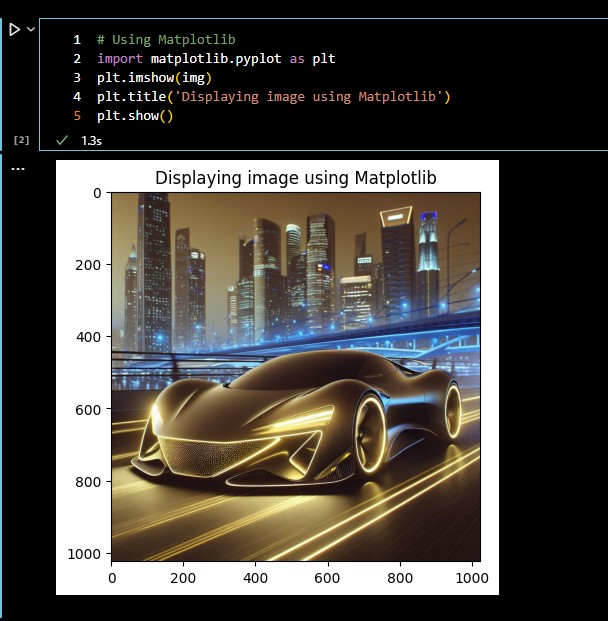
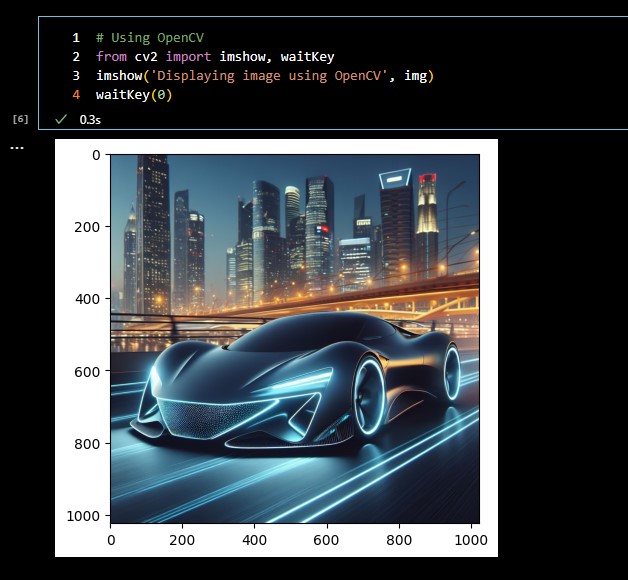 Understanding the differences between BGR and RGB representations facilitates seamless integration.
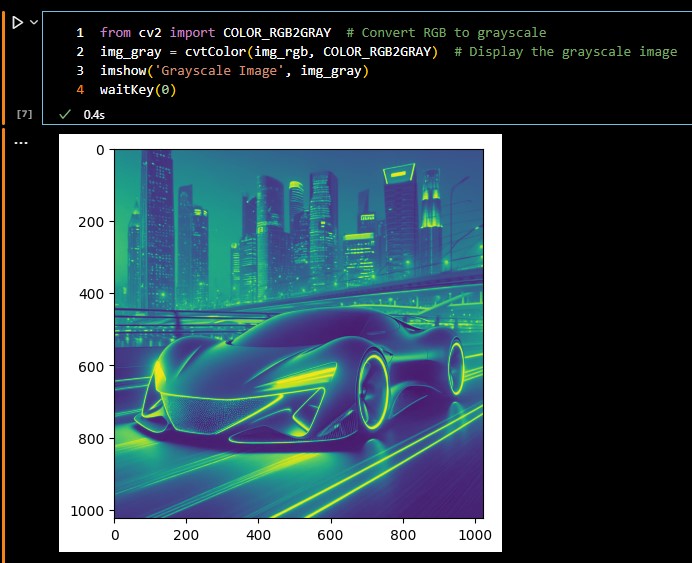 A nuanced approach to grayscale conversion is presented, ensuring a clear understanding of image transformations.

