
Fix Slow Windows 10 OS [Full Guide With Images]
Introduction
Sometimes we have computers that are good enough to do many cool things like gaming, running heavy applications, handling high graphics, producing great images and so on. But we might not just be able to do the stuff even with performant computers and rather spend most of our time trying to fix a slow windows 10.
Fix Slow Windows 10 OS [Full Guide With Images]
Description
So, what is wrong? Did the manufacturers exaggerate with the computer specifications or what? No, they didn’t, the problem is Windows OS is used by many PC manufacturers as their operating system and Microsoft cannot in-turn tailor-make its operating system for all manufacturers.
This sometimes causes Windows OS to function poorly when installed on some PC hardware. So, how do we now solve the problem? Well, that’s what we will be talking about today.
How to Fix Slow Windows 10 OS
In the following procedure, we will show you how to fix your slow windows 10 PC in a few steps without doing things like core overclocking or anything which will endanger your PC’s health.
Time Needed : 02 hours 00 minutes
Quickly and easily solve slow your windows 10 problem by following the 7 simple steps below.
Using System Configuration (MS-Config)
A) While on the desktop click the search area on the task bar, type in ”run”, then hit the enter key.
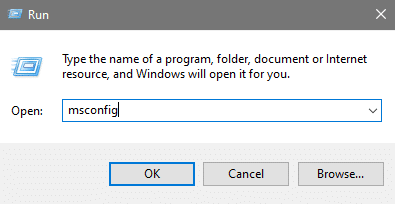
 B) While in the run app, type ”msconfig.exe” and hit enter to launch the ”system configuration menu”.NB: OK, so as from here you’ve got to be very careful because you don’t want to mess up with your boot-up process so do only what is shown in this tutorial.
 C) Click on the ”boot” tab, which is the second tab from the left.D) While in the boot tab, hit the ”advanced options” button.
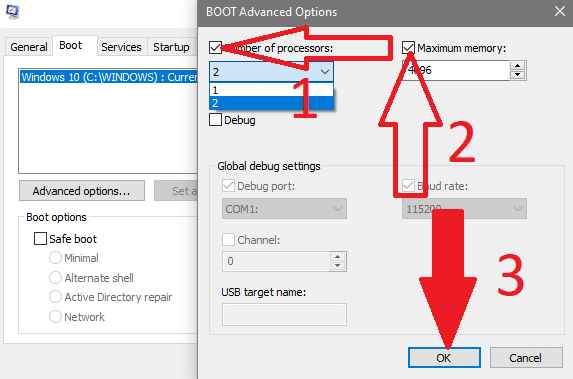
 E) A new window will pop up. At its top left side, you will find a checkbox labelled ”number of processors” with a drop-down menu containing the total number of processors.F) At the top right of this window, appears a checkbox labelled ”maximum memory” with an input value box under it.G) Check the box labelled ”maximum number of processors”, click the drop-down menu under it and select the highest value in that menu. This sets the Windows OS to use the highest number of processors (cores/threads) available in your PC, which will go a long way in fixing a slow windows 10.H) Check the box labelled ”maximum memory”, adjust the values to reach the PC’s maximum RAM then click ”OK” at the bottom of the window.This will automatically set Windows OS to use the maximum available memory (RAM), which can greatly contribute in fixing a slow windows 10.I) Click ”Apply” in the MS-Config window and click ”OK” to confirm changes then restart Your PC.
Using The Performance Monitor
A) Go to ”Start Menu>All Programs>Windows Administrative Tools>Performance Monitor”.
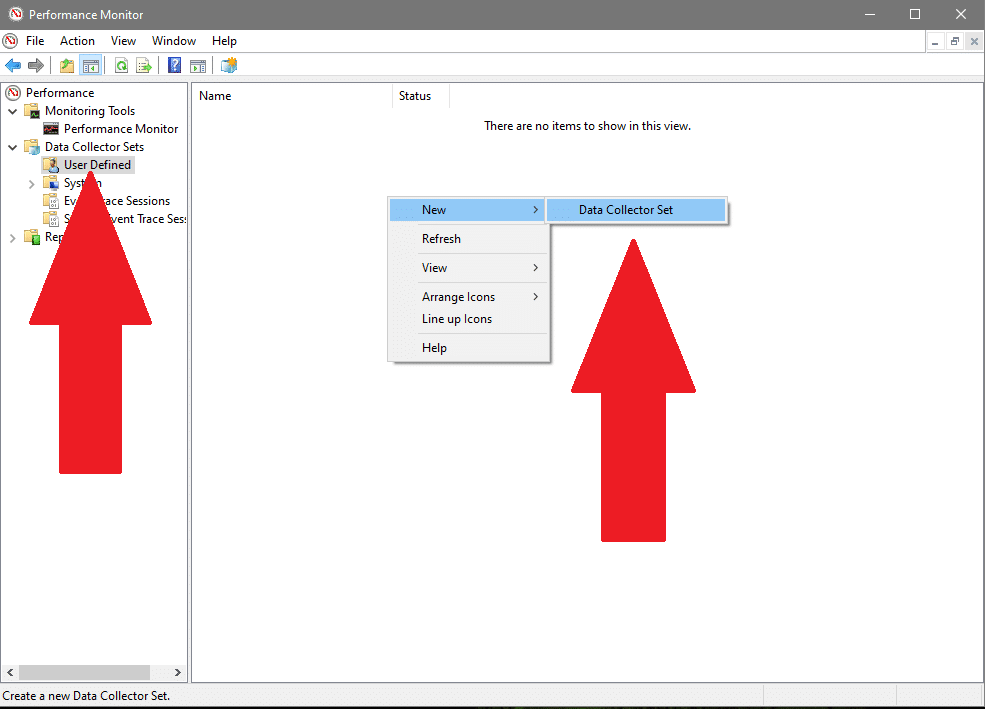
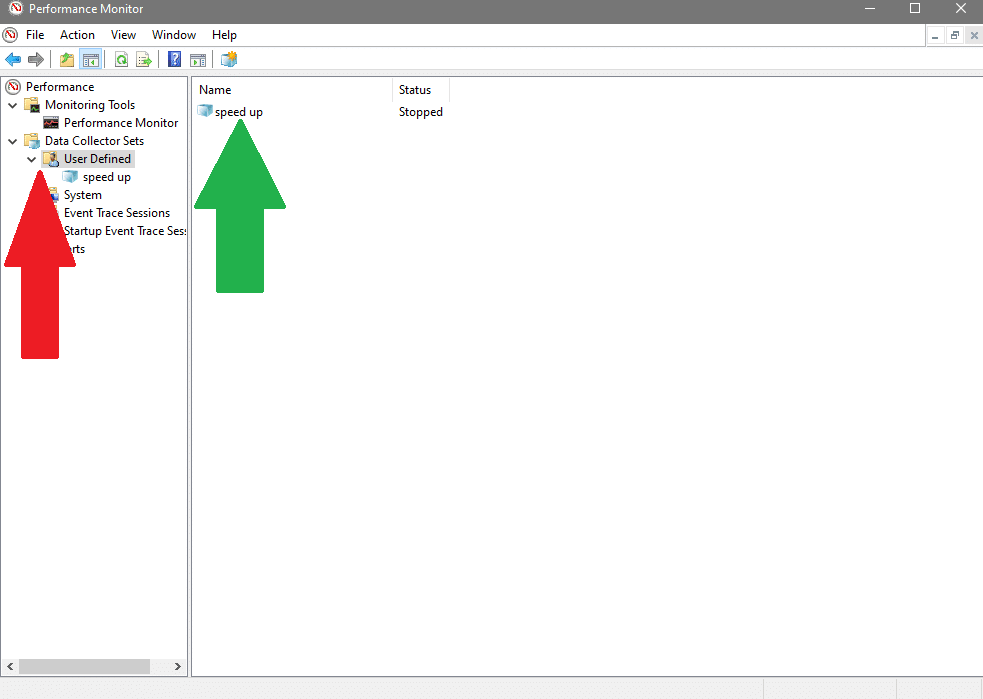
 B) In the ”performance monitor” right side pane, click on the ”data collector” sets drop down menu.C) Under data, collector sets click ”user-defined”.D) Right-click within the right pane of the window and select ”New>data collector sets” in the expansion menu.
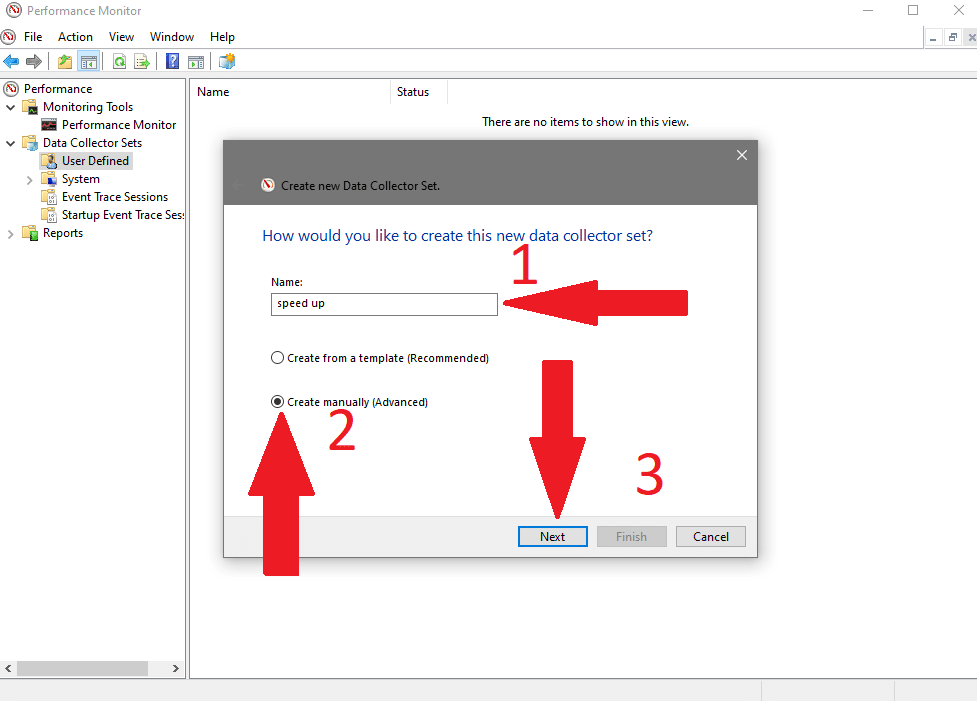
 E) In the new window rename the data collector set and click ”create manually (advanced)” then click on ”next”.
 G) In the next window, click ”Add” at the top right.
 H) At the bottom left pane of the next window scroll down to the highest number you see and click the ”Add” button.
 I) In the top-left pane, scroll down to process and click the drop-down menu arrow, then scroll down to the ”thread count” select it and click ”add”.
 This will make Windows OS detect the processors which were activated using the system configuration menu and will, in turn, dedicate applications to use them.At this point, on the right pane of the window, you should see something like what is displayed in the image below.J) Click ”OK” on this window, then click ”Next” till the last window where you will select the ”save and close’‘ option, then click on ”Finish”.
 You will notice a cube-like icon in the performance monitor window, which is a save profile of your configuration and will take place immediately after a fresh reboot.
Using Advanced System Settings
A) On your keyboard, press the combined key command ”Windows key + E’‘, and click on ”This PC” icon found on Windows’ file explorer left navigation pane.
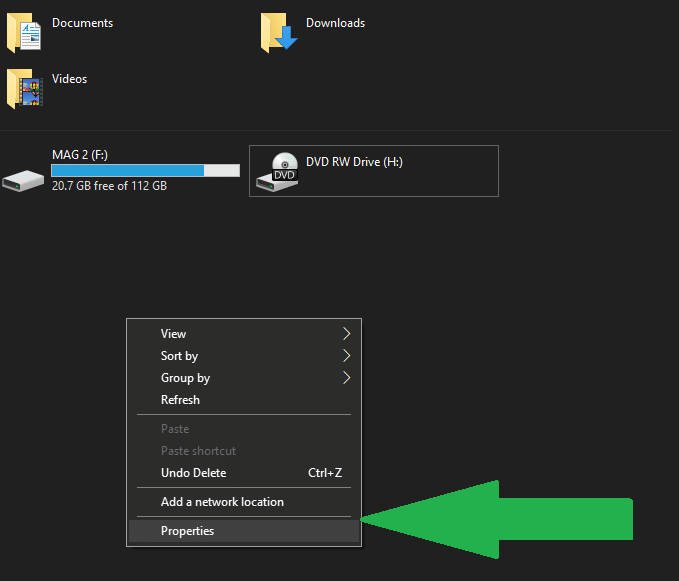
 B) Within the opened window right-click on any space and click properties. This will open the ”system properties” window.
 C) On the right pane of the newly opened window click on ”advanced system settings” which will open the ”advanced’‘ tab within the advanced properties window, with administrator privileges.
 D) In the tab under the ‘‘advanced”, click on ”settings” to open the ”performance menu”.
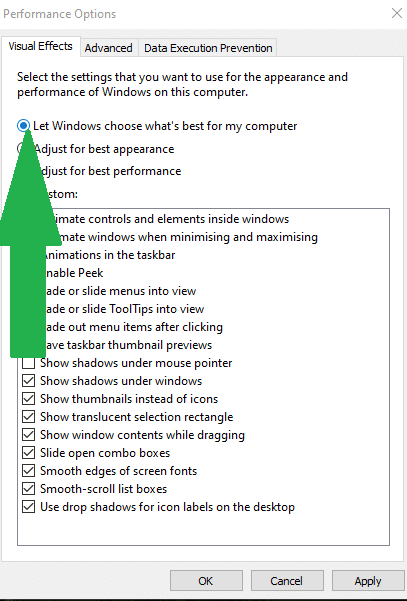
 E) In the newly opened window, select the option ”let windows choose what is best for my computer”.If you are looking forward to boosting a low-end PC, select ”Adjust for best performance” but Note that your windows interface appearance will greatly be sacrificed to free the RAM and processor for more performance.
 F) Within that same window, click the ”Advanced” tab, which is next to the visual effect tab, then click the ”change” button under that tab.In the newly opened window, we will be trying to increase the available RAM by borrowing some memory from the hard disk drive to add to the existing RAM.This can be a big booster to a PC, it can even go as far as doubling the memory speed, and helping you fix your slow windows 10 PC.
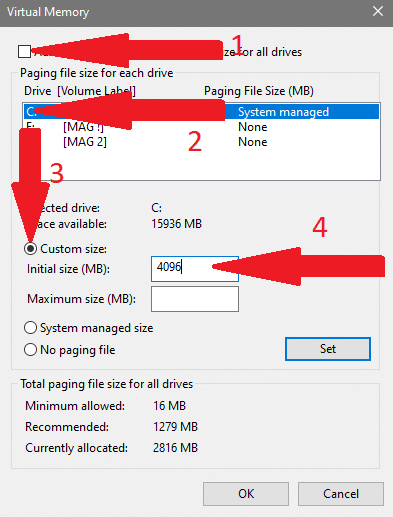
 G) In the ”virtual memory” window, uncheck the box for ”automatically manage paging file size for all drives” at the top, to unlock all other options in this window.Select the drive where Windows OS is installed.H) Select the ”customize size” option below, which will permit you to edit your paging file size.I) In the ”initial size” section enter your default PC RAM size in megabytes.My RAM is 4 GB, but since 1024 MB make 1 GB my initial size will be 1024 x 4giving4096 MB.
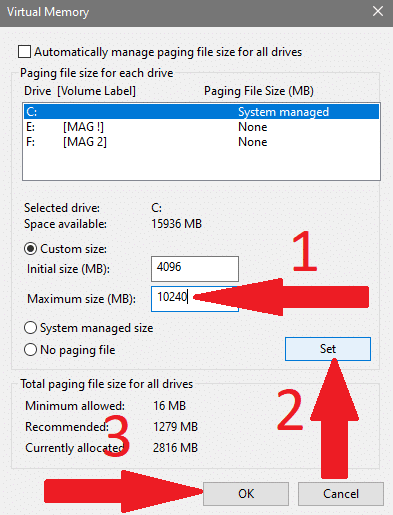
 J) The next thing is to enter the ”maximum size in MB”. Now don’t just go putting crazy figures because you want to increase your performance. There is a maximum which can be input.To get this maximum, you have to first multiply your actual RAM by 1.5 and add the answer to your actual RAM.Next, multiply all your GB values by 1024 to convert to MB values.For example;My RAM is 4 GB so we have to multiply 4 x 1.5 = 6Then add 6+4 = 10And finally multiply 10 x 1024 = 10240.We can then type the value 10240 in the ”’maximum size” box.(Feel free to correct my math in the comments)K) Click on ”set”, ”apply”, ”OK” and restart your PC.
Using Disk Clean-up
A) Click the search area on the Windows 10 task bar.B) Type in ”disk clean-up” and hit enter to search, then run the ”Disk Clean-up” utility.
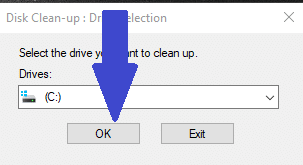
 C) Select a ”Drive” from the drop-down menu and click ”OK”.
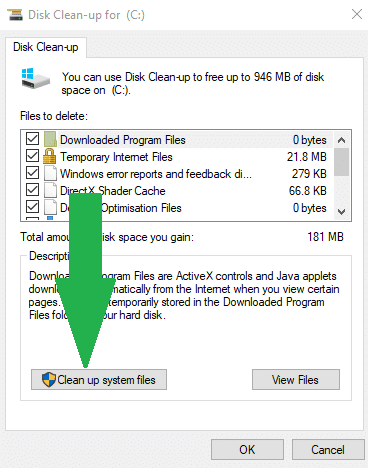
 D) After a short while of loading, another window appears. Click on ”Clean up system files” at the bottom and wait for a while.
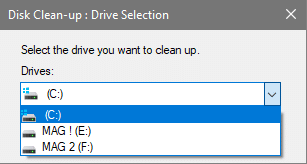
 E) Select your ”C: Drive” or the drive that contains your system files, from the drop-down menu.
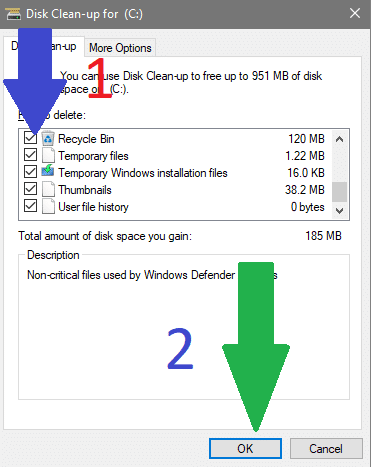
 F) Select all the system files you want to permanently delete by checking the boxes beside them, click on ”OK” to permanently delete them.This process helps clean your system drive from hidden files, which when accumulated, begin to slow your PC down. Doing this once in a while can help you fix a slow windows 10.
Using Power Options
A) From your desktop right click your battery icon on your task bar and select ”power options”. This will open the power control menu under the control panel.
 B) Locate the ”high-performance” option, select it and click on the ”change plan settings” to the right of the window. This will open the ”advanced power setting” window.
 C) In the newly opened window, click on ”change advanced power setting” at the bottom of the window.
 D) In the new window, scroll down to ”processor power management” and click the ”plus sign” to open the drop down menu.E) Click ”plus sign” on ”minimum processor state”, and set the value to 100% when plugged in.Click ”plus sign” on ”maximum processor state”, and set the value to 100% when plugged in.Finally, click ”apply”, ”OK” and ”save changes”
 All the above settings will make the processor work at its optimum rate when PC is plugged in, helping you to further fix your slow windows 10.
Removing Start-up Programs
A) In the search menu on the task bar, type in ”MSConfig” and run the ”system configuration”.
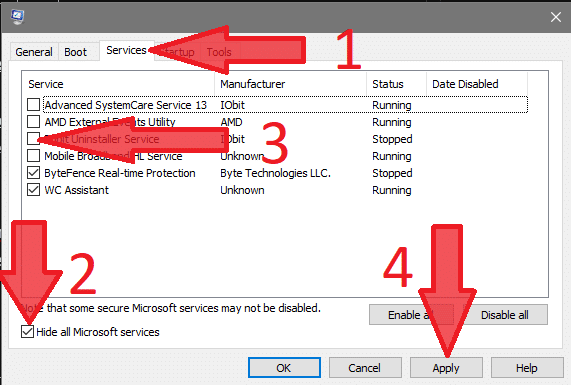
 B) Click the ”services” tab, which is the third tab from the left.C) Click the ”checkbox” labelled ”hide all Microsoft services” at the bottom left of the window. This will hide all Microsoft services and leave all non-Microsoft services visible.D) Then uncheck all unnecessary services, like those from software not being used and click ”Apply”.
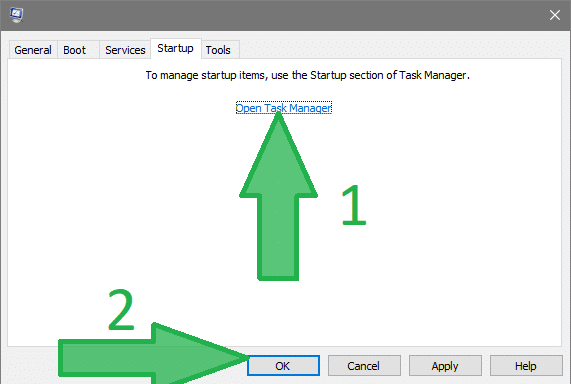
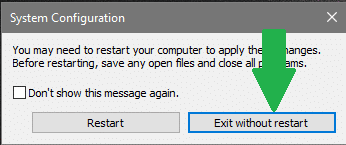
 E) Click on the ”startup” tab, which is the fourth tab from the left.F) While in that tab, click on ”open task manager” to launch the ”startup” tab in the task manager. Click on ”OK” in the system configuration menu and click ”exit without restart”.
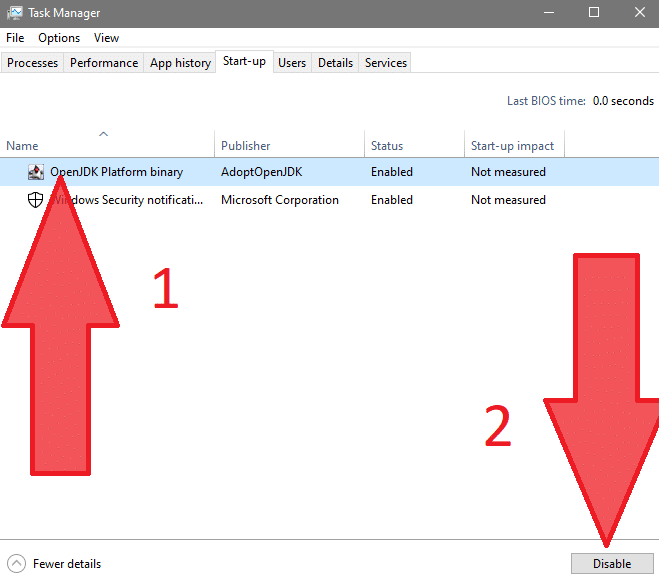
 G) In the task manager startup menu, select all the unwanted programs that launch during bootup and disable them.
Using Optimization Software
A) Download and install Advanced System Care.B) Run the software, locate the ”select all” checkbox and click it.
 C) Click on ”scan” and click the checkbox below, making sure that the option ”automatically fix” has been selected.This software will automatically carry out a number of optimizations, boost your PC and fix your slow windows 10.
 D) Download and install Iobit Uninstaller.E) Run the software.
 F) Use the various sorting options such as ”recently installed”, ”infrequently used” and ”large programs”.G) See which programs might be slowing down your PC, like programs under ”infrequently used”.H) Select them in bulk using their check boxes on the left, and click uninstall.
 This software will help you free disk space which can also help speed up your PC.
Conclusion on Fixing Slow Windows 10
All the above steps should combine to give a massive change to your overall PC performance, and definitely fix your slow windows 10 PC.
Ok, so we have gotten to the end of this tutorial. If you have any more optimization techniques please do well to share them with us in the comment section.
Other Fixes
- Avast Caused BSOD on Windows 10
- Kaspersky Causing Blue Screen [SOLVED]
- Fix Slow Windows 10 OS [Full Guide With Images]
- How To Speed Up Windows 11 [Full Guide With Images]
- Thunder Spy Assault: Vulnerability in Windows, Mac and Linux
Frequently Asked Questions and Their Answers
What is slowing down my Windows 10 computer?
There are many things that can slow down your windows 10 PC.The first thing is to check whether your PC is able to support windows 10. Low-end PCs will likely have a hard time running windows 10.Another thing is after upgrading to Windows 10 OS, it is usually very slow. It is advisable to download all updates and drivers for Windows 10 after upgrading.
What causes slow startup Windows 10?
The main reason for slow start-up on windows 10 is due to the number of programs that auto-launch during Windows OS start-up.To remedy this, try removing as many programs from your boot-up process as possible. This can go a long way to speed up your boot process and fix a slow windows 10 startup.
What programs slow down Windows 10?
Programs which require a lot of resources such as video editing apps or video games can slow down your OS when being run multiple times and simultaneously.Also, make sure you properly close and exit an app if you are not using it. Beware that some apps may run in the background, even after being closed and will require you to go into your task manager and stop them manually in order to fix your slow windows 10.







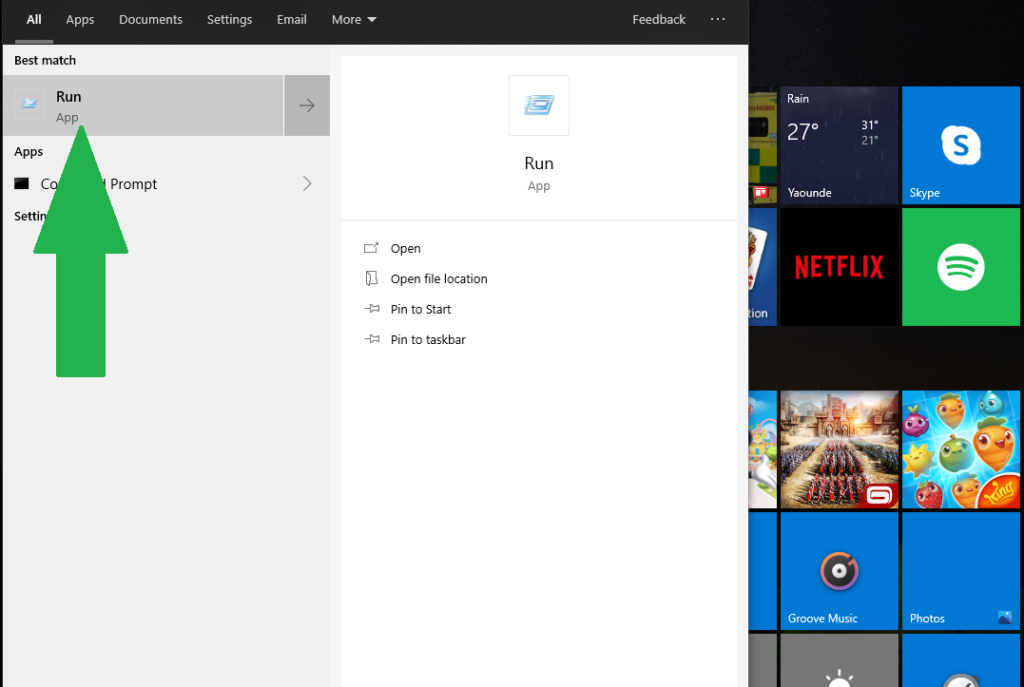 B) While in the run app, type ”msconfig.exe” and hit enter to launch the ”system configuration menu”.NB: OK, so as from here you’ve got to be very careful because you don’t want to mess up with your boot-up process so do only what is shown in this tutorial.
 C) Click on the ”boot” tab, which is the second tab from the left.D) While in the boot tab, hit the ”advanced options” button.
 E) A new window will pop up. At its top left side, you will find a checkbox labelled ”number of processors” with a drop-down menu containing the total number of processors.F) At the top right of this window, appears a checkbox labelled ”maximum memory” with an input value box under it.G) Check the box labelled ”maximum number of processors”, click the drop-down menu under it and select the highest value in that menu. This sets the Windows OS to use the highest number of processors (cores/threads) available in your PC, which will go a long way in fixing a slow windows 10.H) Check the box labelled ”maximum memory”, adjust the values to reach the PC’s maximum RAM then click ”OK” at the bottom of the window.This will automatically set Windows OS to use the maximum available memory (RAM), which can greatly contribute in fixing a slow windows 10.I) Click ”Apply” in the MS-Config window and click ”OK” to confirm changes then restart Your PC.
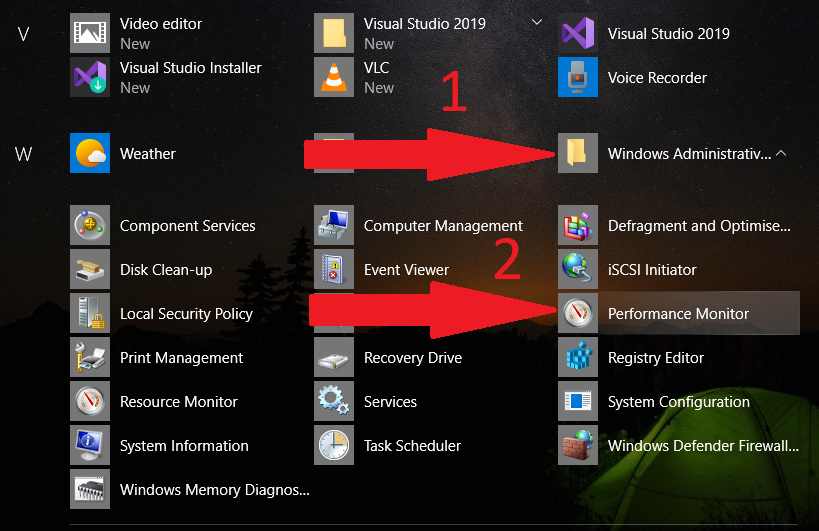 B) In the ”performance monitor” right side pane, click on the ”data collector” sets drop down menu.C) Under data, collector sets click ”user-defined”.D) Right-click within the right pane of the window and select ”New>data collector sets” in the expansion menu.
 E) In the new window rename the data collector set and click ”create manually (advanced)” then click on ”next”.
 G) In the next window, click ”Add” at the top right.
 H) At the bottom left pane of the next window scroll down to the highest number you see and click the ”Add” button.
 I) In the top-left pane, scroll down to process and click the drop-down menu arrow, then scroll down to the ”thread count” select it and click ”add”.
 This will make Windows OS detect the processors which were activated using the system configuration menu and will, in turn, dedicate applications to use them.At this point, on the right pane of the window, you should see something like what is displayed in the image below.J) Click ”OK” on this window, then click ”Next” till the last window where you will select the ”save and close’‘ option, then click on ”Finish”.
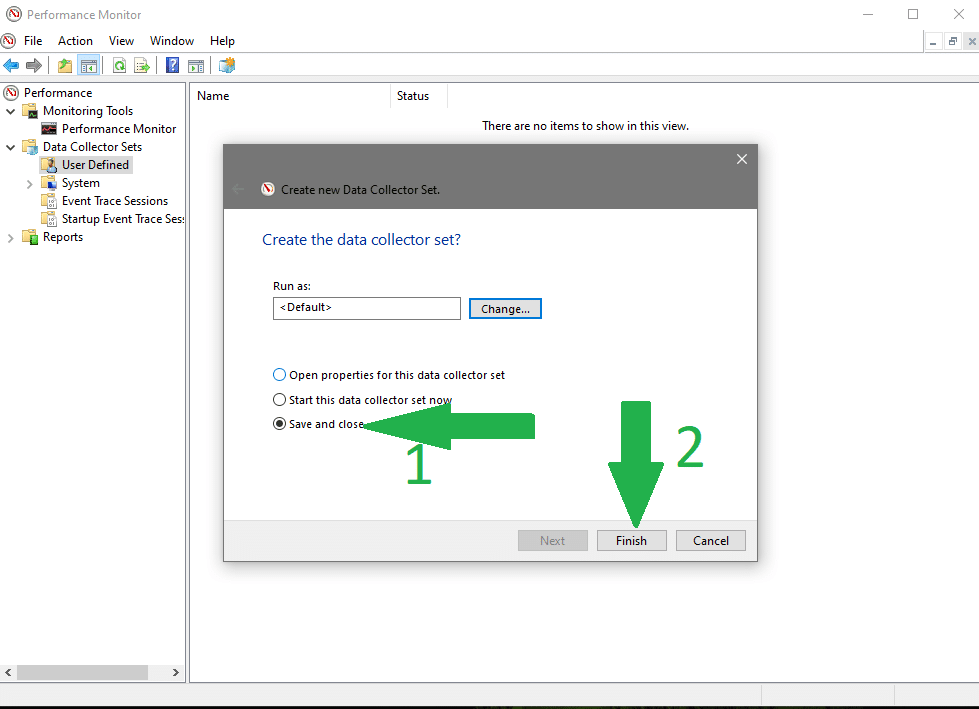 You will notice a cube-like icon in the performance monitor window, which is a save profile of your configuration and will take place immediately after a fresh reboot.
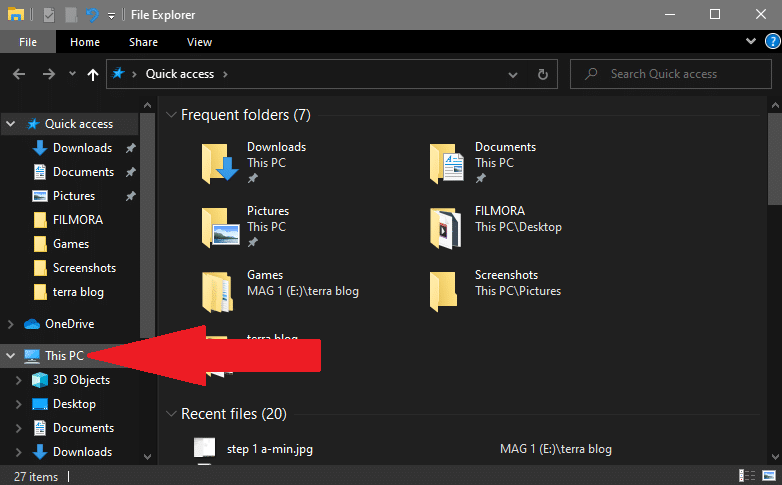 B) Within the opened window right-click on any space and click properties. This will open the ”system properties” window.
 C) On the right pane of the newly opened window click on ”advanced system settings” which will open the ”advanced’‘ tab within the advanced properties window, with administrator privileges.
 D) In the tab under the ‘‘advanced”, click on ”settings” to open the ”performance menu”.
 E) In the newly opened window, select the option ”let windows choose what is best for my computer”.If you are looking forward to boosting a low-end PC, select ”Adjust for best performance” but Note that your windows interface appearance will greatly be sacrificed to free the RAM and processor for more performance.
 F) Within that same window, click the ”Advanced” tab, which is next to the visual effect tab, then click the ”change” button under that tab.In the newly opened window, we will be trying to increase the available RAM by borrowing some memory from the hard disk drive to add to the existing RAM.This can be a big booster to a PC, it can even go as far as doubling the memory speed, and helping you fix your slow windows 10 PC.
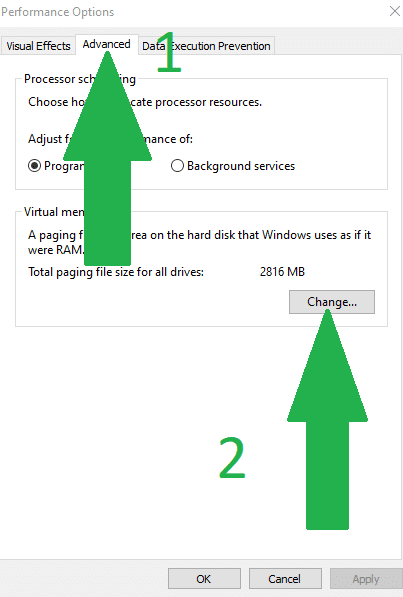 G) In the ”virtual memory” window, uncheck the box for ”automatically manage paging file size for all drives” at the top, to unlock all other options in this window.Select the drive where Windows OS is installed.H) Select the ”customize size” option below, which will permit you to edit your paging file size.I) In the ”initial size” section enter your default PC RAM size in megabytes.My RAM is 4 GB, but since 1024 MB make 1 GB my initial size will be 1024 x 4giving4096 MB.
 J) The next thing is to enter the ”maximum size in MB”. Now don’t just go putting crazy figures because you want to increase your performance. There is a maximum which can be input.To get this maximum, you have to first multiply your actual RAM by 1.5 and add the answer to your actual RAM.Next, multiply all your GB values by 1024 to convert to MB values.For example;My RAM is 4 GB so we have to multiply 4 x 1.5 = 6Then add 6+4 = 10And finally multiply 10 x 1024 = 10240.We can then type the value 10240 in the ”’maximum size” box.(Feel free to correct my math in the comments)K) Click on ”set”, ”apply”, ”OK” and restart your PC.
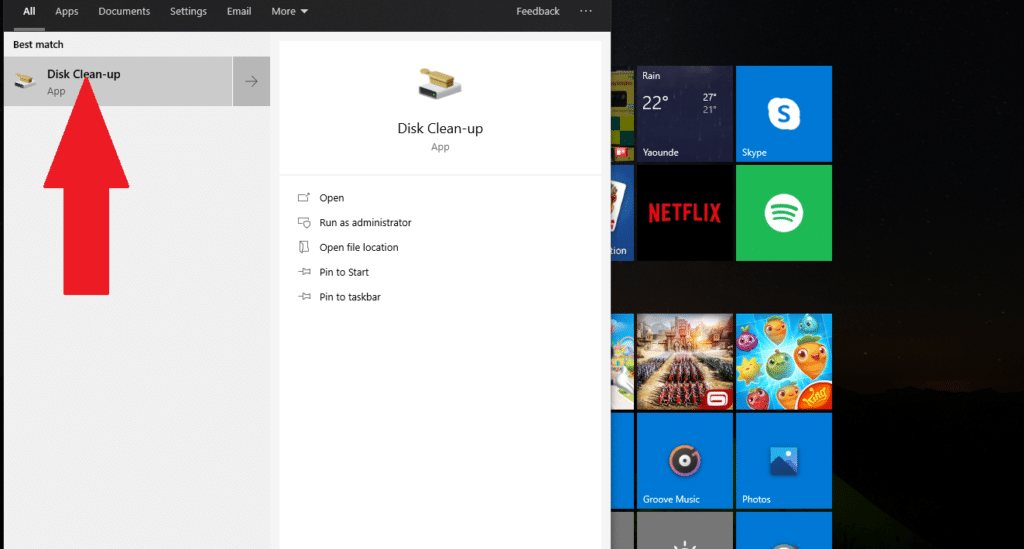 C) Select a ”Drive” from the drop-down menu and click ”OK”.
 D) After a short while of loading, another window appears. Click on ”Clean up system files” at the bottom and wait for a while.
 E) Select your ”C: Drive” or the drive that contains your system files, from the drop-down menu.
 F) Select all the system files you want to permanently delete by checking the boxes beside them, click on ”OK” to permanently delete them.This process helps clean your system drive from hidden files, which when accumulated, begin to slow your PC down. Doing this once in a while can help you fix a slow windows 10.
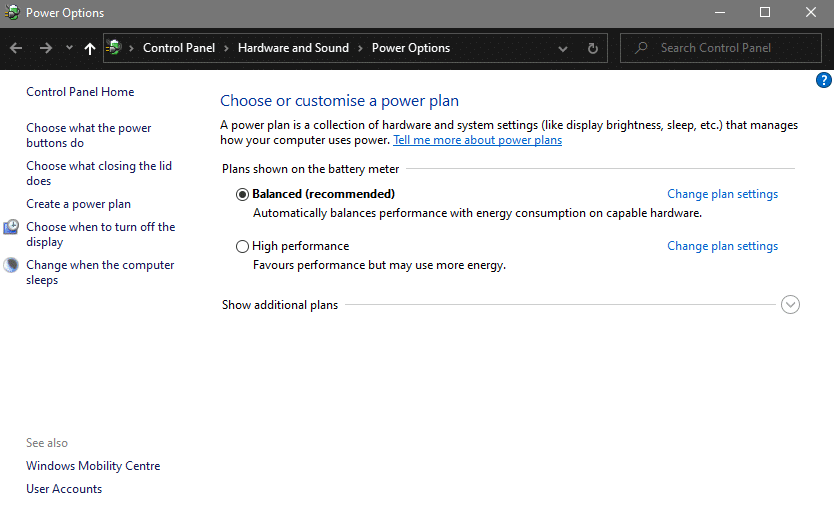 B) Locate the ”high-performance” option, select it and click on the ”change plan settings” to the right of the window. This will open the ”advanced power setting” window.
 C) In the newly opened window, click on ”change advanced power setting” at the bottom of the window.
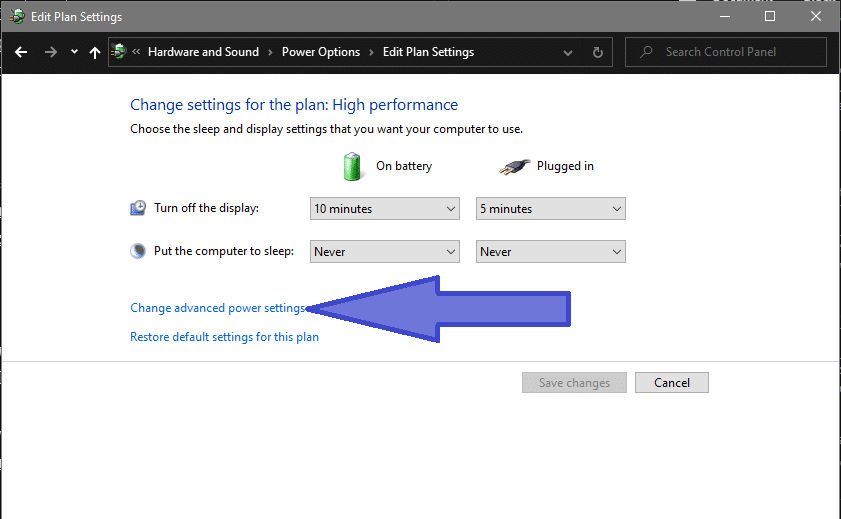 D) In the new window, scroll down to ”processor power management” and click the ”plus sign” to open the drop down menu.E) Click ”plus sign” on ”minimum processor state”, and set the value to 100% when plugged in.Click ”plus sign” on ”maximum processor state”, and set the value to 100% when plugged in.Finally, click ”apply”, ”OK” and ”save changes”
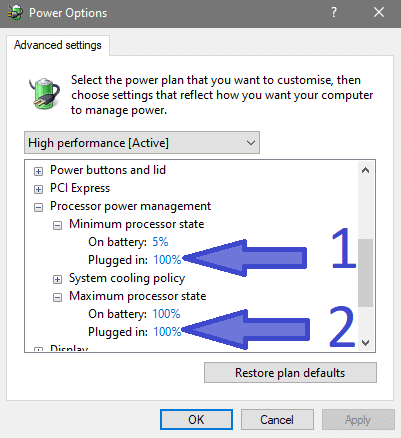 All the above settings will make the processor work at its optimum rate when PC is plugged in, helping you to further fix your slow windows 10.
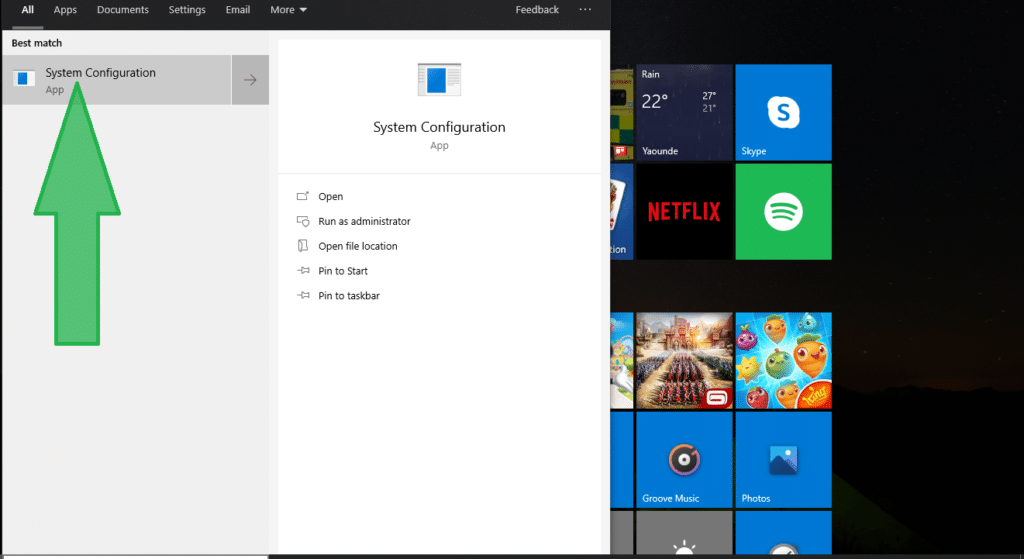 B) Click the ”services” tab, which is the third tab from the left.C) Click the ”checkbox” labelled ”hide all Microsoft services” at the bottom left of the window. This will hide all Microsoft services and leave all non-Microsoft services visible.D) Then uncheck all unnecessary services, like those from software not being used and click ”Apply”.
 E) Click on the ”startup” tab, which is the fourth tab from the left.F) While in that tab, click on ”open task manager” to launch the ”startup” tab in the task manager. Click on ”OK” in the system configuration menu and click ”exit without restart”.
 G) In the task manager startup menu, select all the unwanted programs that launch during bootup and disable them.
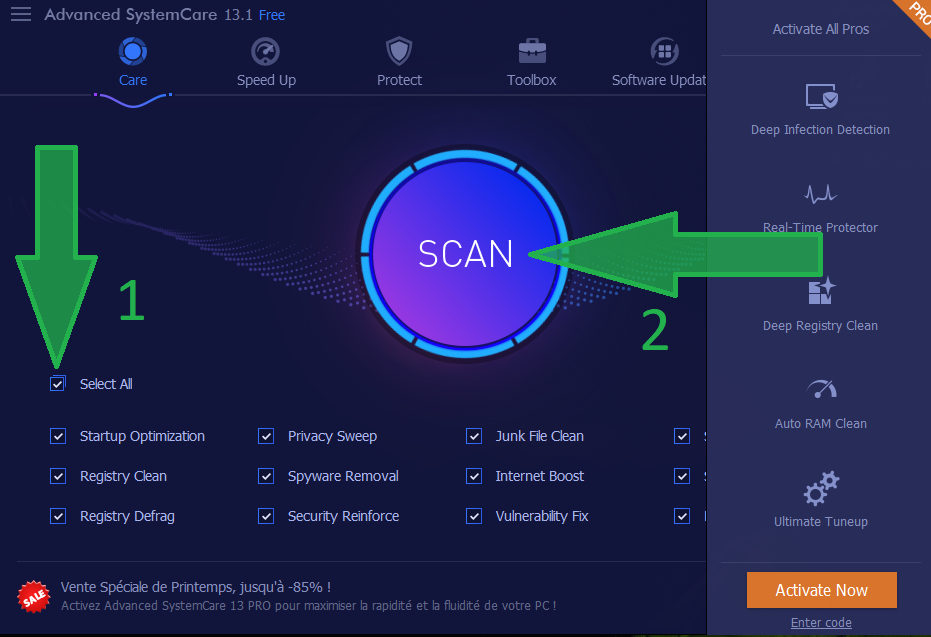 C) Click on ”scan” and click the checkbox below, making sure that the option ”automatically fix” has been selected.This software will automatically carry out a number of optimizations, boost your PC and fix your slow windows 10.
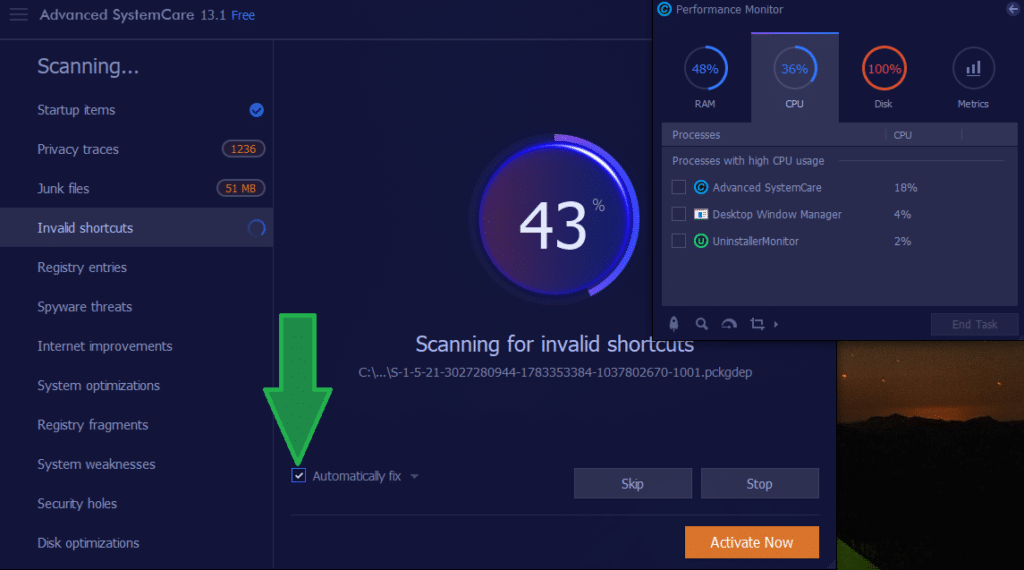 D) Download and install
 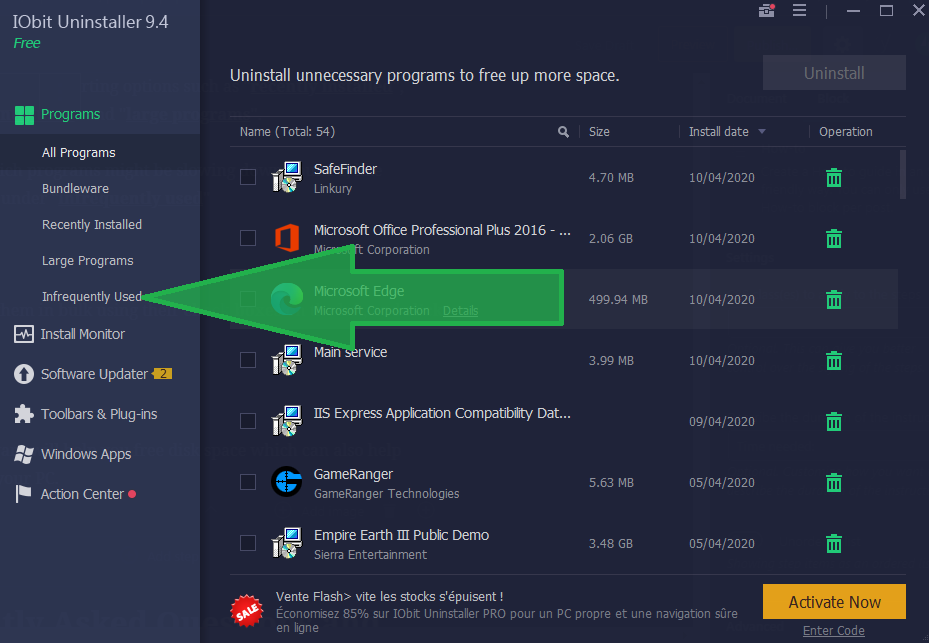 F) Use the various sorting options such as ”recently installed”, ”infrequently used” and ”large programs”.G) See which programs might be slowing down your PC, like programs under ”infrequently used”.H) Select them in bulk using their check boxes on the left, and click uninstall.
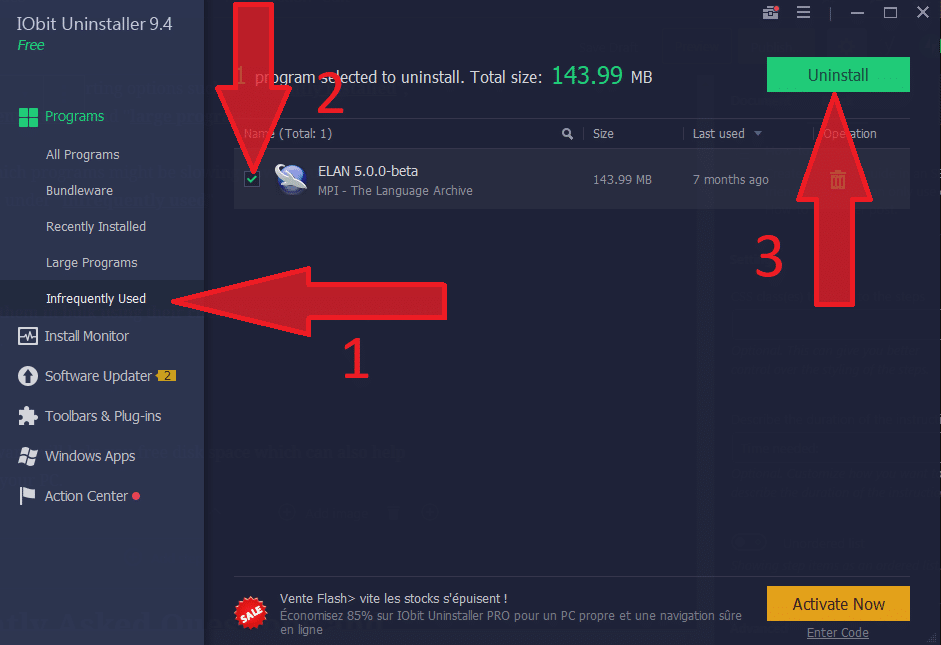 This software will help you free disk space which can also help speed up your PC.

![Kaspersky Causing Blue Screen [SOLVED] Kaspersky Causing Blue Screen](https://terraexploration.space/wp-content/uploads/Kaspersky-Causing-Blue-Screen100-324x160.jpg)
Very detailed. Will absolutely help everyone who tries it out
Thanks for your feedback. ????