Stable Diffusion
Introduction
Unlocking the full potential of Stable Diffusion on Mac can be a daunting challenge. However, fear not! Today, we explore Invoke AI, a powerhouse fork, tailor-made for Mac M1 users.
How to Install and Use Diffusion
Navigating the Stable Diffusion Landscape on Mac
Stable Diffusion with AUTOMATIC1111’s WebUI
| PROS | CONS |
|---|---|
| Renowned UI for Stable Diffusion. | Slower generation speeds. |
| Mac version installation challenges. | |
| Non-optimized software. |
Stable Diffusion with DiffusionBee
| PROS | CONS |
|---|---|
| Effortless Mac app installation. | Limited features compared to other versions. |
| Seamless user experience. |
Stable Diffusion with InvokeAI
| PROS | CONS |
|---|---|
| An early CompVis Stable Diffusion repo fork. | Requires technical understanding for installation. |
| A rapidly evolving feature set. | |
| An intuitive UI. | |
| A vibrant community. |
What we recommend: We opt for InvokeAI for its extensive features, and all the advantages listed in the above analysis table. Refer to the official InvokeAI repository for an in-depth guide on getting started.
Installation Process
Prerequisites
- Apple computer.
- M1 chip preferred (Intel chip acceptable with minimum 4GB VRAM).
- Minimum 10 GB of free disk space.
- macOS 12.3 Monterey or later.
How to Install InvokeAI on Your Mac
Time Needed : 00 hours 10 minutes
In this tutorial, we’ll guide you through the process of installing InvokeAI on your Mac such that you can use it for generating images with Stable Diffusion. This might take about 10 minutes, so grab a cup of coffee and let’s get started!
Step 1: Visit InvokeAI
 As shown in the image above, visit the InvokeAI release page on GitHub.
Step 2: Download the file
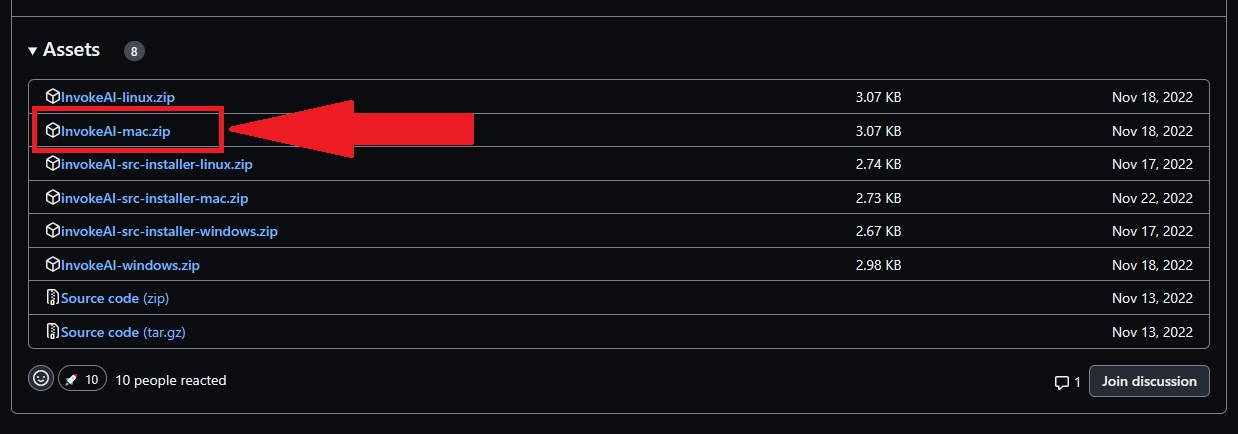
 As shown in the image above, download the “InvokeAI-mac.zip” file.
Step 3: Unzip the file
Unzip the file to reveal “readme.txt” and “install.sh.“
Step 4: Launch your terminal
Open your terminal using the following shortcut: [Command + Spacebar, search for “terminal”]
Step 5: Open the Download Folder
 As shown in the image above, navigate to the downloaded folder using the following terminal command:
cd downloads/invokeai Adjust the path if your InvokeAI folder is elsewhere. As shown in the image above, to go back, use the following terminal command:
 cd ..Step 6: Run the Installation
 As shown in the image above, run the installation script using the following terminal command:
./install.sh
After carrying out the above procedure, the download will launch, displaying “***** Installing InvokeAI… *****” and various packages being downloaded (totalling approximately 90MB).
Handling Python Errors
Encountering Python errors during installation is not uncommon. If you’ve tangled with multiple Python installations, consider a clean slate. Follow Muhsin Fatih’s guide for a straightforward Python uninstallation and reinstallation process.
Conclusion
Embark on your image generation journey on Mac M1 with InvokeAI. Using this tutorial enjoy a smooth installation process, and let your creative exploration flourish seamlessly.
Frequently Asked Questions and Their Answers
Is Invoke AI the only recommended option for running Stable Diffusion on Mac M1
Yes, Invoke AI is a highly recommended option for Mac M1 users due to its full-featured Stable Diffusion fork with an excellent Mac M1 version. It offers a robust feature set, an intuitive UI, and an active community.
Can I install Invoke AI alongside other Stable Diffusion options on my Mac M1?
Yes, it is possible to install both Invoke AI and stable-diffusion-webui on a Mac M1, and users have reported successful installations with both applications working fine.
What are the system requirements for installing Invoke AI on Mac M1?
To install Invoke AI on Mac M1, you need an Apple computer with an M1 chip (Intel chip is acceptable with a minimum of 4GB VRAM), at least 10 GB of free disk space, and macOS 12.3 Monterey or later.
Are there alternative installation guides available for Stable Diffusion on Mac M1?
Yes, there are alternative installation guides for Stable Diffusion on Mac, providing step-by-step instructions. Different guides may offer additional insights or variations in the installation process.
References
- Diffusion on Mac M1: Invoke AI.
- GitHub: New instructions for running web UI on macOS.
- Hacker News: Run Diffusion on Your M1 Mac’s GPU.
- Diffusion Art: How to install and run Diffusion on Apple Silicon M1.
Other Interesting Articles
- NovelAI Image Generator Pricing: Unlock NovelAI Image Generator with artistic potential, getting insights on understanding image generation, pricing plans, trial options…
- How to use AnimateDiff for Free: Explore AnimateDiff video generation with terms like motion module, prompt, and seed. Learn to create captivating visuals effortlessly…


 As shown in the image above, visit the
  As shown in the image above, download the “InvokeAI-mac.zip” file.
 As shown in the image above, navigate to the downloaded folder using the following terminal command:
 Adjust the path if your InvokeAI folder is elsewhere. As shown in the image above, to go back, use the following terminal command:
  As shown in the image above, run the installation script using the following terminal command:

