21.7 C
Yaoundé
23:40:25 Thursday, 19 September, 2024
Home Blog Page 4

How to Create Videos From Images with OpenCV

0
How to Create Videos From Images with OpenCV

Manipulate Videos with OpenCV

Introduction

When diving into the realm of computer vision and machine learning, the ability to convey your findings and progress is paramount. Static images might not always capture the essence of your work. In this comprehensive guide, we’ll explore the art of creating captivating videos using OpenCV, focusing on the renowned Ken Burns effect.

Video Source: Rob Mulla
Video Manipulation

Understanding the Ken Burns Effect

What is the Ken Burns Effect?

Named after the filmmaker Ken Burns, this technique involves dynamically panning and zooming across images. Instead of presenting a stagnant photo, the Ken Burns effect brings life to your visuals by zooming into details and smoothly panning across the image.

Creating the Ken Burns Animation with OpenCV

Cropping Magic with OpenCV

The essence of the Ken Burns effect lies in the art of cropping. Each frame in the video is essentially a cropped version of the original image, zoomed to fill the screen. With OpenCV and its powerful numpy arrays, this becomes an elegant dance.

def crop(img, x, y, w, h): x0, y0 = max(0, x - w//2), max(0, y - h//2) x1, y1 = x0 + w, y0 + h return img[y0:y1, x0:x1]

The Pan and Zoom Choreography with OpenCV

To orchestrate the dance of pan and zoom, we need to define our constants:

video_dim = (1280, 720) fps = 25 duration = 2.0 start_center = (0.4, 0.6) end_center = (0.5, 0.5) start_scale = 0.7 end_scale = 1.0

Now, with these parameters, we can create a mesmerizing video. For each frame, we calculate the crop coordinates, adjust for aspect ratio, and resize the cropped image.

num_frames = int(fps * duration) frames = [] for alpha in np.linspace(0, 1, num_frames): rx = end_center[0] * alpha + start_center[0] * (1 - alpha) ry = end_center[1] * alpha + start_center[1] * (1 - alpha) x = int(orig_shape[1] * rx) y = int(orig_shape[0] * ry) scale = end_scale * alpha + start_scale * (1 - alpha) # determine how to crop based on the aspect ratio of width/height if orig_shape[1] / orig_shape[0] > video_dim[0] / video_dim[1]: h = int(orig_shape[0] * scale) w = int(h * video_dim[0] / video_dim[1]) else: w = int(orig_shape[1] * scale) h = int(w * video_dim[1] / video_dim[0]) # crop, scale to video size, and save the frame cropped = crop(img, x, y, w, h) scaled = cv2.resize(cropped, dsize=video_dim, interpolation=cv2.INTER_LINEAR) frames.append(scaled)

Bringing the Frames to Life

The final act involves putting all these frames together into a seamless video. OpenCV’s VideoWriter comes to our rescue.

# write to MP4 file vidwriter = cv2.VideoWriter("output.mp4", cv2.VideoWriter_fourcc(*"mp4v"), fps, video_dim) for frame in frames: vidwriter.write(frame) vidwriter.release()

Getting Started

To demonstrate this effect, let’s begin with a high-resolution image, like the football picture available here. This image, in all its 1600 x 1067 pixels, will be our canvas.

Creating Videos from Images with OpenCV

Time Needed : 00 hours 30 minutes

Carefully follow the next series of instructions to get the best results from this tutorial. This is going to be interesting, so, grab a cup of coffee, and let’s get started.

  1. Step 1: Importing Necessary Libraries

    To begin, we import the OpenCV library with the following line of code:import cv2The above operations can be done as shown in the following image:open cv video manipulation

  2. Step 2: Define the Function

    Define the function ken_burns_effect() which takes the input image path, output video path, duration, and zoom factor as parameters. The function can be defined as follows:def ken_burns_effect(image_path, output_path, duration=5, zoom=1.2): # Function code will go hereThe above operations can be done as shown in the following image:open cv video manipulation

  3. Step 3: Read the Input image

    Get the image you earlier downloaded, to use within your OpenCV program, using the following code:image = cv2.imread(image_path) if image is None: print("Error: Image not found!") returnThe above operations can be done as shown in the following image:open cv video manipulation

  4. Step 4: Get the Dimensions of the Input Image

    Get the dimensions of the image you earlier imported into your program, using the following code:height, width = image.shape[:2]The above operations can be done as shown in the following image:open cv video manipulation

  5. Step 5: Define the Starting and Ending Scale

    Define starting and ending scale factors for zooming and starting and ending translation values for panning, with the following code:start_scale = 1.0 end_scale = zoom start_translation = (0, 0) end_translation = (width * (end_scale - 1) / 2, height * (end_scale - 1) / 2)The above operations can be done as shown in the following image:open cv video manipulation

  6. Step 6: Define the Frames

    Define the total number of frames for the video based on the specified duration, using the following code:num_frames = duration * 25 # Assuming 25 frames per secondThe above operations can be done as shown in the following image:open cv video manipulation

  7. Step 7: Create a Video Writer Object

    Create a video writer object to save the Ken Burns effect video, using the following code:fourcc = cv2.VideoWriter_fourcc(*'mp4v') video_writer = cv2.VideoWriter(output_path, fourcc, 25, (width, height))The above operations can be done as shown in the following image:open cv video manipulation

  8. Step 8: Apply the Ken Burns Effect

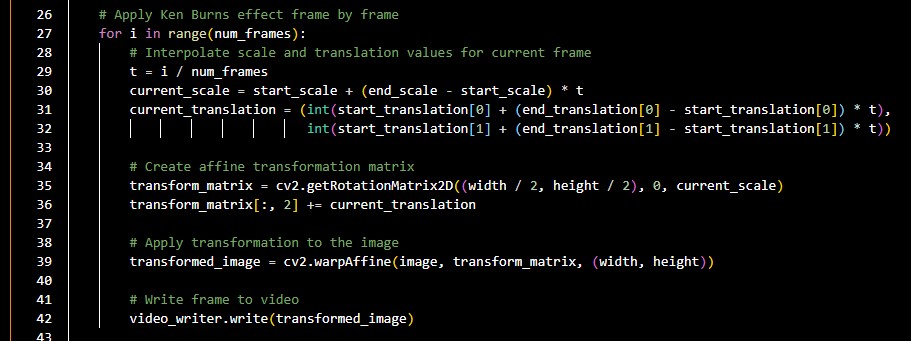
    Apply the Ken Burns effect frame by frame by interpolating scale and translation values, using the following code:for i in range(num_frames): t = i / num_frames current_scale = start_scale + (end_scale - start_scale) * t current_translation = (int(start_translation[0] + (end_translation[0] - start_translation[0]) * t), int(start_translation[1] + (end_translation[1] - start_translation[1]) * t)) transform_matrix = cv2.getRotationMatrix2D((width / 2, height / 2), 0, current_scale) transform_matrix[:, 2] += current_translation transformed_image = cv2.warpAffine(image, transform_matrix, (width, height)) video_writer.write(transformed_image)The above operations can be done as shown in the following image:open cv video manipulation

  9. Step 9: Release the Video Writer

    Release the video writer, using the following code:video_writer.release() print("Ken Burns effect video saved successfully!")The above operations can be done as shown in the following image:open cv video manipulation

  10. Step 10: Define Input Image and Output Video Paths

    Define the input image path, and output video path, and call the ken_burns_effect() function with desired parameters, using the following code:if name == "main":input_image = "input_image.jpg"output_video = "ken_burns_effect.mp4"ken_burns_effect(input_image, output_video, duration=5, zoom=1.2)The above operations can be done as shown in the following image:open cv video manipulationIf everything goes fine, you should see a message saying that the video was saved successfully, and you’ll also see the video saved in its respective directory.

The resulting video from the above program looks as follows:

Video Source: TERRA-X
How to Create Videos From Images with OpenCV

In case you prefer copying parts of the code, or reading the full content of the downloaded source file before extracting and running it, check out the raw source code below.

Also, the code was written in a Jupyter Notebook, not with the default Python file, you might have to take note of that, as it determines how the code should be compiled to avoid any worries. (within Jupyter Notebook or Jupyter Lab) and not using the default Python compiler.

Jupyter | Cell 2
def ken_burns_effect(image_path, output_path, duration=5, zoom=1.2):
    # Read the image
    image = cv2.imread(image_path)
    if image is None:
        print("Error: Image not found!")
        return

    # Get image dimensions
    height, width = image.shape[:2]

    # Define starting and ending scale factors for zoom
    start_scale = 1.0
    end_scale = zoom

    # Define starting and ending translation values for panning
    start_translation = (0, 0)
    end_translation = (width * (end_scale - 1) / 2, height * (end_scale - 1) / 2)

    # Define total number of frames
    num_frames = duration * 25  # Assuming 25 frames per second

    # Create video writer object
    fourcc = cv2.VideoWriter_fourcc(*'mp4v')
    video_writer = cv2.VideoWriter(output_path, fourcc, 25, (width, height))

    # Apply Ken Burns effect frame by frame
    for i in range(num_frames):
        # Interpolate scale and translation values for current frame
        t = i / num_frames
        current_scale = start_scale + (end_scale - start_scale) * t
        current_translation = (int(start_translation[0] + (end_translation[0] - start_translation[0]) * t),
                               int(start_translation[1] + (end_translation[1] - start_translation[1]) * t))

        # Create affine transformation matrix
        transform_matrix = cv2.getRotationMatrix2D((width / 2, height / 2), 0, current_scale)
        transform_matrix[:, 2] += current_translation

        # Apply transformation to the image
        transformed_image = cv2.warpAffine(image, transform_matrix, (width, height))

        # Write frame to video
        video_writer.write(transformed_image)

    # Release video writer
    video_writer.release()
    print("Ken Burns effect video saved successfully!")
Visit My GitHub At https://github.com/N-Elmer/
Jupyter | Cell 3
if __name__ == "__main__":
    input_image = "image/football.jpg"
    output_video = "video/ken_burns_effect.mp4"
    ken_burns_effect(input_image, output_video, duration=5, zoom=1.2)
Visit My GitHub At https://github.com/N-Elmer/

Conclusion

Congratulations! You’ve just mastered the art of creating visually stunning videos with the Ken Burns effect using OpenCV. This technique not only showcases your work more dynamically but also adds a layer of professionalism to your presentations. Dive into the world of computer vision, armed with the ability to tell your story through captivating visuals.

Some Frequently Asked Questions and Their Answers

  1. What is OpenCV and how does it relate to image manipulation?

    OpenCV is a powerful computer vision library widely used for image processing.

  2. Can you provide practical examples of image processing using OpenCV?

    Yes, there are practical examples demonstrating image preprocessing with OpenCV.

  3. How can OpenCV be used for real-time image manipulation in Python?

    OpenCV allows real-time image manipulation by capturing frames and applying edits in Python.

  4. What are the essential concepts in computer vision and image processing for beginners?

    A beginner’s guide to computer vision and image processing with OpenCV simplifies essential concepts in these cutting-edge fields.

OpenCV References

Other Interesting Articles

A Comprehensive Guide on How to Use Stable Diffusion Seeds

0
How to Use Stable Diffusion Seeds

Stable Diffusion Seeds

Introduction

In the realm of AI-generated images, the concept of Seeds holds an enigmatic power, often surrounded by confusion and misinformation. This guide aims to unravel the mysteries behind Stable Diffusion Seeds, providing clarity on what they are, how they function, and, most importantly, how you can harness their potential to fine-tune your generated images.

Video Source: BOKKI
Stable Diffusion Seeds

Understanding the Essence of Stable Diffusion Seeds

A Seed, in the context of Stable Diffusion, is simply a numerical value from which the algorithm generates noise. Contrary to misconceptions, a Seed is not the noise image itself, nor does it encapsulate all parameters used in image generation.

It remains detached from specific text prompts, poses, clothing, backgrounds, or artistic styles. Stable Diffusion’s noise generator is not entirely random; it reliably reproduces a noise pattern from a given Seed, laying the foundation for repeatable image generation.

Demystifying Stable Diffusion’s Process

To grasp the intricacies of Stable Diffusion’s image generation, consider the algorithm’s ability to consistently reproduce a pattern of noise from a Seed. The resulting images may seem random to human eyes, but they follow a discernible structure.

For a deeper dive into this process, let’s explore examples demonstrating how Stable Diffusion transforms initial noise into compelling images. The repeatability inherent in Stable Diffusion introduces myriad potential use cases, empowering users to:

  • Reproduce images across sessions with the same Seed, prompt, and parameters.
  • Collaborate by working from someone else’s Seed, prompt, and parameters.
  • Make subtle tweaks by adjusting the prompt or parameters without altering the overall image composition significantly.

Exploring the Influence of Stable Diffusion Seeds and Prompts

Delving into detailed experiments conducted by the Stable Diffusion community, certain Seeds exhibit a higher probability of producing images with specific characteristics. Users have identified Seeds associated with distinct colour palettes or compositions, providing a strategic advantage in obtaining desired outputs.

/u/wonderflex’s experiments reveal intriguing insights:

  • Changing the Seed while keeping the prompt and parameters constant results in markedly different output images.
  • Modifying the text prompt, even with a single word, can alter output images without drastically changing their general look or colour palette.

Navigating the Stable Diffusion Web UI Seed Field

Seeds wield conceptual power, and leveraging them involves understanding the Stable Diffusion Web UI. In both the text2img and img2img tabs, you’ll encounter a field labelled Seed. Key considerations include:

  • The default setting is -1, prompting Stable Diffusion to pull a random Seed for image generation.
  • You can manually input a specific Seed number into the field.
  • The dice button resets the Seed to -1, while the green recycle button populates it with the Seed used in your generated image.

Maintaining Consistency with Stable Diffusion Seeds

Suppose you’ve generated a batch of images and wish to retain their overall look while making minor modifications. The process involves populating the Seed field with the desired Seed from a selected image, ensuring consistency in the generated images.

Consider the following steps:

  1. Select the generated image.
  2. Hit the green recycle button to populate the Seed field.
  3. Make necessary tweaks to the text prompt or parameters while preserving the Seed for consistency.

Modifying Images with Precision

When it comes to precise modifications, starting with a specific Seed is crucial. Explore freely available AI-generated images and their associated Seeds through platforms like Lexica. By selecting a Seed known for specific characteristics, you can fine-tune your generated images with precision.

How to Find Seeds

To discover Seeds linked to desired characteristics, leverage the vast repository of AI-generated images available in Stable Diffusion communities. Lexica proves to be an efficient tool for sorting through images and finding associated Seeds.

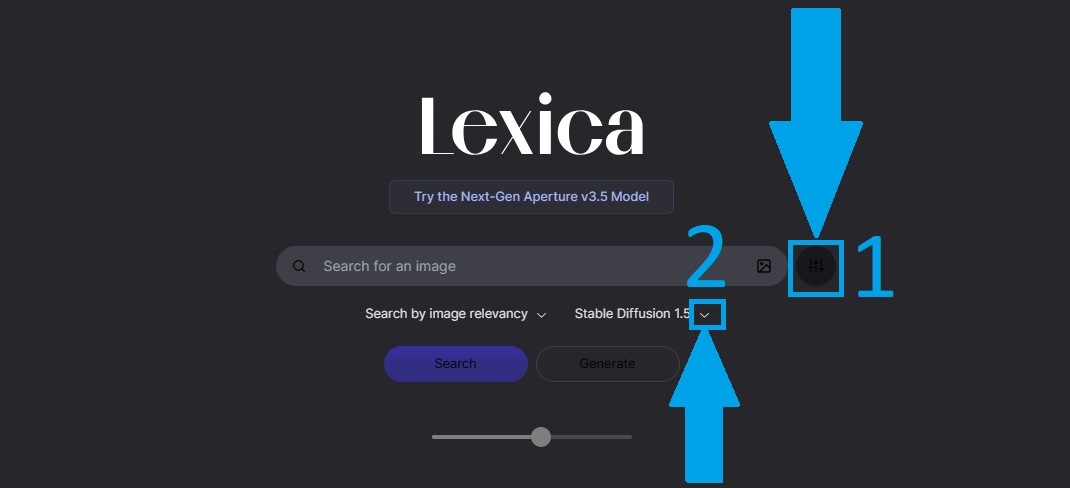
By filtering results to Stable Diffusion 1.5, you gain access to valuable information, including the text prompt, parameters, and the coveted Seed number.

Time Needed : 00 hours 05 minutes

In this tutorial, we’ll guide you through the process of finding Stable Diffusion Seeds such that you can use them for generating images with Stable Diffusion. This might take about 5 minutes, so grab a cup of coffee and let’s get started!

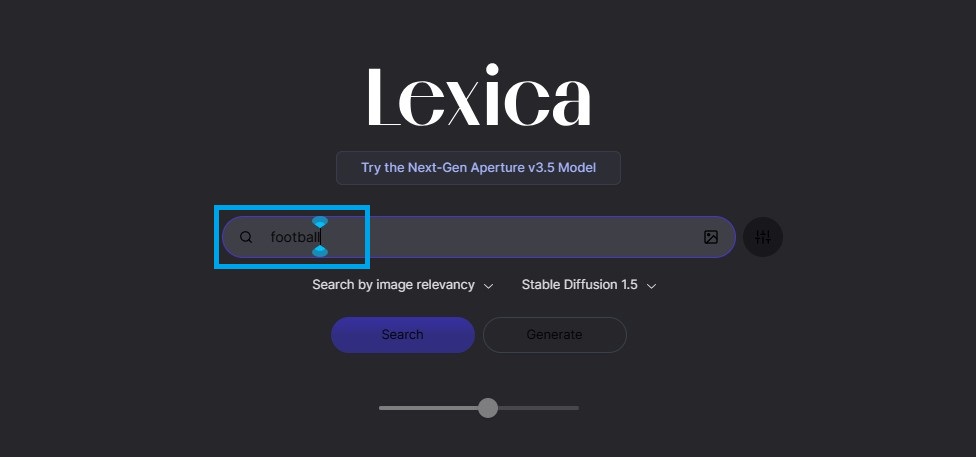
  1. Step 1: Visit Lexica

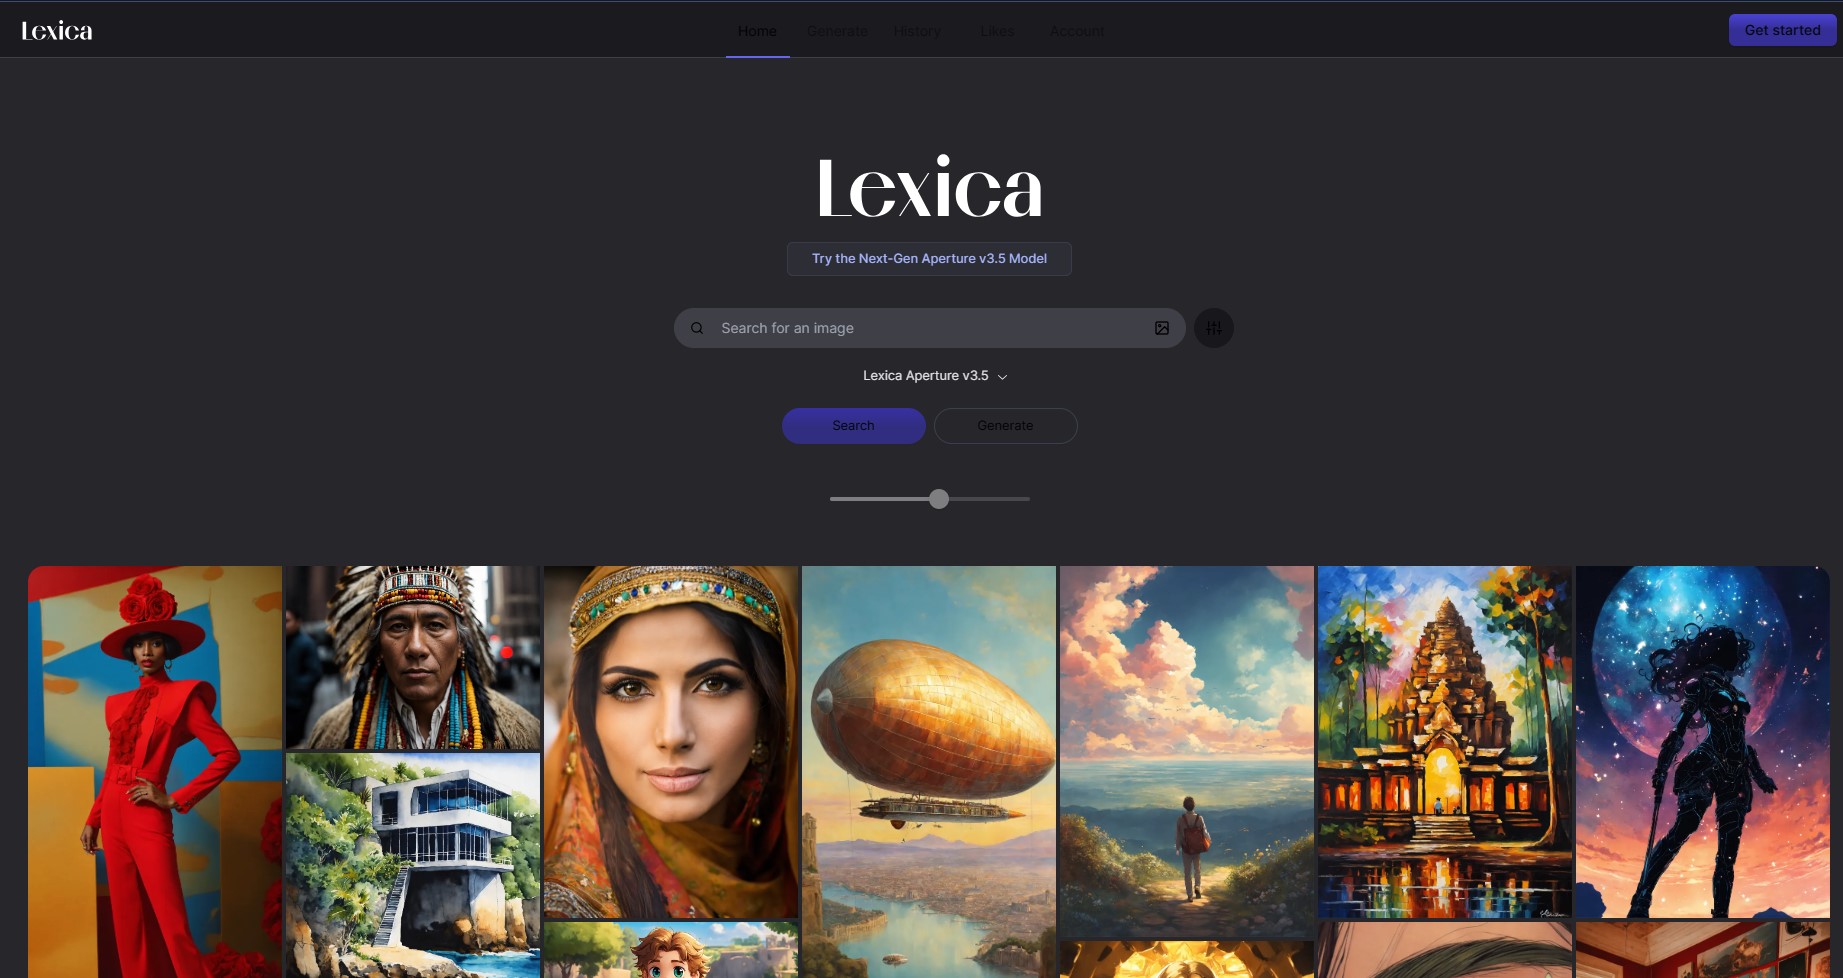
    How to Use Stable Diffusion SeedsGo the Lexica’s website using the following URL: Lexica as shown in the image above.

  2. Step 2: Select Correct Filter

    How to Use Stable Diffusion SeedsAs seen in the image in step 1, the filter is set by default to Lexica Aperture V3.5 (which could be a different version if you are reading this long after this article was published). As shown in the image above, Switch to select the Stable Diffusion 1.5 in the search filter.

  3. Step 3: Search for An AI-generated Image

    How to Use Stable Diffusion SeedsSearch for an AI-generated image, by typing a description for the desired image and hitting the search button, as shown in the image above.

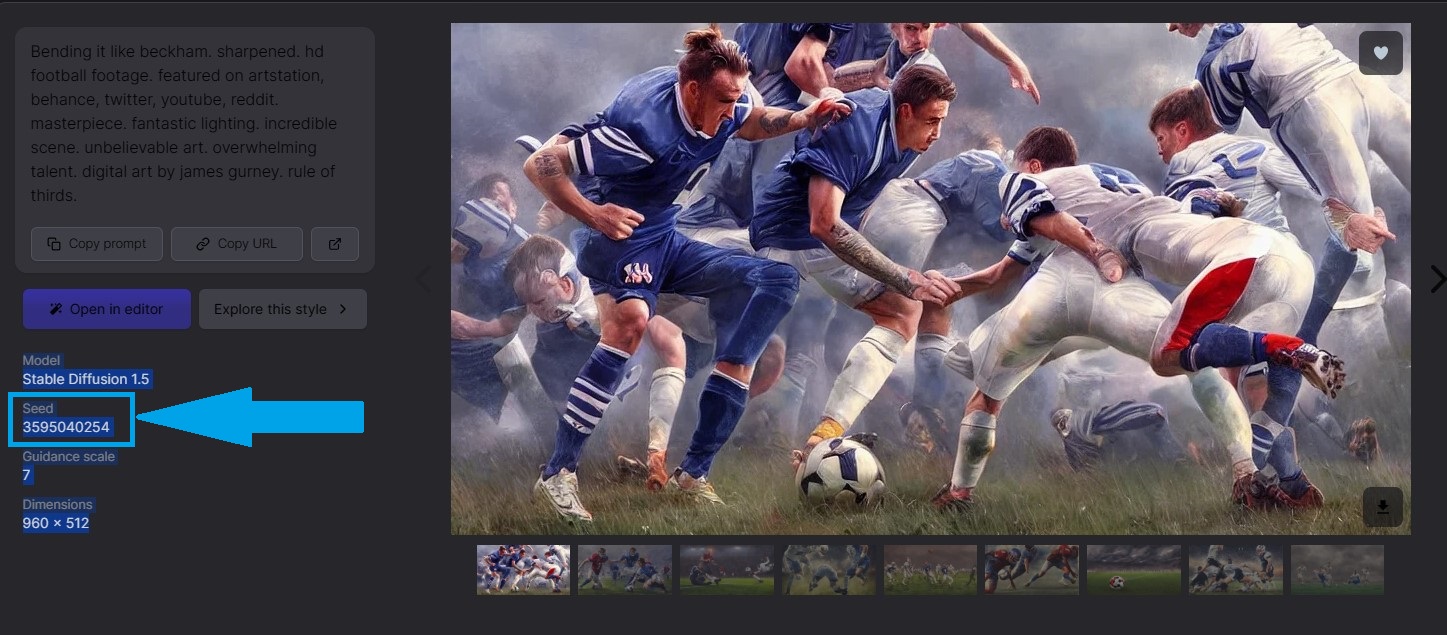
  4. Step 4: View Image Stable Diffusion Seed

    How to Use Stable Diffusion SeedsOnce the images show up, click on any of the results to see the image’s Seed, as shown in the image above.

Armed with these tools and insights, you’re well-equipped to embark on a journey of creative exploration within the Stable Diffusion ecosystem. Best of luck and enjoy the fascinating world of AI-generated images!

Conclusion

In conclusion, understanding and effectively using Stable Diffusion Seeds opens up a realm of possibilities for consistent, controlled, and personalized image generation. Whether replicating others’ work or seeking a reliable starting point, mastering the art of Seeds in the Stable Diffusion Web UI empowers you to unleash the full potential of AI-generated images.

Frequently Asked Questions and Their Answers

  1. What is a seed in Stable Diffusion?

    A seed in Stable Diffusion is a numerical value used to generate noise, a fundamental component in the AI image generation process. It does not represent the image itself but influences the algorithm’s ability to consistently reproduce patterns of noise from the given seed.

  2. How does changing the seed impact image generation?

    Changing the seed while keeping the prompt and parameters constant results in different-looking output images. This variation allows users to explore diverse visual outcomes while maintaining consistency in other aspects of the generated images.

  3. Where can I find specific seeds for desired image characteristics?

    Users can explore freely available AI-generated images in Stable Diffusion communities, particularly through platforms like Lexica. By filtering results to Stable Diffusion 1.5, users can discover associated seeds along with text prompts and parameters.

  4. How can I use seeds to modify generated images with precision?

    To modify generated images with precision, users can start with a specific seed known for desired characteristics. By inputting this seed and adjusting the text prompt or parameters, users can make controlled tweaks while preserving the overall look of the image.

References

Other Interesting Articles

Stable Diffusion: How to Install it on Mac M1 with Invoke AI

0
How to Install Stable Diffusion on Mac M1 with Invoke AI

Stable Diffusion

Introduction

Unlocking the full potential of Stable Diffusion on Mac can be a daunting challenge. However, fear not! Today, we explore Invoke AI, a powerhouse fork, tailor-made for Mac M1 users.

Video Source: Sebastian Kamph
How to Install and Use Diffusion

Navigating the Stable Diffusion Landscape on Mac

Stable Diffusion with AUTOMATIC1111’s WebUI

PROSCONS
Renowned UI for Stable Diffusion.Slower generation speeds.
Mac version installation challenges.
Non-optimized software.
Summary Table for Installing Diffusion on Mac M1 with AUTOMATIC1111’s WebUI

Stable Diffusion with DiffusionBee

PROSCONS
Effortless Mac app installation.Limited features compared to other versions.
Seamless user experience.
Summary Table for Installing Diffusion on Mac M1 with DiffusionBee

Stable Diffusion with InvokeAI

PROSCONS
An early CompVis Stable Diffusion repo fork.Requires technical understanding for installation.
A rapidly evolving feature set.
An intuitive UI.
A vibrant community.
Summary Table for Installing Diffusion on Mac M1 with InvokeAI

What we recommend: We opt for InvokeAI for its extensive features, and all the advantages listed in the above analysis table. Refer to the official InvokeAI repository for an in-depth guide on getting started.

Installation Process

Prerequisites

  • Apple computer.
  • M1 chip preferred (Intel chip acceptable with minimum 4GB VRAM).
  • Minimum 10 GB of free disk space.
  • macOS 12.3 Monterey or later.

How to Install InvokeAI on Your Mac

Time Needed : 00 hours 10 minutes

In this tutorial, we’ll guide you through the process of installing InvokeAI on your Mac such that you can use it for generating images with Stable Diffusion. This might take about 10 minutes, so grab a cup of coffee and let’s get started!

  1. Step 1: Visit InvokeAI

    How to Install Stable Diffusion on Mac M1 with Invoke AIAs shown in the image above, visit the InvokeAI release page on GitHub.

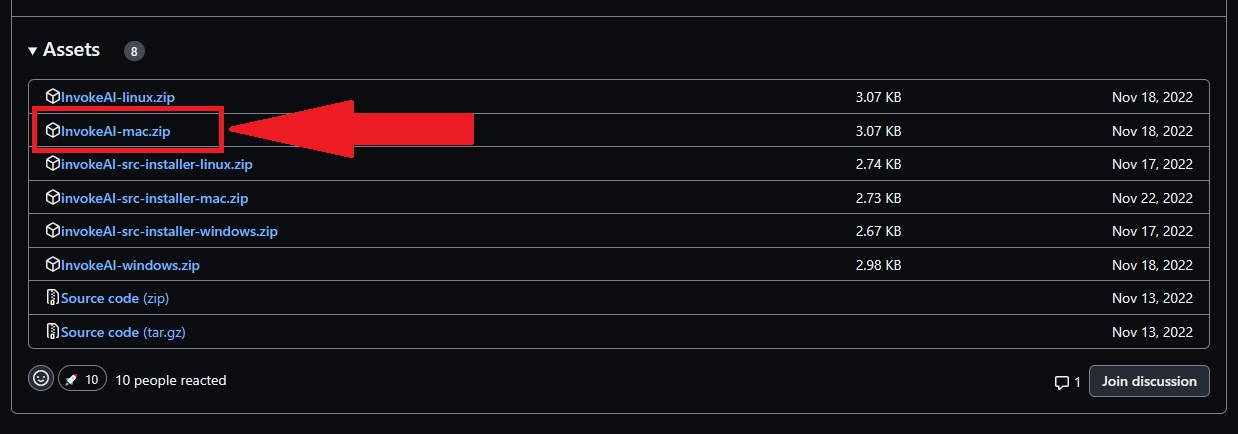
  2. Step 2: Download the file

    How to Install Stable Diffusion on Mac M1 with Invoke AIAs shown in the image above, download the “InvokeAI-mac.zip” file.

  3. Step 3: Unzip the file

    Unzip the file to reveal “readme.txt” and “install.sh.

  4. Step 4: Launch your terminal

    Open your terminal using the following shortcut: [Command + Spacebar, search for “terminal”]

  5. Step 5: Open the Download Folder

    How to Install Stable Diffusion on Mac M1 with Invoke AIAs shown in the image above, navigate to the downloaded folder using the following terminal command:cd downloads/invokeai Adjust the path if your InvokeAI folder is elsewhere. As shown in the image above, to go back, use the following terminal command: cd ..

  6. Step 6: Run the Installation

    How to Install Stable Diffusion on Mac M1 with Invoke AIAs shown in the image above, run the installation script using the following terminal command:./install.sh

After carrying out the above procedure, the download will launch, displaying “***** Installing InvokeAI… *****” and various packages being downloaded (totalling approximately 90MB).

Handling Python Errors

Encountering Python errors during installation is not uncommon. If you’ve tangled with multiple Python installations, consider a clean slate. Follow Muhsin Fatih’s guide for a straightforward Python uninstallation and reinstallation process.

Conclusion

Embark on your image generation journey on Mac M1 with InvokeAI. Using this tutorial enjoy a smooth installation process, and let your creative exploration flourish seamlessly.

Frequently Asked Questions and Their Answers

  1. Is Invoke AI the only recommended option for running Stable Diffusion on Mac M1

    Yes, Invoke AI is a highly recommended option for Mac M1 users due to its full-featured Stable Diffusion fork with an excellent Mac M1 version. It offers a robust feature set, an intuitive UI, and an active community.

  2. Can I install Invoke AI alongside other Stable Diffusion options on my Mac M1?

    Yes, it is possible to install both Invoke AI and stable-diffusion-webui on a Mac M1, and users have reported successful installations with both applications working fine.

  3. What are the system requirements for installing Invoke AI on Mac M1?

    To install Invoke AI on Mac M1, you need an Apple computer with an M1 chip (Intel chip is acceptable with a minimum of 4GB VRAM), at least 10 GB of free disk space, and macOS 12.3 Monterey or later.

  4. Are there alternative installation guides available for Stable Diffusion on Mac M1?

    Yes, there are alternative installation guides for Stable Diffusion on Mac, providing step-by-step instructions. Different guides may offer additional insights or variations in the installation process.

References

Other Interesting Articles

  • NovelAI Image Generator Pricing: Unlock NovelAI Image Generator with artistic potential, getting insights on understanding image generation, pricing plans, trial options…
  • How to use AnimateDiff for Free: Explore AnimateDiff video generation with terms like motion module, prompt, and seed. Learn to create captivating visuals effortlessly…

NovelAI Image Generator Pricing and Subscription Bundles

0
NovelAI Image Generator

NovelAI Image Generator

Introduction

In the ever-evolving landscape of AI-driven creativity, NovelAI stands out with its dual offering – an AI story writer and an AI Image Generator for anime images. In this guide, we delve into the intricacies of NovelAI’s Image Generation, exploring subscription plans, the absence of free trials, and the promising future developments on the horizon.

Video Source: Nate errant
NovelAI Image Generator

Understanding NovelAI Image Generator Components

NovelAI boasts two powerful components: the AI story writer and the AI Image Generator. While the story writer offers a tantalizing free trial, the Image Generator, unfortunately, does not extend the same courtesy. Subscribers must commit to a minimum $10/mo subscription to unlock the artistic potential of the Image Generator.

The NovelAI Image Generator Dilemma

No Free Trial, But a Glimmer of Hope

Regrettably, at present, NovelAI Image Generation lacks a free trial. However, whispers of change are in the air, with the NovelAI team hinting at the inclusion of a trial feature in 2023. The anticipation for a trial option reflects user concerns, especially from those solely interested in the Image Generation feature.

Also, NovelAI can be installed offline and used for free, check out our tutorial on how to do that here. The only problem with this is that you need a beefed-up PC to run it locally, so still requires you to spend quite a lot.

Bundled Subscription: A Turn-off for Some

A significant drawback lies in the bundled subscription, combining the Image Generation and Story Writer features. This approach may deter users from solely seeking image creation, deeming it an unnecessary expense for unused writing features. The NovelAI team has acknowledged this concern and plans to address it with a trial for image generation in the coming year.

Gift Keys: A Gesture of Generosity

Decoding the NovelAI Image Generator Gift Key

A standout feature in NovelAI’s ecosystem is the Gift Key. This unique key allows users to gift a subscription month to others without requiring an active subscription themselves. The unpredictability of Streamer giveaways adds an element of excitement to obtaining Gift Keys, which can be purchased using a credit card, Apple Pay, or Google Pay.

How to Acquire a NovelAI Image Generator Gift Key

Time Needed : 00 hours 05 minutes

With the following steps, we are going to show you how to acquire a gift key for NovelAI, in less than 5 minutes.

  1. Step 1: Accessing Settings: Click on the Gear Icon

    Click on the Gear icon.

  2. Step 2: Account Information: Navigate to the “Account” Tab

    Navigate to the “Account” tab.

  3. Step 3: Obtaining a New Gift Key: Scroll Down and Click “Purchase New Gift Key”

    Scroll down and click “Purchase New Gift Key.”

Upon purchase, recipients can redeem the code, gaining access to plans identical to those available for personal subscriptions.

NovelAI Image Generator Subscription Plans

NovelAI offers three subscription plans, each catering to different needs, as shown in the table below:

PLANBUNDLE
Tablet: $10/monthUnlimited text generation.
AI memory of 4096 characters (~500 words).
1000 Anlas for art generation (~200 images).
Scroll: $15/monthUnlimited text generation.
AI memory expanded to 8192 characters (~1000 words).
1000 Anlas for art generations (~200 images).
Opus: $25/monthUtilizes a superior AI storyteller model.
Unlimited text generation.
AI memory of 8192 characters (~1000 words).
10,000 Anlas for art generations (~2000 images).
Summary Table for NovelAI Image Generator Pricing and Subscription Bundles

Notably, normal image generations under the Opus plan do not consume Anlas, providing virtually limitless creative freedom.

Why We Recommend the Opus Plan

The Opus plan emerges as the optimal choice for enthusiasts planning to extensively use the Image Generation feature. The advanced AI storyteller model and the generous 10,000 Anlas allocation set it apart.

An Inside Perspective

Upon exploration, it’s evident that even familiarizing oneself with the software and experimenting with features consumes around 500 Anlas, half of the limit on lower-tier plans. In stark contrast, Opus plan users enjoy unlimited normal-resolution generations without depleting their Anlas.

NovelAI Image Generator VS Niji Journey

In comparing NovelAI to Niji Journey, both platforms offer similarly priced plans with infinite generations. The differentiating factor lies in their distinctive art styles. Dive into our guides to NovelAI prompting and Niji Journey prompts to discover which art style resonates with you.

Conclusion

In conclusion, NovelAI’s Image Generation is a powerful tool for crafting anime-style images and stories. While challenges like the absence of free trials persist, the future promises exciting developments. Embrace the flexibility of subscription plans, consider the Opus plan for unlimited creativity, and explore the unique realm of NovelAI’s artistic possibilities.

Frequently Asked Questions and Their Answers

  1. Is there a free trial for NovelAIAI Image Generation?

    At the moment, there is no free trial for NovelAIAI Image Generation. The NovelAI team plans to introduce this feature in 2023, responding to user requests for a trial option.

  2. Can I purchase the Image Generation feature separately, without the Story Writer?

    Unfortunately, NovelAI currently offers Image Generation and Story Writer as a bundled deal. Users seeking only Image Generation express concerns about committing to a subscription that includes features they might not use.

  3. What is a NovelAIAI Gift Key, and how can I get one?

    A Gift Key allows users to gift someone else a subscription per month. It can be purchased without an active subscription and is obtainable through a credit card, Apple Pay, or Google Pay. Streamers occasionally give out NovelAI Gift Keys during their streams, adding an element of unpredictability to acquiring them.

  4. Why does the Opus plan stand out for Image Generation?

    The Opus plan is recommended for heavy users of the Image Generation feature due to its superior AI storyteller model and a generous 10,000 Anlas allocation. Users on the Opus plan enjoy normal-resolution generations without consuming Anlas, providing virtually unlimited creative freedom.

References

  • Toolify: Master the Art of NovelAI Image Generation: This source provides insights into mastering the art of NovelAI Image Generation, including details on subscription plans.
  • Capterra: NovelAI Pricing, Cost & Reviews: Capterra provides pricing information and reviews for NovelAI, emphasizing the visualization of characters using powerful image models.
  • Saasworthy: NovelAI Pricing: Cost and Pricing Plans: Saasworthy details the pricing structure for NovelAI, highlighting the three different plans available.
  • Reddit: Average Cost of NovelAI’s Image Generation: This Reddit discussion sheds light on the average cost of NovelAI’s image generation, providing insights from the community.

Other Interesting Articles

  • Top 10 ChatGPT Plugin: Unlock ChatGPT’s full potential with the top ChatGPT Plugin. FAQs, plugin details, and tips for optimal use. Elevate AI interactions now…
  • AutoGPT: How to Install and Use Free Offline: Unlock AutoGPT AI potential, learn: how to install offline, key features, prerequisites etc. Elevate text generation with GPT-4…

Top 10 ChatGPT Plugin

0
Top 10 ChatGPT Plugins

ChatGPT Plugin

Introduction

In the ever-evolving world of artificial intelligence, ChatGPT stands out as a powerful tool, and its capabilities are further enhanced by a range of innovative plugins. These plugins, similar to adding features to dynamic software, play a crucial role in expanding ChatGPT’s abilities across various domains.

Our exploration into the top 10 ChatGPT plugins promises an in-depth look at transformative tools that reshape how businesses and individuals interact with AI technology.

Video Source: Howfinity
Top 10 ChatGPT Plugins

1. Canva ChatGPT Plugin

Enhance Your Visual Presence with Ease

The Canva Plugin for ChatGPT is changing the game for digital marketers and social media managers. By seamlessly integrating with ChatGPT, this plugin simplifies the process of creating engaging post texts, captivating captions, and visually appealing image templates.

It’s a valuable tool for crafting consistent and attractive social media content, benefiting businesses, including those in sustainable clothing brands.

2. Visla ChatGPT Plugin

Effortless Creation of Professional Videos

Visla takes video production to new heights, serving as a boon for creating promotional videos. Its features allow users to specify aspect ratios, content themes, and branding elements, making it easy to craft anything from a short ad to a detailed product showcase. Visla makes professional video production accessible to all, promoting a new level of creativity and efficiency.

3. SpeechKi ChatGPT Plugin

Transforming Written Content into Engaging Narratives

SpeechKi is a beacon for creators, transforming written content into natural, human-like voiceovers. When combined with scripts from Visla, it provides a seamless transition from visual to auditory content. Podcasters, video creators, and digital marketers benefit from its ability to produce clear and engaging voiceovers, making it an indispensable tool in the AI toolkit.

4. WebPilot ChatGPT Plugin

Crafting Engaging Narratives with Analytical Precision

WebPilot, a valuable tool for content creators and marketers, excels in generating high-quality written content. From blog posts to newsletters and website copy, it analyzes and pulls content from existing web pages, aiding in the creation of unique and engaging material. Enhance your digital presence with this content mastery tool.

5. E-commerce SEO.app

Optimizing Product Descriptions for Unrivaled Visibility

Tailored for e-commerce platforms, SEO.app focuses on optimizing product descriptions for search engines. Providing meta keywords and descriptions becomes a cornerstone for online retailers aiming to improve product visibility and climb the search engine rankings. Elevate your online store’s SEO potential with this indispensable plugin.

6. SEO Core AI

Comprehensive Analysis for Online Visibility Enhancement

SEO Core AI offers a holistic analysis of a website’s SEO performance. From keyword optimization to backlink strategies and content relevance, this plugin provides actionable suggestions for improvement. A must-have for businesses looking to enhance their online visibility and credibility in the competitive digital landscape.

7. Text.Cortex

Seamless Writing Assistance Across Platforms

TextCortex emerges as an innovative AI assistant, streamlining writing endeavours and encompassing SEO-related tasks.

Available as both a web application and a browser extension, it seamlessly integrates with over 4,000 websites and applications, providing consistent support whenever and wherever needed. Elevate your writing experience with this indispensable personal assistant.

8. Kraftful ChatGPT Plugin

Invaluable Insights for Innovation and User-Friendly Products

Kraftful serves as an invaluable resource for startups and companies involved in product development. Offering industry-standard best practices and insights ensures that new products are not only innovative but also user-friendly and market-ready. Streamline your product development process with the guidance of Kraftful.

9. Wolfram ChatGPT Plugin

Accessing Crucial Data for Informed Business Decisions

Wolfram opens the gateway to a vast array of advanced mathematical, scientific, and real-world data. Particularly beneficial for businesses expanding internationally, it provides crucial information such as currency conversion rates, market trends, and consumer preferences. Make informed decisions with the wealth of data offered by Wolfram.

10. Zapier ChatGPT Plugin

Streamlining Workflows for Peak Productivity

Zapier emerges as the ultimate tool for automation, connecting various apps and creating efficient workflows. Simplifying tasks like adding new subscribers to email marketing lists or sending notifications to teams on platforms like Slack, enhances productivity and coordination. Automate tasks seamlessly and efficiently with Zapier.

How to Choose the Best ChatGPT Plugins for Your Needs

Time Needed : 00 hours 10 minutes

When exploring ChatGPT plugins, consider the following factors to guide you in selecting the most fitting tools for your specific requirements:

  1. Step 1: Identify Your Needs

    Clearly define your objectives with ChatGPT. Whether it’s enhancing SEO, language translation, data analysis, or content creation, let your goals guide your plugin choices.

  2. Step 2: Compatibility and Integration

    Ensure the plugins are compatible with your version of ChatGPT. Verify if they integrate smoothly with your existing systems or the platforms you frequently use.

  3. Step 3: User Reviews and Ratings

    Look for user feedback, reviews, and ratings. These insights provide valuable information about a plugin’s performance, reliability, and user-friendliness.

  4. Step 4: Ease of Use

    Choose plugins that are user-friendly and don’t require extensive technical knowledge. A good plugin should be intuitive and easy to navigate.

  5. Step 5: Functionality and Features

    Evaluate the features offered by each plugin. Do they align with your requirements? Are there unique functionalities that set a plugin apart from others?

  6. Step 6: Security and Privacy

    Investigate the security measures of the plugin. Ensure it has a good track record in protecting user data and privacy.

  7. Step 7: Support and Documentation

    Good plugins come with comprehensive documentation and reliable customer support. This is crucial for troubleshooting and getting the most out of the plugin.

  8. Step 8: Update Frequency

    Check how often the plugin is updated. Regular updates indicate ongoing support, bug fixes, and adaptation to changing technologies.

  9. Step 9: Cost-Effectiveness

    Consider the cost of the plugin versus the features and benefits it offers. Sometimes, a free plugin might suffice, while other times, investing in a paid version is more beneficial.

  10. Step 10: Trial and Testing

    If possible, test the plugin before fully committing. Many plugins offer trial periods or demo versions, allowing you to assess their suitability.

  11. Step 11: Community and Ecosystem

    Look into the community around the plugin. A strong, active community can be a great resource for learning and troubleshooting.

  12. Step 12: Scalability

    Consider whether the plugin can scale with your needs. As your usage of ChatGPT grows, you’ll want a plugin that can accommodate increased demands.

Conclusion

The key to unlocking the full potential of ChatGPT plugins lies in crafting effective prompts. Whether you’re aiming for more engaging content, precise SEO optimization, or streamlined task automation, mastering the art of prompt engineering is crucial.

Frequently Asked Questions and Their Answers

  1. What is ChatGPT, and how does it work?

    ChatGPT is a powerful artificial intelligence tool developed by OpenAI. It excels in generating human-like text responses based on given prompts. To understand its functionality, you can refer to OpenAI’s official help centre.

  2. Are there plugins available for ChatGPT, and how do they enhance its capabilities?

    Yes, ChatGPT supports plugins that extend its functionalities. Notable plugins include those for content creation, video production, and SEO optimization. These plugins empower users to achieve diverse tasks efficiently.

  3. How real and trustworthy is the output from ChatGPT?

    ChatGPT generates text responses that may seem real and lifelike. However, users should be aware that the AI’s responses are based on patterns learned from data and may not always reflect factual information. It’s essential to use discretion and verify critical information from reliable sources.

  4. What role does ChatGPT play in the enterprise, and how can it be utilized?

    ChatGPT has various applications in the enterprise, from content creation to SEO optimization. Its versatility allows businesses to streamline workflows, enhance digital presence, and make informed decisions. Understanding the different ways to use ChatGPT can unlock its full potential in diverse professional settings.

References

Other Interesting Articles

AutoGPT: How to Install and Use Free Offline

0
How to Install AutoGPT
How to install AutoGPT

AutoGPT Tutorial

Introduction

In the ever-evolving landscape of artificial intelligence, the AutoGPT open-source library stands out as a powerful tool for text generation and cognitive data processing. This comprehensive guide delves into the intricacies of the installation process, explores the diverse set of features, and provides insights into how to leverage AutoGPT’s capabilities for an enhanced AI experience.

Video Source: Fireship
Installing and Using AutoGPT

Key Features of AutoGPT

AutoGPT comes equipped with a range of functionalities, making it a versatile solution for various applications.

AutoGPT Seamless Internet Access

With uninterrupted internet connectivity, AutoGPT empowers users to conduct searches and gather information from the vast expanse of the web.

AutoGPT Efficient Memory Management

Smart memory management ensures optimal performance, allowing AutoGPT to handle both enduring and short-lived tasks seamlessly.

GPT-4 Instances for Advanced Text Generation

Harness the power of GPT-4 instances to push the boundaries of AI-driven content creation to new heights.

AutoGPT Easy Access to Popular Websites and Platforms

AutoGPT simplifies access to popular online domains and platforms, facilitating the integration of external content into AI-powered applications.

Streamlined File Storage and Summarization with GPT-3.5

Experience efficient file storage and summarization capabilities using GPT-3.5, enhancing the organization and retrieval of information.

System Requirements

Before diving into the installation process, ensure that your system meets the following prerequisites:

  • Python 3.8 or later.
  • OpenAI API key.
  • PINECONE API key.
  • ElevenLabs Key.

How to Install AutoGPT

Time Needed : 00 hours 10 minutes

In this tutorial, we’ll guide you through the process of installing AutoGPT to automate your GPT prompting, such that you can get your automated large language model solutions. This might take about 10 minutes, so grab a cup of coffee and let’s get started!

  1. Step 1: Clone the Repository

    How to install AutoGPTAs shown in the image above, clone the repository using the following terminal command: git clone https://github.com/Torantulino/Auto-GPT.git

  2. Step 2: Navigate to the Project Directory

    How to install AutoGPTAs shown in the image above, navigate to the project directory, using the following terminal command: cd 'Auto-GPT'

  3. Step 3: Install Required Dependencies

    How to install AutoGPTAs shown in the image above, Install the required dependencies using the following terminal command: pip install -r requirements.txt

  4. Step 4: Configure Environment Variables

    How to install AutoGPTAs shown in the image above, rename .env.template to .env and fill in your OPENAI_API_KEY. If using Speech Mode, also fill in your ELEVEN_LABS_API_KEY.

Usage

Unlocking the full potential of AutoGPT is just a few commands away. Follow these steps to make the most use of its capabilities:

  1. Run the main.py Python script in your terminal: python scripts/main.py
  2. After each of AUTO-GPT’s actions, type “NEXT COMMAND” to authorize them to continue.
  3. To exit the program, type “exit” and press Enter.

Configuring Google API Keys

If you want to give your AutoGPT the ability to search the web (Google), optimize your experience by configuring Google API keys for seamless searches. Follow these steps to set up your keys:

  1. Go to the Google Cloud Console.
  2. Create a new project and enable the Custom Search API.
  3. Obtain your API key and set it as an environment variable named GOOGLE_API_KEY on your machine.

Memory Usage Visualization

How to install AutoGPT
Installation Guide

As shown in the image above, for a visual representation of AutoGPT’s memory usage, you can use the --debug flag when running the script, with the following terminal command:

python scripts/main.py --debug

Integrate this command into your workflow to gain valuable insights into the performance and memory utilization of AutoGPT.

NOTE: For further insights and updates, consider referring to the official documentation.

Conclusion

In conclusion, AutoGPT is a robust open-source library that opens new horizons in AI text generation. By following the precise installation and configuration steps outlined in this guide, you are poised to unlock the full potential of this AI and elevate your AI-driven applications to new heights.

Some Frequently Asked Questions and Their Answers

  1. What is AutoGPT’s main capability in the field of artificial intelligence?

    AutoGPT is renowned for its ability to generate text and process information using GPT-4 instances, pushing the boundaries of AI-driven content creation.

  2. What are the key features that make AutoGPT a versatile tool?

    AutoGPT offers seamless internet access for information gathering, efficient long-term and short-term memory management, utilization of GPT-4 instances for advanced text generation, easy access to popular websites and platforms, and efficient file storage and summarization with GPT-3.5.

  3. What are the prerequisites for installing AutoGPT?

    Before installing AutoGPT, ensure your system meets the following requirements: Python 3.8 or later, OpenAI API key, and PINECONE API key. Optionally, an ElevenLabs Key is needed for AI speech capabilities.

  4. How can one visualize AutoGPT’s memory usage?

    How to install AutoGPTAs shown in the image, to get a visual representation of AutoGPT’s memory usage, run the script with the: --debug flag: python scripts/main.py --debug

References

Other Interesting Articles

  • How to use AnimateDiff for Free: Explore AnimateDiff video generation with terms like motion module, prompt, and seed. Learn to create captivating visuals effortlessly…
  • How to Use Skolar AI For Research: Elevate your research game with Skolar AI free version! Unleash AI-driven precision, tailored recommendations, and seamless exports for…

How to use AnimateDiff for Free

0
How to use AnimateDiff

AnimateDiff Tutorial

Introduction

In today’s fast-paced digital landscape, video creation has become a compelling force, captivating audiences, evoking emotions, and fostering engagement in ways previously unmatched. Despite the allure of crafting compelling videos, the perceived complexity often leaves innovative ideas untapped.

Enter AnimateDiff, an AI-driven marvel designed to transform text into stunning videos with just a click effortlessly. This guide offers an in-depth exploration of using this AI tool, which surpasses the capabilities of what many other AI tools out there propose.

Video Source: Sebastian Kamph
Animate with AnimateDiff

What is AnimateDiff?

AnimateDiff is your digital sorcerer, weaving enchanting tales through the art of video creation. It’s tailored to understand user descriptions, generating video content by tapping into a built-in repository of video styles, music, and animations.

Unlike traditional language models, this AI tool turns words into a visual spectacle, giving users control over the video’s theme, soundtrack, and narration style. This powerful tool combines a stable diffusion AI model and a motion adapter, producing awe-inspiring video outputs.

Additional features include automated animation styles, voice-over options, customizable music, diverse background choices, and rapid video rendering.

Getting Started with AI AnimateDiff

Now that you’re intrigued, let’s explore the steps to kickstart your creative journey.

Signup for an Account

  1. Visit the the HuggingFace Project or the Replicate.
  2. Click on the “Sign up” button.
  3. Enter your email, choose a strong password, and agree to the terms.
  4. Click “Create” and verify your account through the email link.

Navigating the AnimateDiff Interface

Once logged into any of the above-mentioned platforms, you’ll find a variety of tools at your disposal.

Interface Overview

  • Main Workspace: Includes a Text Input box, Preview window, Toolbar, and side panel.
  • Customization Options: Explore animation styles, music, backgrounds, voice-over options, and visual elements.

Crafting Your First AnimateDiff Video

Step-by-Step Guide

Let’s walk through the steps to bring your creative vision to life. For this tutorial, I will be using the Replicate version of AnimateDiff to create an animation.

Time Needed : 00 hours 30 minutes

In this tutorial, we’ll guide you through the process of using AnimateDiff to create your own animated content, in less than 30 minutes. Let’s get started!

  1. Step 1: Access AnimateDiff

    Go the the Replicate version of the project as discussed above. When there, you should see an interface as shown below:How to use AnimateDiff for Free

  2. Step 2: Inputting Main Workspace Parameters

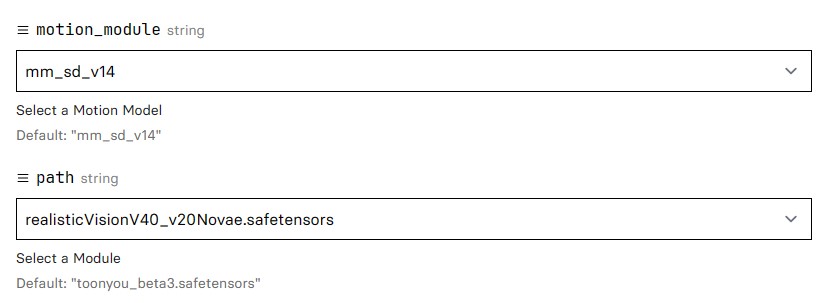
    Input the required parameter within their appropriate text fields. The required parameters are as seen below:How to use AnimateDiff for Freemotion_module: The motion_module, refers to a component or feature within the animatediff website that handles the animation and movement aspects of the generated images. The input type required here is a string (series of characters).-path: The path, refers to the trajectory or course followed by an animated element within the generated images. It involves the movement or transition of objects, text, or other visual elements over a series of frames or steps. The input type required here is a string (series of characters).-prompt: The prompt, is a user-provided input that serves as the basis for generating the content of the animated images. You may input text, ideas, or instructions, and the animatediff system utilizes this prompt to create visually engaging animations. The input type required here is a string (series of characters).-n_prompt: The n_prompt, refers to an extended or refined version of the prompt. It involves additional specifications or details provided by the user to guide the generation of the animated content. Additional specifications here involve what the system should not generate. The input type required here is a string (series of characters).-steps: The steps, represent the discrete stages or frames through which the generation process evolves. Each step contributes to the progression and refinement of the animated image. The input type required here is an integer (series of numbers).-guidance_scale: The guidance_scale, denotes a parameter or setting that influences the level of direction or control applied to the AnimateDiff generation process. It determines how closely the generated content adheres to the user’s input. The input type required here is a floating point (series of decimal or fractional numbers).-seed: The seed, is a starting point or initial configuration that influences the randomness or variability in the generated images. You might use seeds to achieve specific outcomes or styles in the animation. The input type required here is an integer (series of numbers).

  3. Step 3: Inputting a Text Description for Your Video

    Ok, after glancing through your AnimateDiff interface and how it works, we can now proceed to input the required data for each field and generate our video. First, think of what you want to generate then type your idea into the prompt text field.How to use AnimateDiff for FreeFor me, I use the following prompt: “masterpiece, best quality, 1girl, solo, cherry blossoms, hanami, pink flower, white flower, spring season, wisteria, petals, flower, plum blossoms, outdoors, falling petals, white hair, black eyes” as shown above.

  4. Step 4: Tweaking Visual Effects

    After entering your prompt, for you to get the most out of your video, enter all the other extra parameters required.How to use AnimateDiff for FreeHow to use AnimateDiff for FreeFor me, I used the following parameters, as shown in the images above:-motion_module: mm_sd_v15_v2-path: realisticVisionV40_v20Novae.safetensors-prompt: masterpiece, best quality, 1girl, solo, cherry blossoms, hanami, pink flower, white flower, spring season, wisteria, petals, flower, plum blossoms, outdoors, falling petals, white hair, black eyes-n_prompt: badhandv4, easynegative, ng_deepnegative_v1_75t, verybadimagenegative_v1.3, bad-artist, bad_prompt_version2-neg, teeth, worst quality, low quality, nsfw, logo-steps: 25-guidance_scale: 7.5-seed: 255224557

  5. Step 5: Previewing the Video

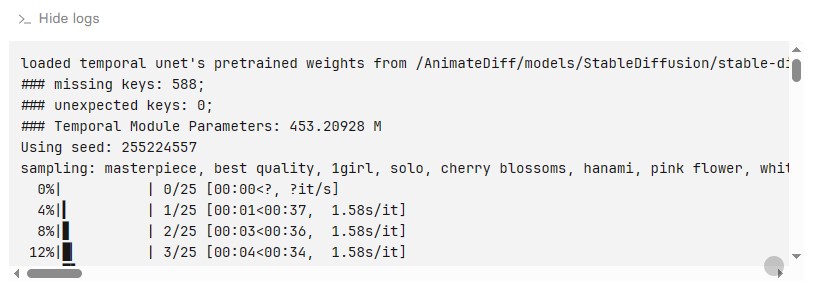
    Hit the Run button, at the bottom right of the left pane to assess the video’s alignment with your intent. The button is as shown in the image below:How to use AnimateDiff for FreeAfter clicking the “Run” button watch the terminal on the right pane, giving you extra information about your generation process, as shown below:How to use AnimateDiff for FreeRepeat the process, tweaking and re-arranging your prompt and parameters, until you get the desired output.NOTE: As of the time of writing this article, you have just 5 tries to generate your video, before the website blocks the generation option and asks for payment to continue.

  6. Step 6: Exporting the Video

    Once satisfied, share or export the video as shown in the image below:How to use AnimateDiff for Free

The combined result of all of the above procedures is as follows:

Video Source: TERRA-X
How to Animate with AnimateDiff

Voila! In just a few minutes, you’ve turned your imagination into reality with AnimateDiff.

Real-World Applications of AnimateDiff

If you’re still contemplating the possibilities, consider this example to kick-start your animated AI video creation.

Example: Enhancing Blog Posts

Imagine you’re a writer who usually relies on catchy headings. Now, complement your content with an animated video that conveys your blog post’s essence. This powerful combination of written and visual content can revolutionize your online presence, just as I have done for this article.

Conclusion

AnimateDiff brings a paradigm shift in video creation, offering users transformative benefits. By seamlessly integrating artificial intelligence, this tool streamlines content production, enhancing creativity, and turning static concepts into dynamic, engaging visuals.

I encourage you to experience this AI tool firsthand; its user-friendly interface and potent capabilities cater to both beginners and seasoned creators alike. Unleash your creativity with this AI tool – where innovation meets simplicity, and ideas come to life in a visual symphony!

Some Frequently Asked Questions and Their Answers

  1. What is AnimateDiff, and how does it work?

    AnimateDiff is a practical framework for animating personalized Text-to-Image (T2I) models without requiring specific tuning.

  2. Are there any specific settings or advanced features in AnimateDiff?

    Yes, AnimateDiff provides advanced settings, including Motion LoRA for enhanced movement and ControlNet for stylizing videos.

  3. Can I find user guides and workflows for AnimateDiff?

    Certainly! Users have created guides and workflows, such as the ComfyUI AnimateDiff Guide/Workflows, providing valuable insights and setups.

  4. Can I use AnimateDiff with existing personalized text-to-image models?

    Yes, AnimateDiff offers a practical framework to animate most existing personalized text-to-image models without the need for specific tuning, simplifying the animation process.

References

Other Interesting Articles

  • How to Use Skolar AI For Research: Elevate your research game with Skolar AI free version! Unleash AI-driven precision, tailored recommendations, and seamless exports for…
  • OpenCV Image Manipulation: This tutorial explores fundamental OpenCV operations, empowering you to understand image formulation, access pixel values, and display images…

How to Use Skolar AI For Research

0
Skolar AI
Skolar AI
skolar ai

Research With Skolar AI

Introduction

Diving into extensive research can be a challenging task for students, educators, writers, and professionals. The process of sorting through a vast amount of information to find credible and relevant sources has been made much easier with the introduction of Skolar AI.

Video Source: Multi Gossip
Research With Skolar AI

In this guide, we’ll take a closer look at what Skolar AI’s free version offers, showcasing how artificial intelligence can make the research process more efficient and effective.

This is a testament to innovation, providing users with an intelligent research engine that incorporates natural language processing and machine learning algorithms. At its core, it offers the following:

  • Quick Access to a Wealth of Information: With access to over 100 million research materials, it ensures users have a large repository of credible information.
  • Personalized Recommendations: It offers customized suggestions that cover scholarly articles, research papers, news articles, books, academic journals, and more, aligning with users’ specific research interests.
  • Fine-Tuned Filters: The platform empowers users with convenient filters to refine suggestions based on relevance, recency, source genre, and other parameters, ensuring precision in the recommendations.
  • Intuitive Features: Going beyond traditional search engines, it provides features like literature map visualization, summarized key takeaways, and even a grammar checker.

Skolar AI Beginner’s Guide

Time Needed : 00 hours 05 minutes

In this tutorial, we’ll guide you through the process of using Skolar AI to research your own academic content, in less than 5 minutes. Let’s get started!

  1. Step 1: Creating a Free Account

    Getting started is easy. Visit skolar.ai and click on “Start Your Search” to quickly create an account. The process is seamless, allowing users to sign up effortlessly using their Google or Microsoft accounts or by providing basic information.

  2. Step 2: Entering Your Research Topic

    Once registered, the main search bar becomes your gateway to a world of information. From broad research areas like “renewable energy” to specific queries such as “How are EU renewable energy policies evolving in 2023?” – Skolar AI begins its quest for relevant materials with a simple enter command.

  3. Step 3: Browsing Recommendations

    Skolar AI presents a tailored list of recommendations, spanning academic papers, news articles, reference books, and more. While the free version offers valuable suggestions, the Premium version unlocks a treasure trove of comprehensive results.

  4. Step 4: Adjusting Filters

    Fine-tune your search using the left sidebar filters. Refine suggestions by relevance, source genre, date range, word count, and more. This precision narrows down parameters, delivering more targeted recommendations aligned with your research needs.

  5. Step 5: Exporting Citations & Summaries

    Found the information you need? Skolar AI lets you effortlessly export citations in APA, MLA, and Harvard formats. One-click exports also capture key summary points and highlights from various sources, facilitating the building of literature reviews or drafting papers.

Unlock even more features with Skolar AI’s Premium trial, including mobile access, source-saving folders, offline usage, and more.

Conclusion on Skolar AI

In conclusion, Skolar AI transforms the research landscape by leveraging the capabilities of artificial intelligence. The free account is a valuable resource that kickstarts early research with customized, credible information.

Skolar AI’s filters, exports, and intuitive interface position it as a next-gen research assistant, empowering users to effortlessly produce high-quality research outputs and papers.

Some Frequently Asked Questions and Their Answers

  1. What is Skolar AI, and how does it enhance research?

    Skolar AI is an innovative AI-powered research assistant designed to expedite research processes. It streamlines and simplifies research by providing instant access to comprehensive information, making it faster, simpler, and more efficient.

  2. What does the free version of Skolar AI offer?

    The free version of Skolar AI offers users a taste of AI-assisted research. It provides customized recommendations for scholarly articles, research papers, news articles, books, and more. Users can benefit from convenient filters, literature map visualization, summarized key takeaways, and a grammar checker.

  3. How do I use Skolar AI for free?

    Using Skolar AI for free is easy. Simply create a free account on skolar.ai, input your research topic, browse tailored recommendations, adjust filters for precision, and export citations & summaries effortlessly.

  4. What sets Skolar AI apart from other research tools?

    Skolar AI stands out by integrating natural language processing and machine learning algorithms. It provides users with instant access to over 100 million research materials, customized recommendations, and intuitive features, making it a next-gen research assistant.

References

Other Interesting Articles

  • OpenCV Image Manipulation: This tutorial explores fundamental OpenCV operations, empowering you to understand image formulation, access pixel values, and display images…
  • OpenCV Beginner’s Guide: Explore official OpenCV Tutorials for in-depth learning on installation, core functionality, and image processing. Dive into OpenCV-Python…

OpenCV Image Manipulation

0
OpenCV Image Manipulation

Manipulating Images with OpenCV

Introduction

In the world of image processing, it’s essential to grasp the basics. This article explores key operations in OpenCV, guiding you through crafting digital images, handling image reading and display, and understanding colour space conversions. Let’s equip ourselves with the knowledge needed to navigate the intricacies of image manipulation.

Video Source: Rob Mulla
Image Manipulation

Understanding Digital Images

A digital image is like a mosaic made up of pixels, each with specific spatial coordinates (x, y) and intensity values. Grayscale images, using values from 0 to 255, differ from RGB images, which blend Red, Green, and Blue channels to create a spectrum of colours. Knowing these basics sets the stage for a deeper exploration.

How to Read and Display Images in OpenCV

Time Needed : 00 hours 30 minutes

Carefully follow the next series of instructions to get the best results from this tutorial. This is going to be interesting, so, grab a cup of coffee, and let’s get started.

  1. Step 1: Importing OpenCV and Reading Images

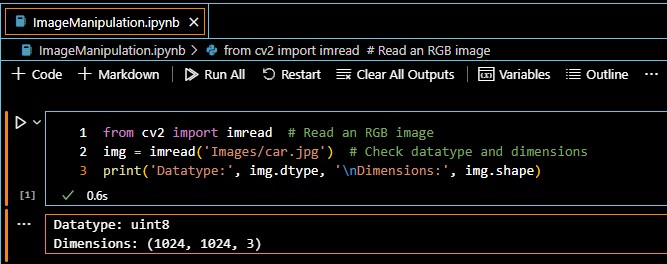
    To begin, we import the imread method from the OpenCV library in Python. We then proceed to import the “car” image from the image folder within the project.For this tutorial, I used an image of a car, which you can get together with my source file by clicking here or using the download button at the bottom of this page. Nevertheless, you can use any image you want.The above operations can be done as shown in the following image:OpenCV Image ManipulationThe output provides insights into the image structure: an 8-bit unsigned integer array with dimensions (1024, 1024, 3). This array allows for flexible manipulation.
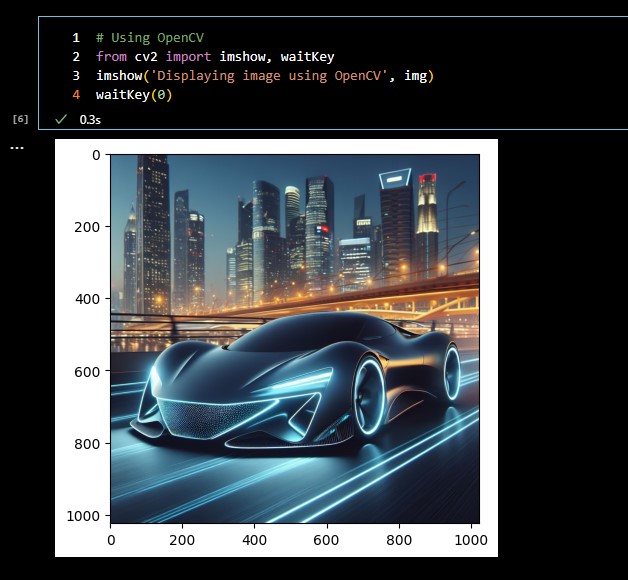
  2. Step 2: Accessing Pixel Values

    Exploring the array, we look into the values of the first pixel at coordinates (0, 0). Pixels, represented by three values, unveil intensity information specific to each channel.

  3. Step 3: Displaying Images

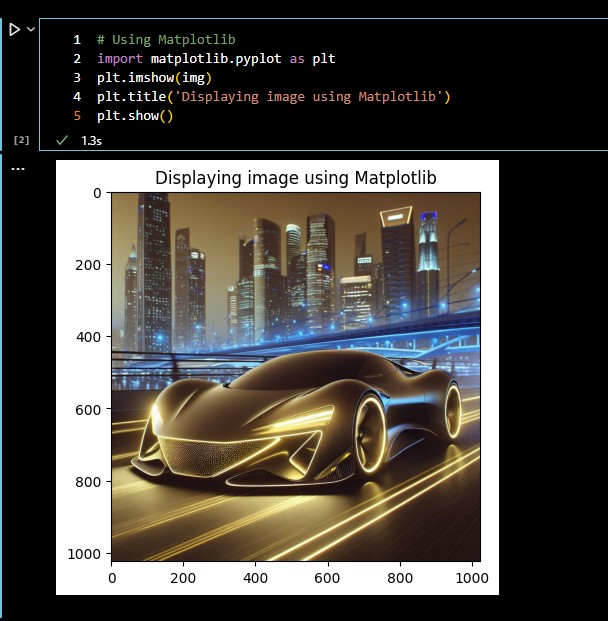
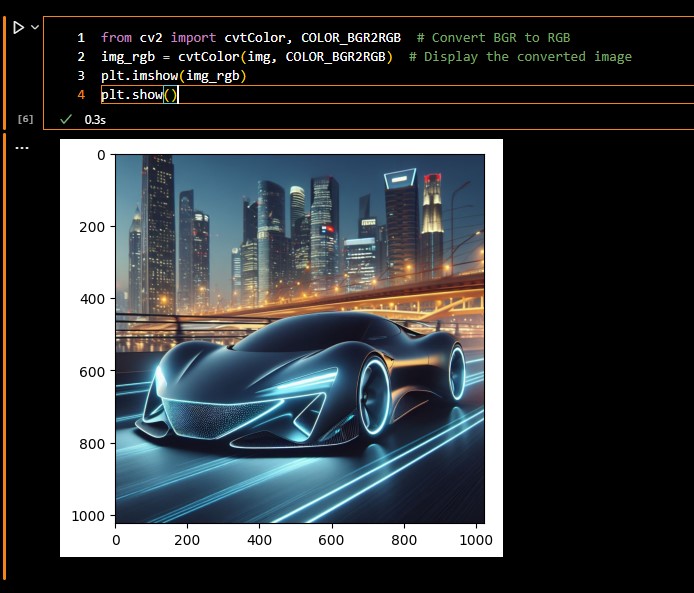
    Both Matplotlib and OpenCV offer methods for image display. OpenCV’s imshow method operates in BGR order, requiring careful consideration when transitioning to Matplotlib. A conversion from BGR to RGB ensures accurate representation.The above comparison is demonstrated with the following images:OpenCV Image ManipulationOpenCV Image ManipulationOpenCV Image ManipulationUnderstanding the differences between BGR and RGB representations facilitates seamless integration.
  4. Step 4: Converting Between Colour Spaces

    Colour space conversion, a crucial skill, uses OpenCV’s cvtColor method. Transitioning between BGR and RGB is demonstrated, emphasizing the importance of channel order.This is shown in the following image:OpenCV Image Manipulation

  5. Step 5: Grayscale Conversion

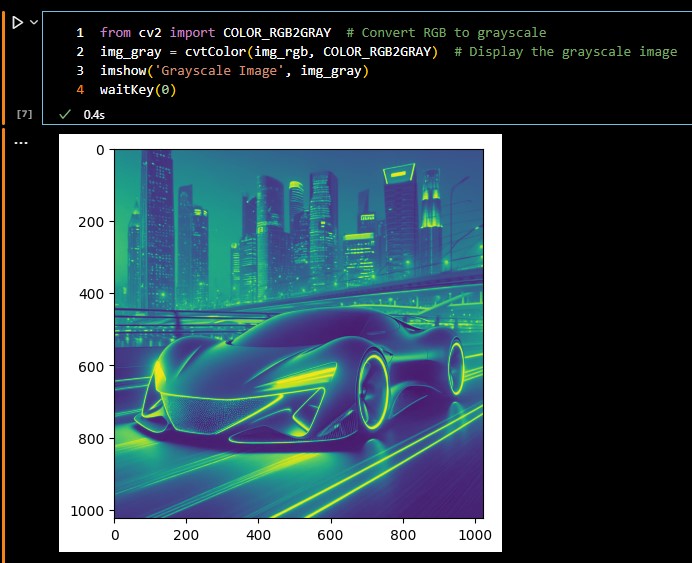
    Taking it a step further, the conversion from RGB to grayscale produces a single-channel image.This can be seen in the following image:OpenCV Image ManipulationA nuanced approach to grayscale conversion is presented, ensuring a clear understanding of image transformations.
In case you prefer copying parts of the code, or reading the full content of the downloaded source file before extracting and running it, check out the raw source code below.

Also, the code was written in a Jupyter Notebook, not with the default Python file, you might have to take note of that, as it determines how the code should be compiled to avoid any worries. (within Jupyter Notebook or Jupyter Lab) and not using the default Python compiler.

Jupyter | Cell 1
from cv2 import imread  
img = imread('Images/car.jpg')  # Read an RGB image
print('Datatype:', img.dtype, '\nDimensions:', img.shape) # Check datatype and dimensions
Visit My GitHub At https://github.com/N-Elmer/
Jupyter | Cell 2
import matplotlib.pyplot as plt  # Using Matplotlib
plt.imshow(img)
plt.title('Displaying image using Matplotlib')
plt.show()
Visit My GitHub At https://github.com/N-Elmer/
Jupyter | Cell 3
from cv2 import imshow, waitKey  # Using OpenCV
imshow('Displaying image using OpenCV', img)
waitKey(0)
Visit My GitHub At https://github.com/N-Elmer/
Jupyter | Cell 4
from cv2 import cvtColor, COLOR_BGR2RGB  # Convert BGR to RGB
img_rgb = cvtColor(img, COLOR_BGR2RGB)  # Display the converted image
plt.imshow(img_rgb)
plt.show()
Visit My GitHub At https://github.com/N-Elmer/
Jupyter | Cell 5
from cv2 import COLOR_RGB2GRAY  # Convert RGB to grayscale
img_gray = cvtColor(img_rgb, COLOR_RGB2GRAY)  # Display the grayscale image
imshow('Grayscale Image', img_gray)
waitKey(0)
Visit My GitHub At https://github.com/N-Elmer/

Conclusion on OpenCV Image Manipulation

This tutorial explores fundamental OpenCV operations, empowering you to understand image formulation, access pixel values, display images, and navigate colour space conversions.

With this knowledge, you’re ready to tackle intricate image-processing tasks. If you have any questions, feel free to ask in the comments below. Dive into the world of image processing with confidence!

Some Frequently Asked Questions and Their Answers

  1. What is OpenCV and how does it relate to image manipulation?

    OpenCV is a powerful computer vision library widely used for image processing.

  2. Can you provide practical examples of image processing using OpenCV?

    Yes, there are practical examples demonstrating image preprocessing with OpenCV.

  3. How can OpenCV be used for real-time image manipulation in Python?

    OpenCV allows real-time image manipulation by capturing frames and applying edits in Python.

  4. What are the essential concepts in computer vision and image processing for beginners?

    A beginner’s guide to computer vision and image processing with OpenCV simplifies essential concepts in these cutting-edge fields.

OpenCV References

Other Interesting Articles

OpenCV Beginner’s Guide

0
Introduction to OpenCV

An Introductory Guide to OpenCV

Introduction

Hey there, if you’re getting into the cool world of computer vision and dreaming of adding smarts to your apps, OpenCV is like your new best buddy. In this guide, we’ll dive into this, check out all the cool things it can do, and understand why everyone loves using it, from tech geeks to big companies.

Video Source: Tecnezo
Introduction to OpenCV

What Makes OpenCV Special?

OpenCV, short for Open Source Computer Vision Library, is like a treasure chest of smart stuff made by a bunch of super-smart people. It’s open-source, meaning it’s free to use, change, and share. This is awesome for companies who want a solid foundation for their tech products.

Works Everywhere, Speaks Every Language

Imagine OpenCV as a language that computers from Windows, Linux, Android, to MacOS all understand. It’s like a multilingual genius that can speak in C++, Python, Java, and MATLAB. Perfect for doing cool things in real time with computer vision and comprehension.

What Can OpenCV Do?

OpenCV isn’t just another boring library; it’s like a superhero with over 2500 cool tricks. From recognizing faces and objects to tracking things, stitching images together, and creating augmented reality, this is a toolbox full of possibilities. In this guide, we’ll show you how to use it to make your computer super smart.

Getting Smarter with OpenCV and Machine Learning

Ready to dive into the world of machine learning? OpenCV’s got your back. It uses fancy algorithms like K-Nearest Neighbors and Support Vector Machines. Plus, it plays nice with big names like TensorFlow and PyTorch, making it a superhero for handling really smart tasks.

OpenCV’s Big Family and Famous Friends

Think of OpenCV as a popular celeb with a massive fan following. There are over 18 million fans who’ve downloaded it, and big-shot companies like Google, Yahoo, Microsoft, Intel, and Toyota are using it for their cool projects.

Doing Real-World Stuff with OpenCV

OpenCV isn’t just for nerds; it’s for making real-world magic happen. From putting together street-view pictures to catching bad guys on surveillance cameras, helping robots find their way, spotting accidents, and creating cool interactive art, this is your go-to guy.

Easy With Python and C++

Even if you’re a Python fan, you can still use OpenCV without any headaches. They’ve made it super easy to mix and match C++ and Python, so you get the best of both worlds.

How to Install and Use OpenCV

Time Needed : 00 hours 05 minutes

In this tutorial, we’ll guide you through the process of installing and importing OpenCV for your computer vision projects, in less than 5 minutes. Let’s get started!

  1. Step 1: Install Python

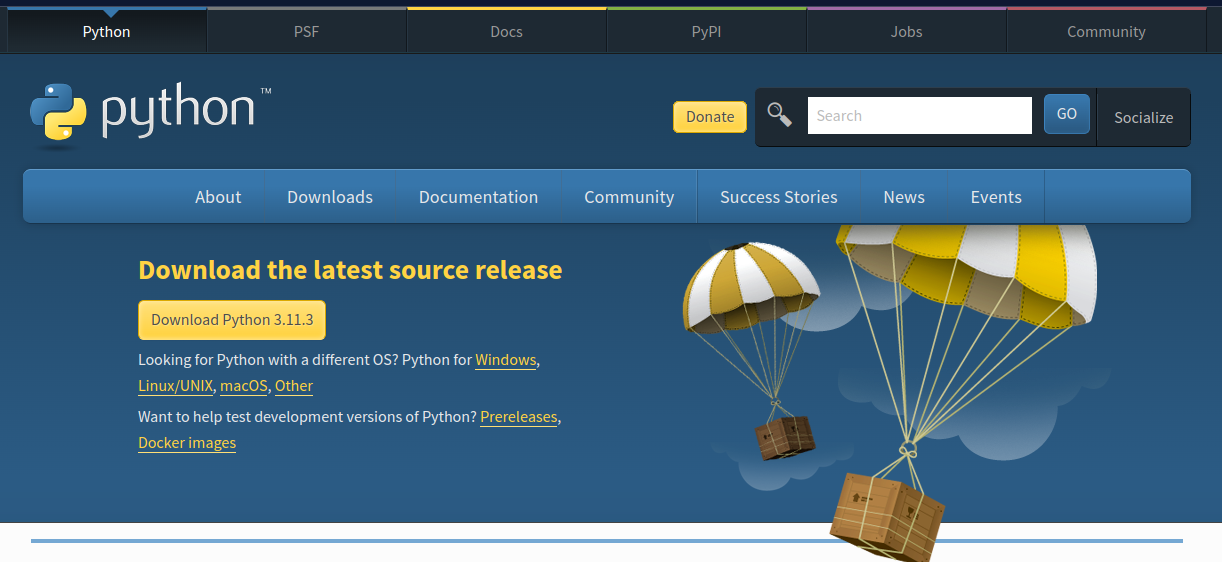
    NovelAI Image GeneratorFirstly, make sure that Python is installed and up to date on your local device. Python is an advanced programming language widely employed within machine learning and artificial intelligence applications. Navigate to Python’s official website and acquire the most recent version compatible with your operating system. After completing the download, initiate the installer and adhere to the on-screen prompts for a successful installation.You can get to the Python website download page using the following URL:https://www.python.org/downloads

  2. Step 2: Upgrade Pip

    Introduction to OpenCVPip serves as a package installer for Python, enabling the user to add supplementary libraries and packages. Upgrade pip using the following command: pip install --upgrade pip, as shown in the image above.

  3. Step 3: Install OpenCV

    Introduction to OpenCVStarting your OpenCV adventure in Python is as simple as ordering a pizza. Just type the following one-liner in your terminal: pip install opencv-python, as shown in the image above.
  4. Step 4: Import OpenCV

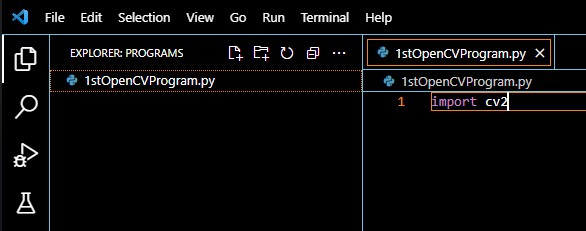
    Introduction to OpenCVTo use the above-installed library, create a new Python file and import it into your project using the following line: import cv2, as shown in the image above.
  5. Step 5: Test OpenCV

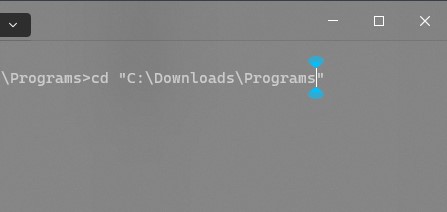
    Introduction to OpenCVYou can test the installed library and configurations by compiling the code you just wrote above. To compile your code, open your terminal and navigate to the location of your file in your system, using the “cd” command, as shown in the image above.Introduction to OpenCVOnce in the directory, use the: “python myscript.py” command, to run the source file, where the “myscript.py” in the previous command, stands for the name of your script. In my case, this command will be: python 1stOpenCVProgram.py, given that my script is called “1stOpenCVProgram.py”. You can see this in the image above.
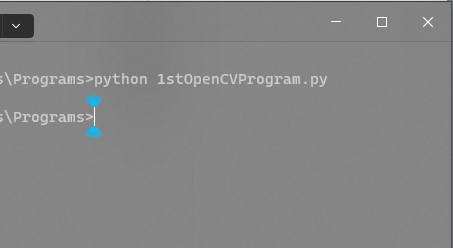
If everything runs without errors, then you are good to go, and just like that, you’ve unlocked the door to a bunch of cool tricks. From looking at pictures and videos to playing with colours, this library makes your projects way more exciting.

Conclusion

This guide is like your map to the big, exciting world of OpenCV. You’ve learned what it is, all the awesome things it can do, how big companies are using it, and how well it buddies up with Python. So, as you start your journey, feel free to check out the extra resources given below, for an even better understanding. Have fun!

Some Frequently Asked Questions and Their Answers

  1. Why isn’t OpenCV’s testing framework part of the distribution?

    OpenCV’s testing framework, known as “ts,” is an internal module designed for internal use and not intended for external use.

  2. What is OpenCV, and why is it significant?

    OpenCV, or Open Source Computer Vision Library, is the world’s largest computer vision library, featuring over 2500 algorithms. It’s open source and managed by the non-profit Open Source Vision organization, making it a crucial tool in the field of computer vision.

  3. Where can I find frequently asked questions about OpenCV University?

    OpenCV University has a dedicated FAQ section on its website, covering queries related to courses, programs, curriculum, payment, and refund policies.

  4. What are some common applications of OpenCV?

    OpenCV finds applications in various fields, including face detection and recognition, object identification, tracking, image registration, stitching, augmented reality, and more. It serves as a versatile toolbox for a wide range of visual computing tasks.

References

Other Interesting Articles